You will need 4 Library Tomb Books, each of helmet piece from omens.
Video of the Quest
First go to NPC Caliph Khanrad in Osaris Palace. He is in top floor of the building. Ask him about MISSION.
When you are done talking with him, go downstairs and ask NPC Kiran about ELYON.
Next step is finding NPC Northimbar, mushroom seller in garrogat, located in the west Magic Tower, second floor. Ask him about ELYON.
He will send you to Glechoma, located in South Magic Tower, ground floor. Ask him about ELYON.
Now go to Yehsha library and find NPC Jameela. You will find her in the basement. Ask her about ULIAX.
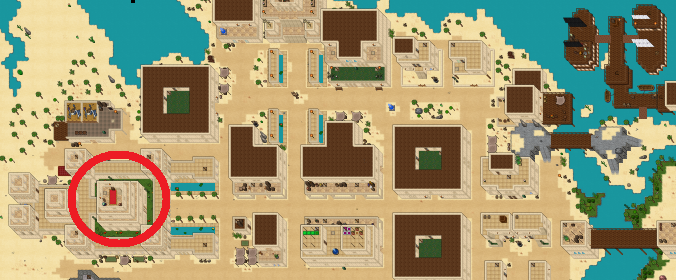
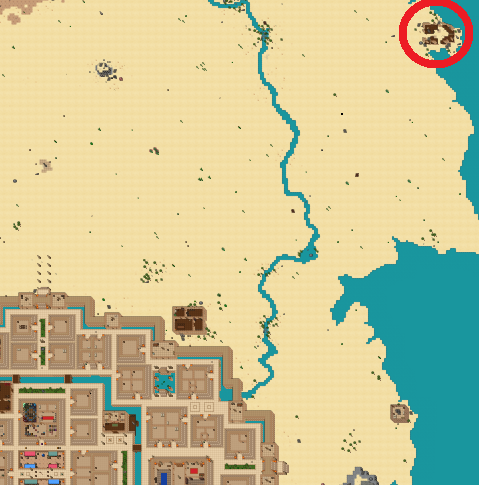
After that go straight into Library Tomb and speak with Spirit Mali. You will need to dig out entrance hole.
Conversation Key Words:
Forgotten Knowledge
Trial
Umos
Rashed
Eashal
The Lights
Five
Sand
Player: Trial
Spirit Mali: What was the name of the Dragon that guarded the first oasis?
Player: Umos
Spirit Mali: Who killed Umos?
Player: Rashed
Spirit Mali: What is the place called where souls go after they die?
Player: Eashal
Spirit Mali: What is the most powerful caste in Yehsha named?
Player: Light
Spirit Mali: How many members does the Yehsha council have?
Player: 5
Spirit Mali: What is the oldest entity of the desert?
Player: Sand
Spirit Mali: Correct! You can now enter the tomb.
Notes


Every person completing this quest MUST have these pieces that drop from the Omens you will fight. In order to talk to the NPC after each kill you will need to have the corresponding piece on you. To complete the Helmet of the Fallen King with Rashed and the end of this quest you require EVERY piece and you will lose them in exchange with the helmet.
Forgotten Library and Uliax
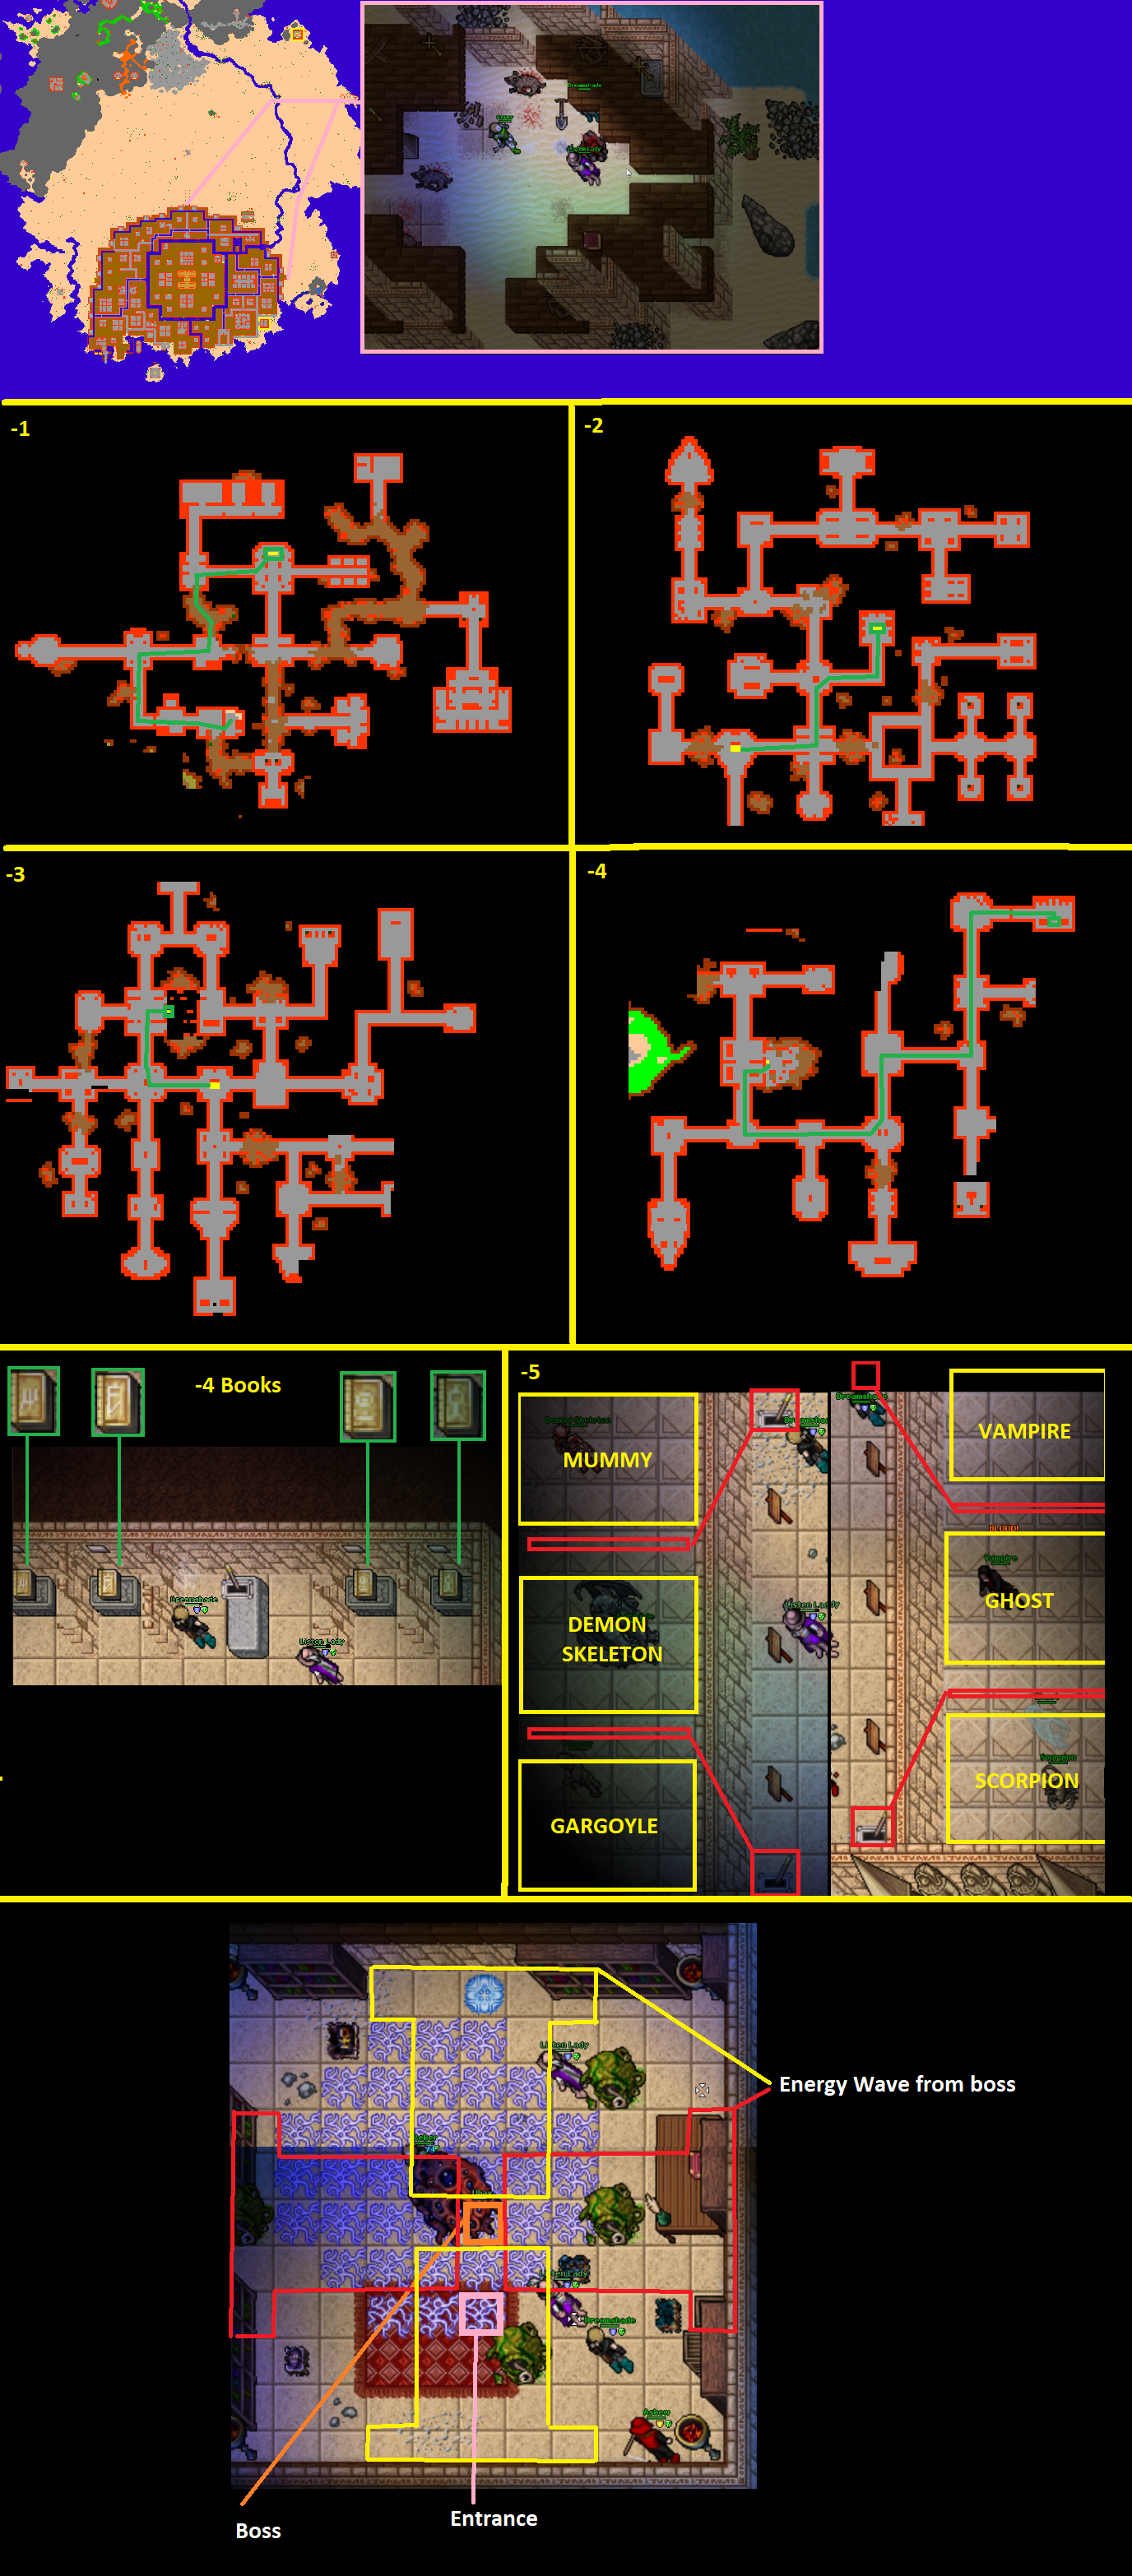
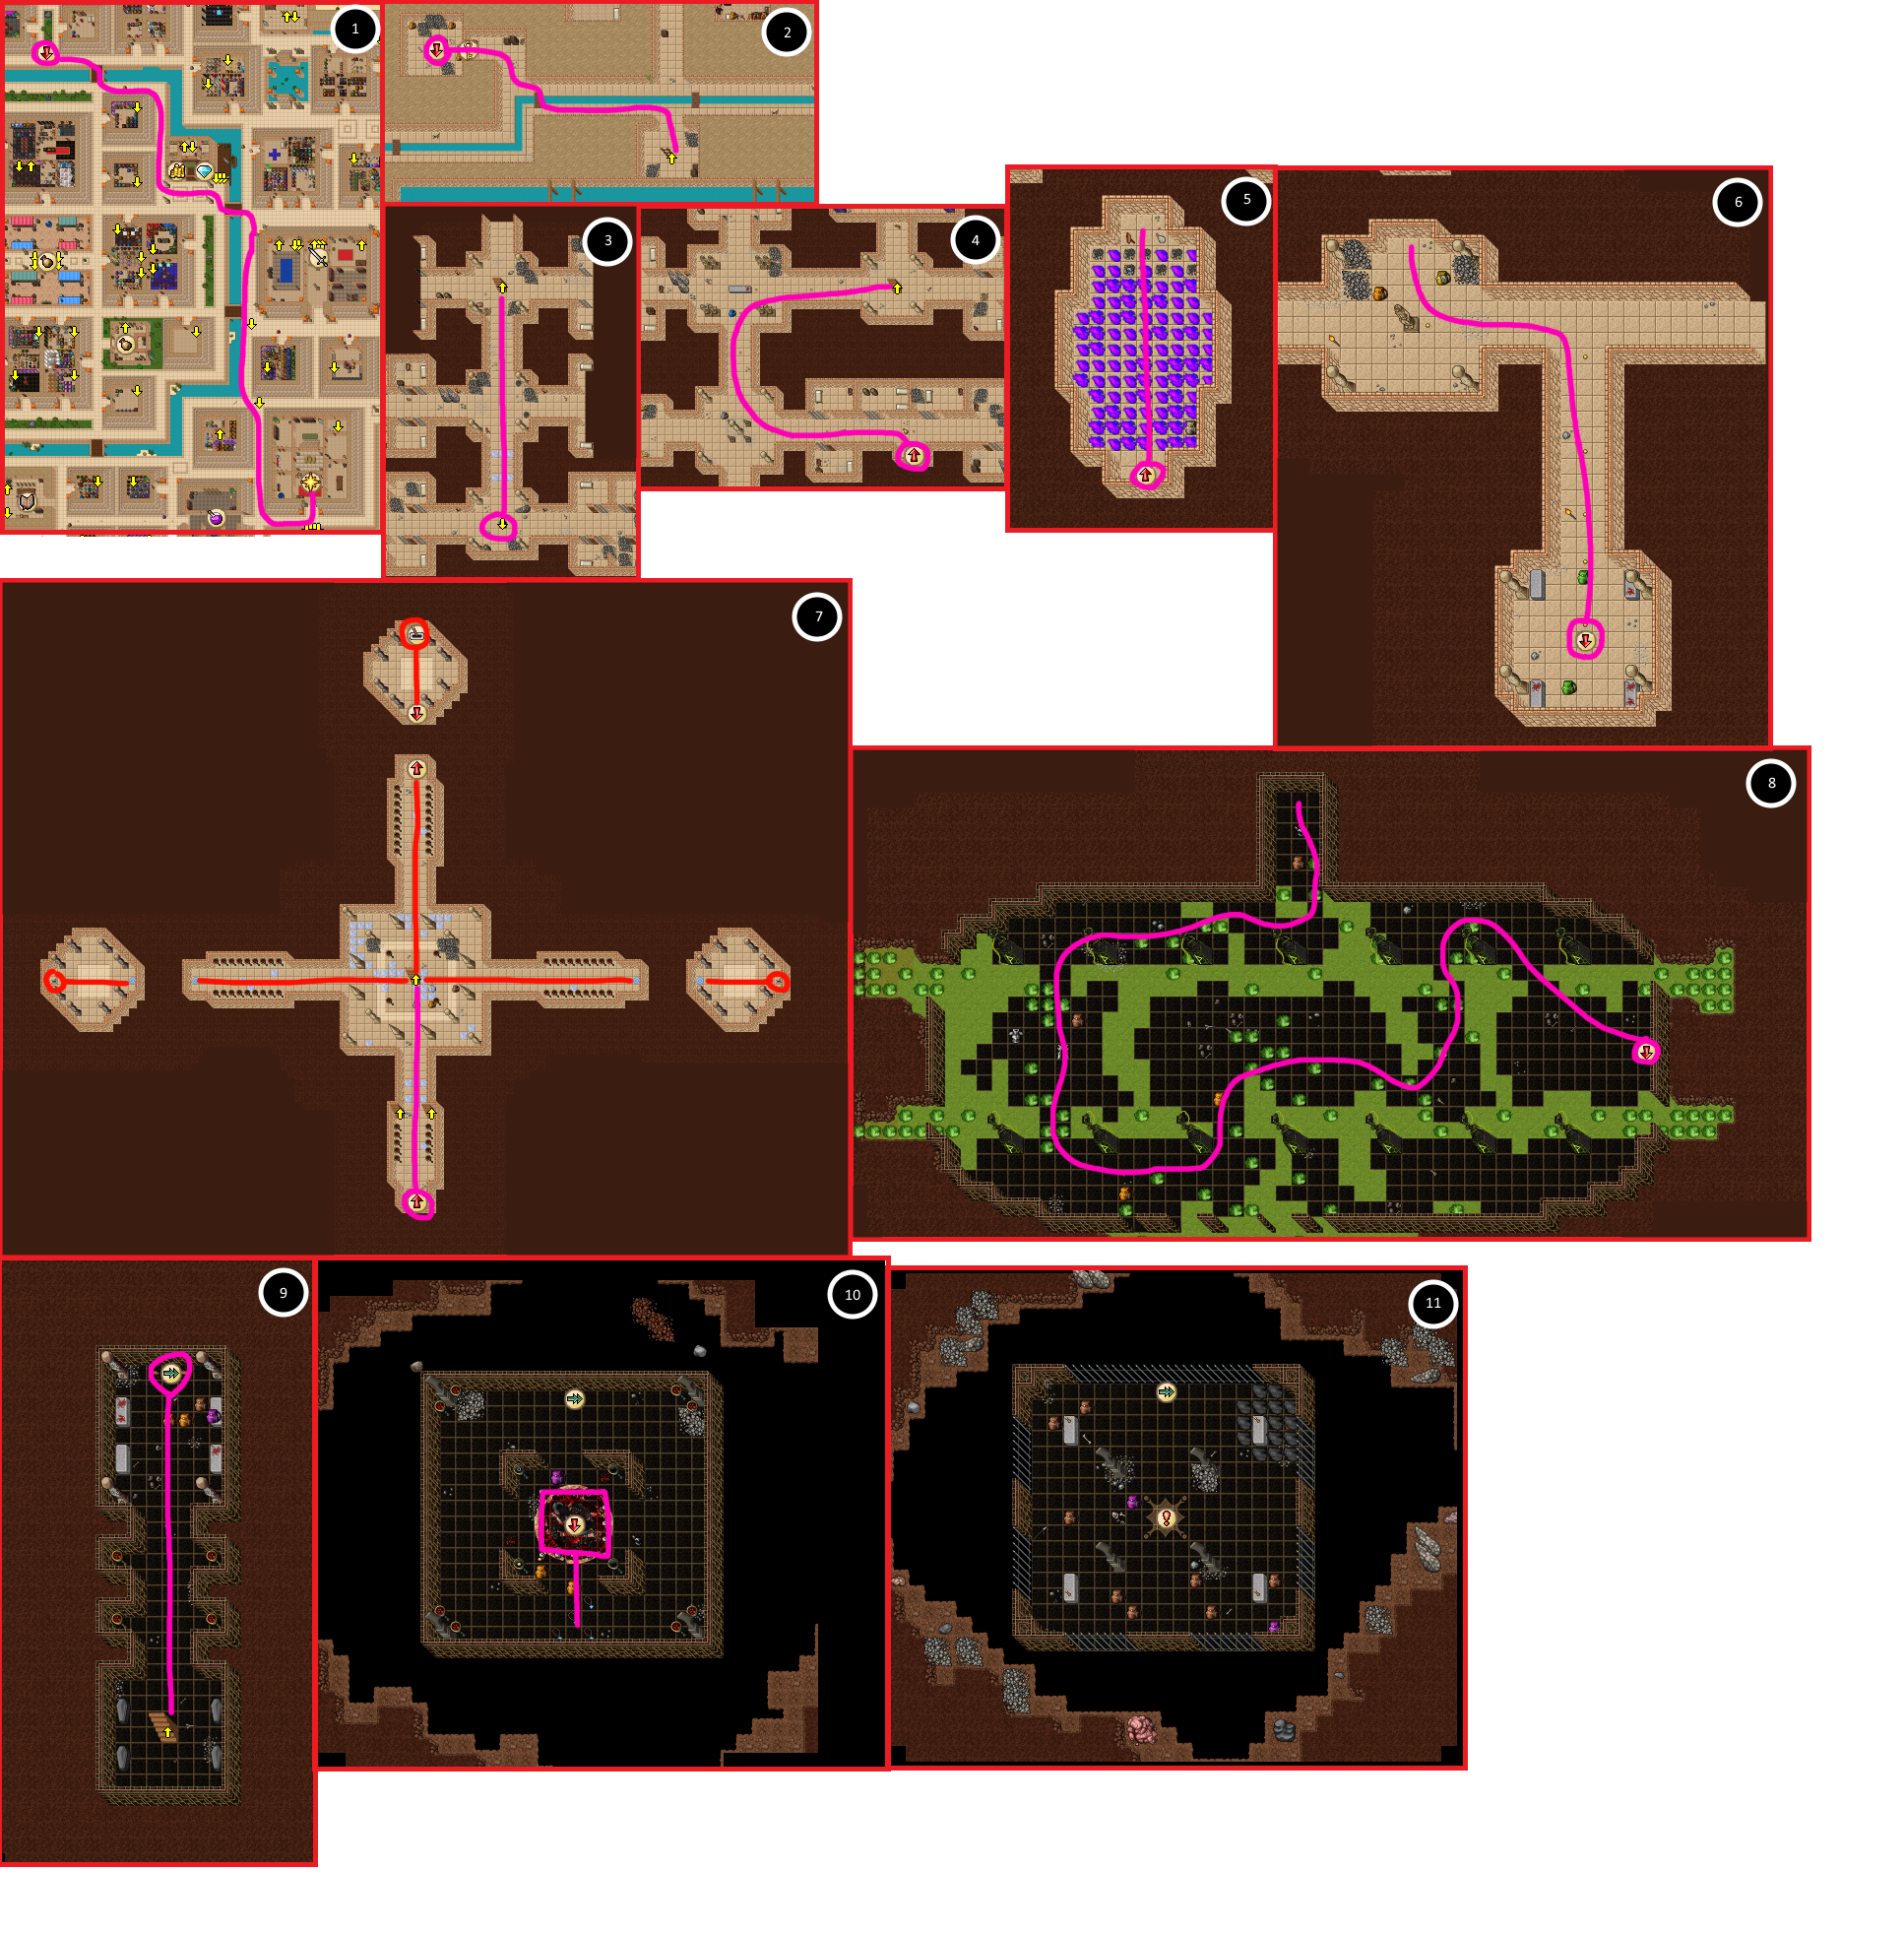
Map for Uliax
Follow the path below. The monsters in this tomb have a chance to drop a book unique to this tomb. There are 4 versions of the books, each with a different symbol on them. You require all 4 symbols to enter the fifth floor of this tomb. On -5 you must have the creatures in the correct rooms to pass. The image below shows which part each creature needs to be in.
Uliax deals massive energy damage with his Energy Wave and Energy Missile. It is advised to have a tank face Uliax in a different direction to the shooters, although as long as they are not in the way of an Energy Wave it does not matter. Uliax does not change target, or at least it is very uncommon. Simply shoot it down with Sudden Death Runes as fast as possible. You need to kill Uliax and take a Damaged Helmet piece with you.
After killing Uliax talk to Glechoma in Garrogat about Uliax. He will forward you to Priest Kelal in Yehsha in order to learn more about Laphis
Player: Uliax
Glechoma: You managed to kill Uliax? Great. What do you have here? Ahh, I know what this is. It's a damaged helmet of Azeran. Looks like the Omens managed to get their hands on his powerful helmet, but split it between themselves...
Glechoma: This gives them additional power, but if we would managed to kill all of them maybe we can restore power of the helmet. For now, you have to find the second Omen, which is Laphis, the Bringer of False Promises...
Glechoma: Unfortunately I'm not familiar with each one of an all of Omens. Good thing is I know a person who might know more - go to Yehsha and find Priest Kelal.
Player: Laphis
Priest Kelal: Laphis, the Bringer of False Promises. He keeps lying to people in Osaris and Yehsha. Good thing is Yehsha people are not so strong followers of Elyons as those in Osaris...
Priest Kelal: Still, Laphis lead to many disasters using hands of high arbiters and even priests. People followed him and believed in his teaching. Now he must pay...
Priest Kelal: Go and find his tomb, Player. Kill this creature before he does more harm. Then you can try your luck visiting Bedhin in Osaris.
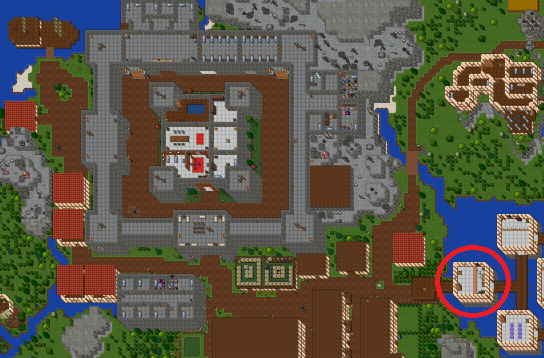
Flooded Tomb and Laphis
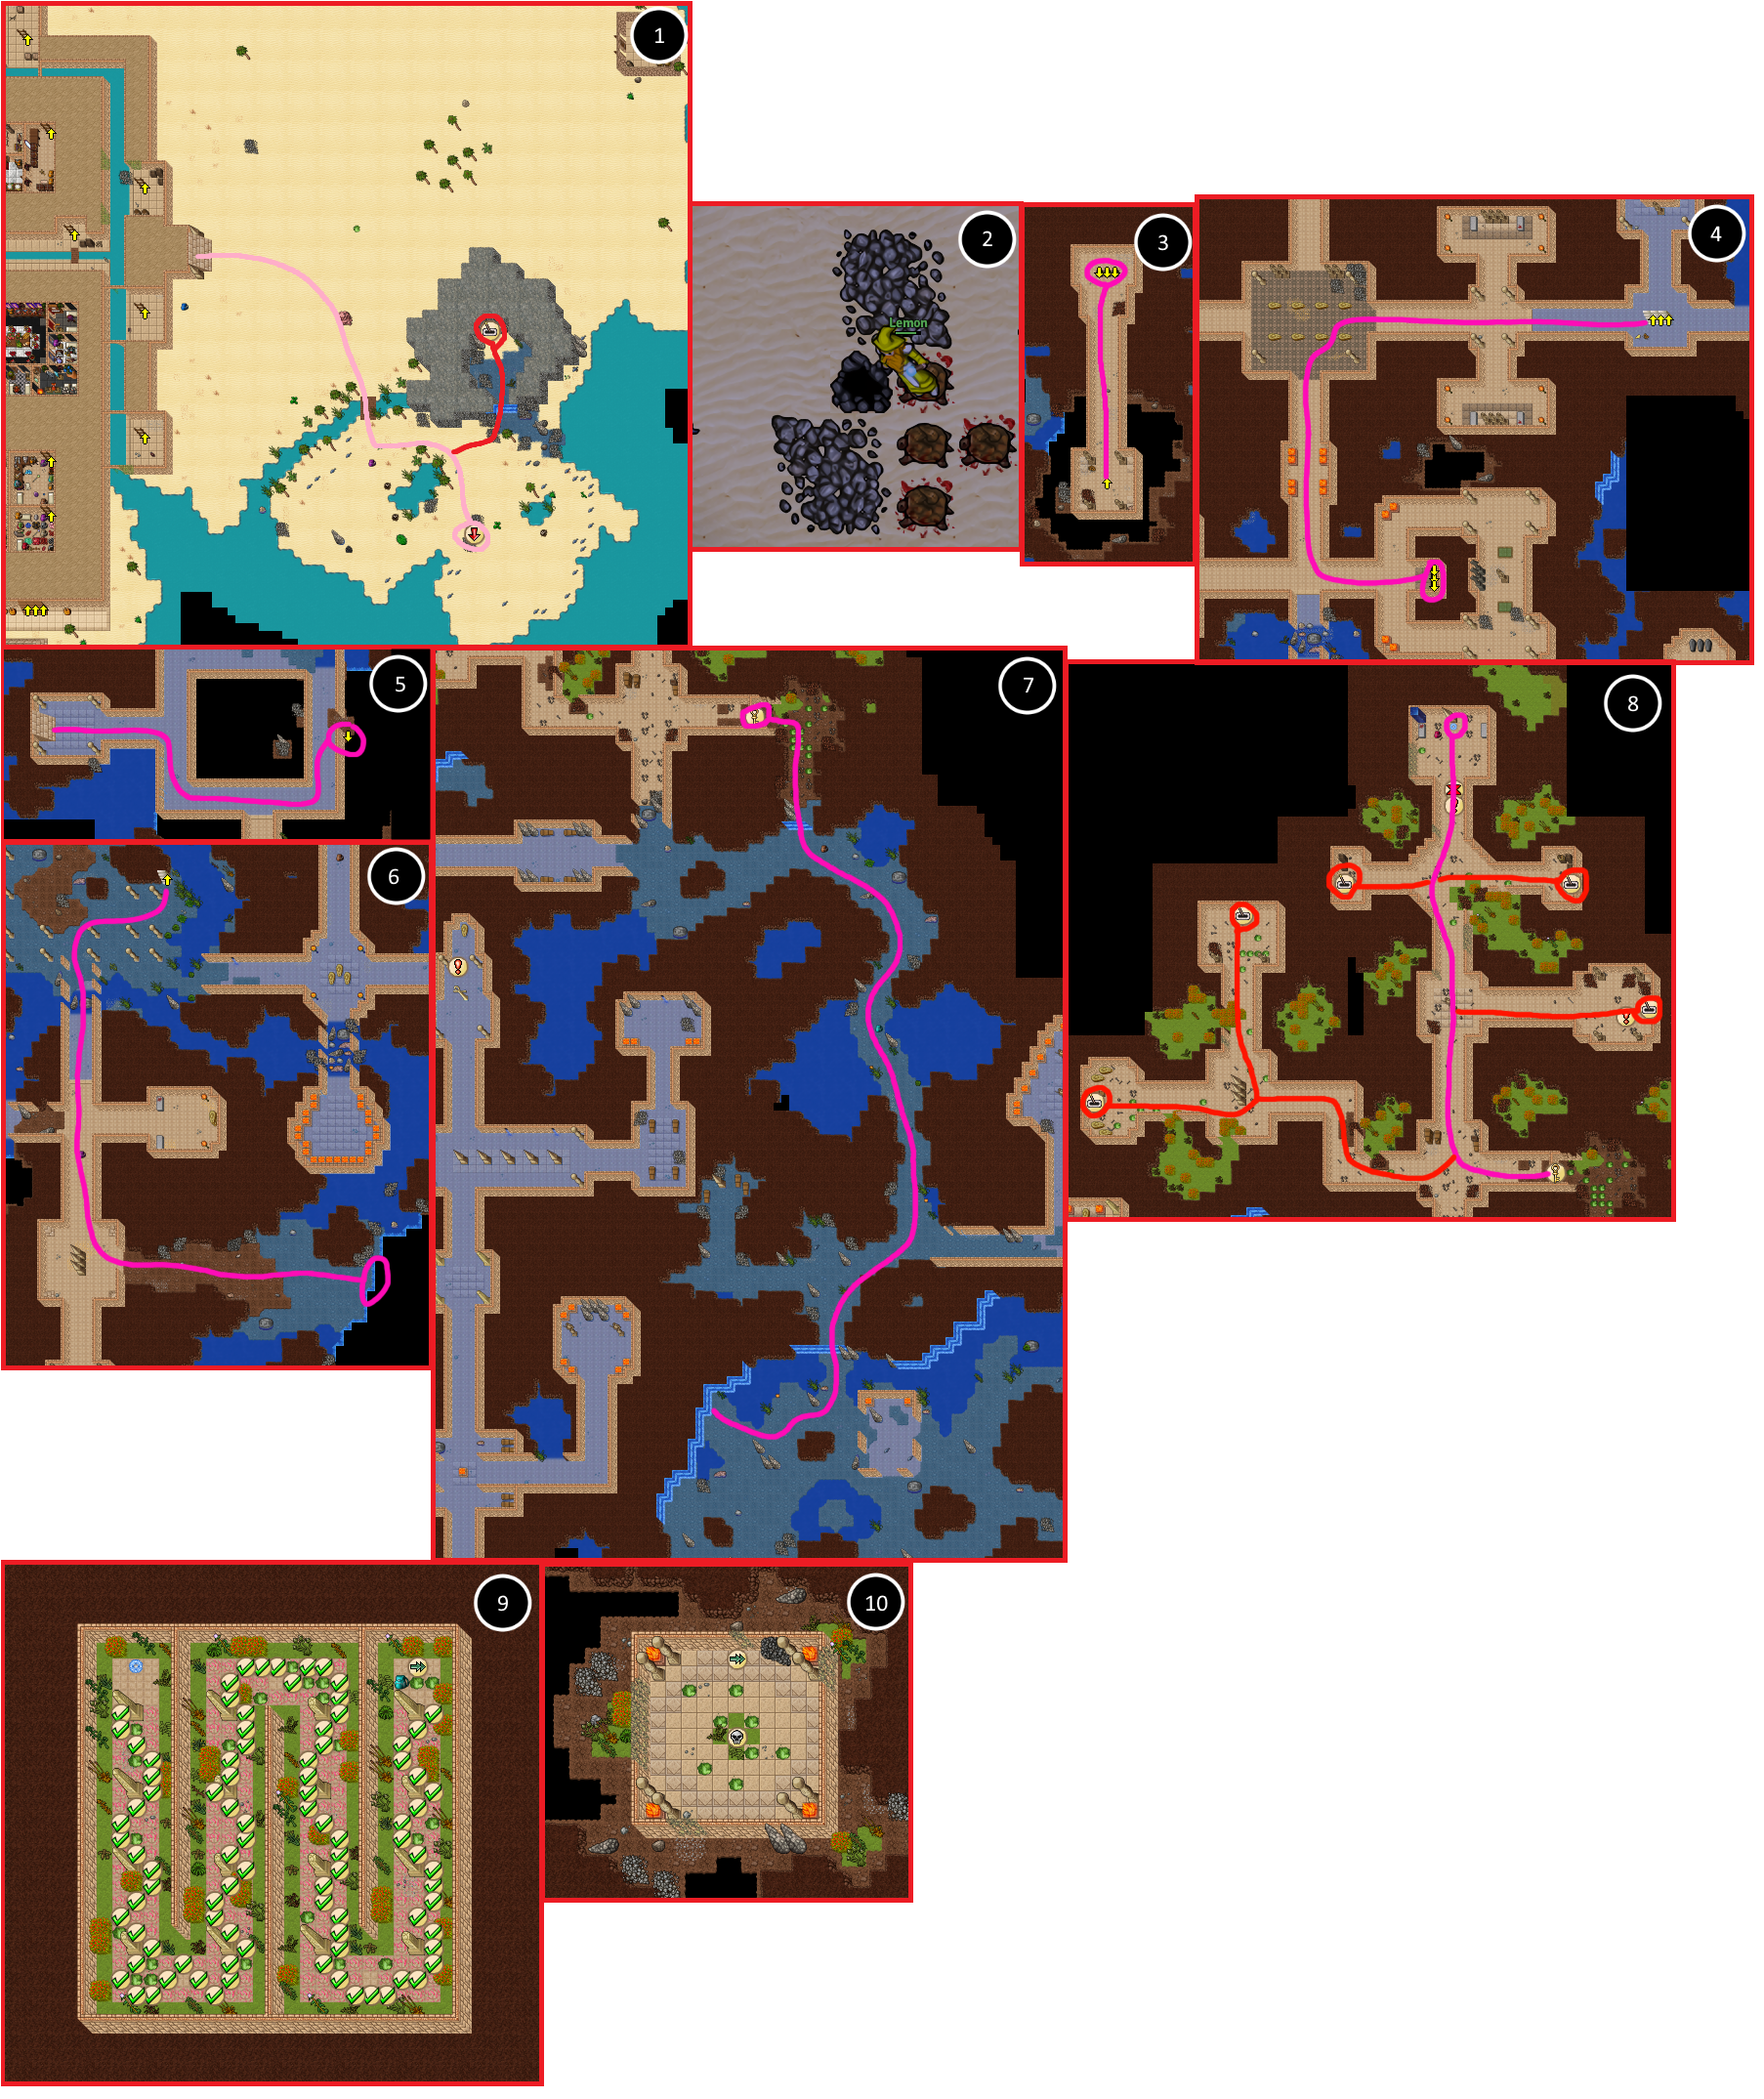
Map for Laphis
You will require a Machete.
Priest Kelal tells you to go to the Flooded Tomb and kill Laphis. You will need to use Levitate while in the Tomb in order to go from -3 to -4. Once you pass the level door you will need to pull 5 levers set about, but be careful as there are 2 Titan on the northern side protecting the seal. After pulling the levers and entering the maze teleporter you will need to step on the correct tiles in order to push onward towards the boss teleporter - but be warned there are false paths! If you have multiple people coming through the maze, it is a good idea to put follow on the person ahead of you as this maze allows your follow target to go exactly in the correct path.
Once you have killed Laphis and taken the Helmet Piece return to Bedhin in Osaris and talk to him about Laphis.
Player: Laphis
Bedhin: It can't be true! Elyons would never do harm to us!...
Bedhin: I can't believe you! I just...
Bedhin: No, It can't be...
Bedhin: Were we fooled all this time?
Bedhin: It can't be Player, it just can't be...
Bedhin: ...
Bedhin: I apologize for my behaviour Player, it is just...a... a hit to the head. We all believed that we were blessed by the presence of Elyons...
Bedhin: Sorry... Of course I will help you, we must put an end to that. You managed to kill two Omens?! That is amazing, in fact I deem you very powerful! However, on from what I know, you should focus on finding Zildur...
Bedhin: Zildur, Elyon of Peace must be the Hideous Interrogator I heard a long time ago. If you find his tomb, be wary, as it may be full of anomalies and things out of this world...
Bedhin: People who tried to sacrifice themselves for Zildur walked to some place south west of Yehsha. Maybe you should try your luck there...
Blood Tomb and Zildur
Map for Zildur
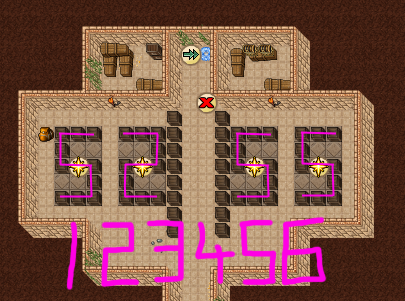
Bedhin tells you to go to the Blood Tomb and kill Zildur. To open the entrance of this tomb you will need to go up some ladders and step on the spikes. When blood has been spilled an entrance will appear below. Once you traverse the tomb and reach the lowest floor, there are 5 tiles you must hit in the correct order (seen in the map above) that will open a bridge near the centre of the floor. When you arrive at the gates of Zildur's teleporter you must go to the 9 spikes just south of you and make an X using your blood on the spikes. On a numpad you want to step on the following numbers: 1-3-5-7-9. Once it has been done the bars will disappear and you may enter the teleporter.
Once you have killed Zildur and taken the Helmet Ornament return to Bedhin in Osaris and talk to him about Zildur.
Player: Zildur
Bedhin: You managed to kill Uliax, Laphis and Zildur. Now you should find Rel'Tir. But know this, Player, Rel Tir is a general of armies. Expect a lot of fighting and a lot of monsters as his help...
Bedhin: Rel'Tir tricked a lot of good generals, some of them may be your opponents, so move fast and don't tell anyone about your mission, Player...
Bedhin: I hope we will be safe soon. The lair of Rel'Tir is in Fiery Pit. Go and find it. Go and kill it.
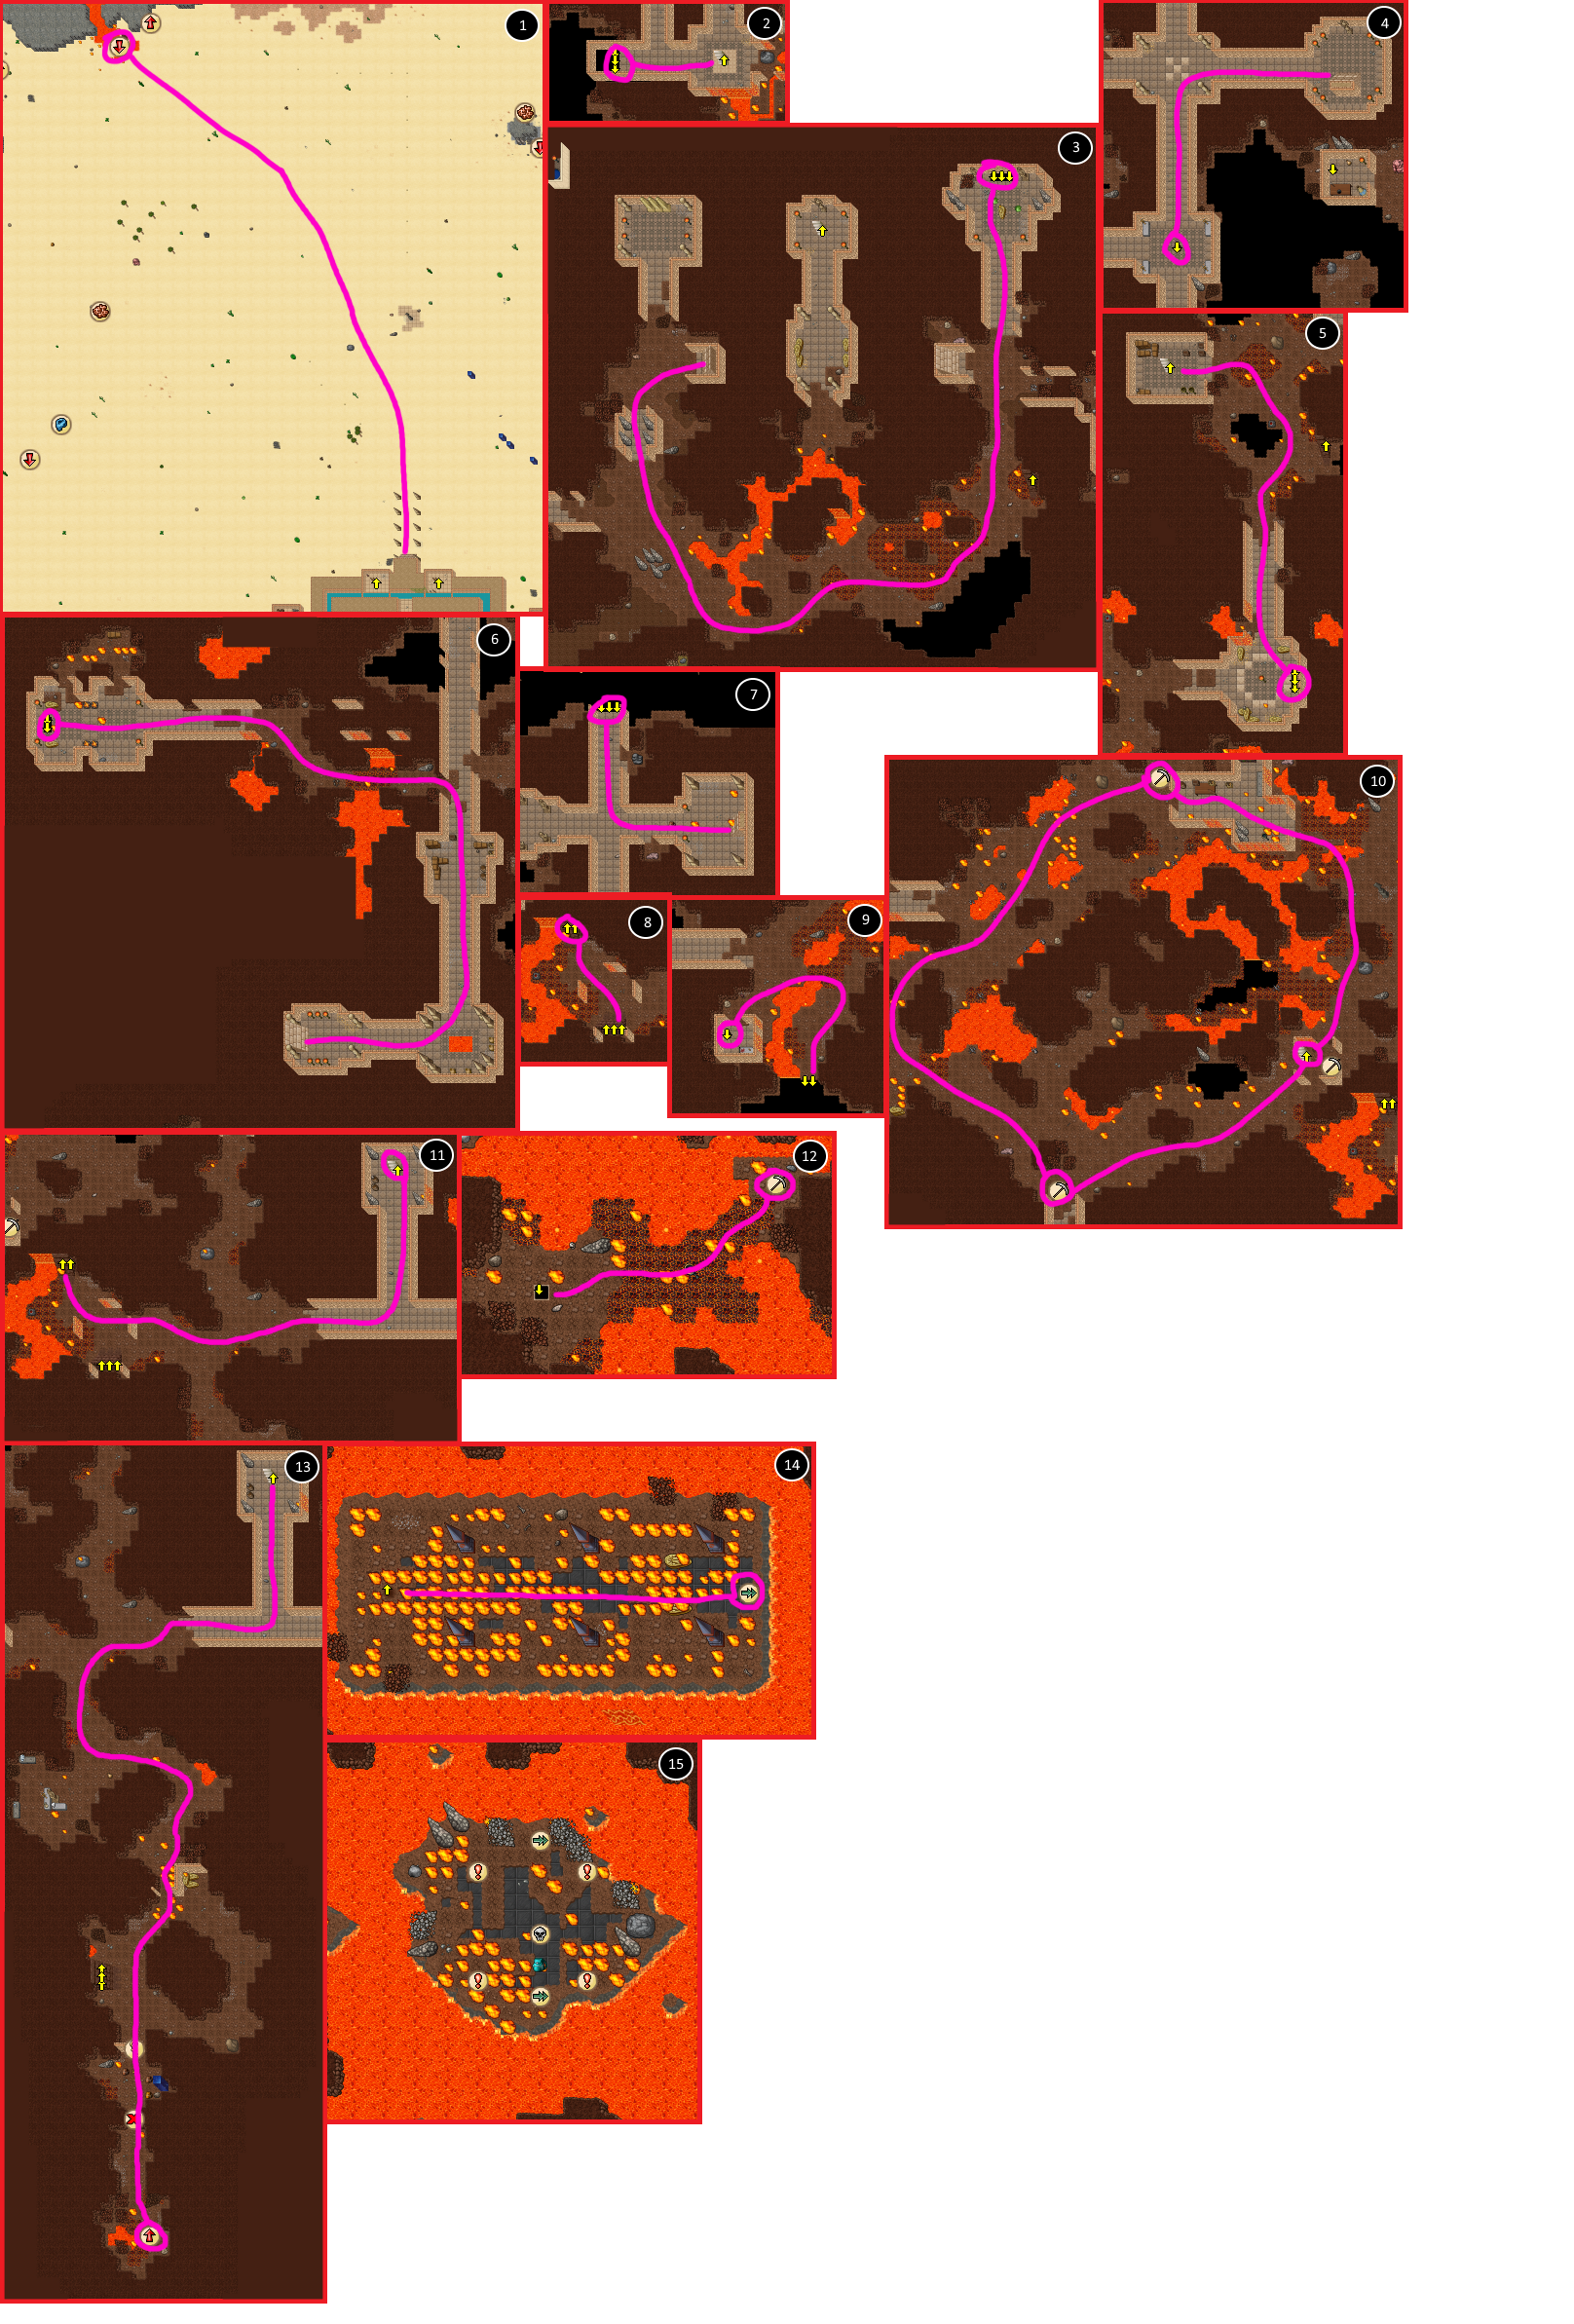
Fiery Tomb and Rel'tir
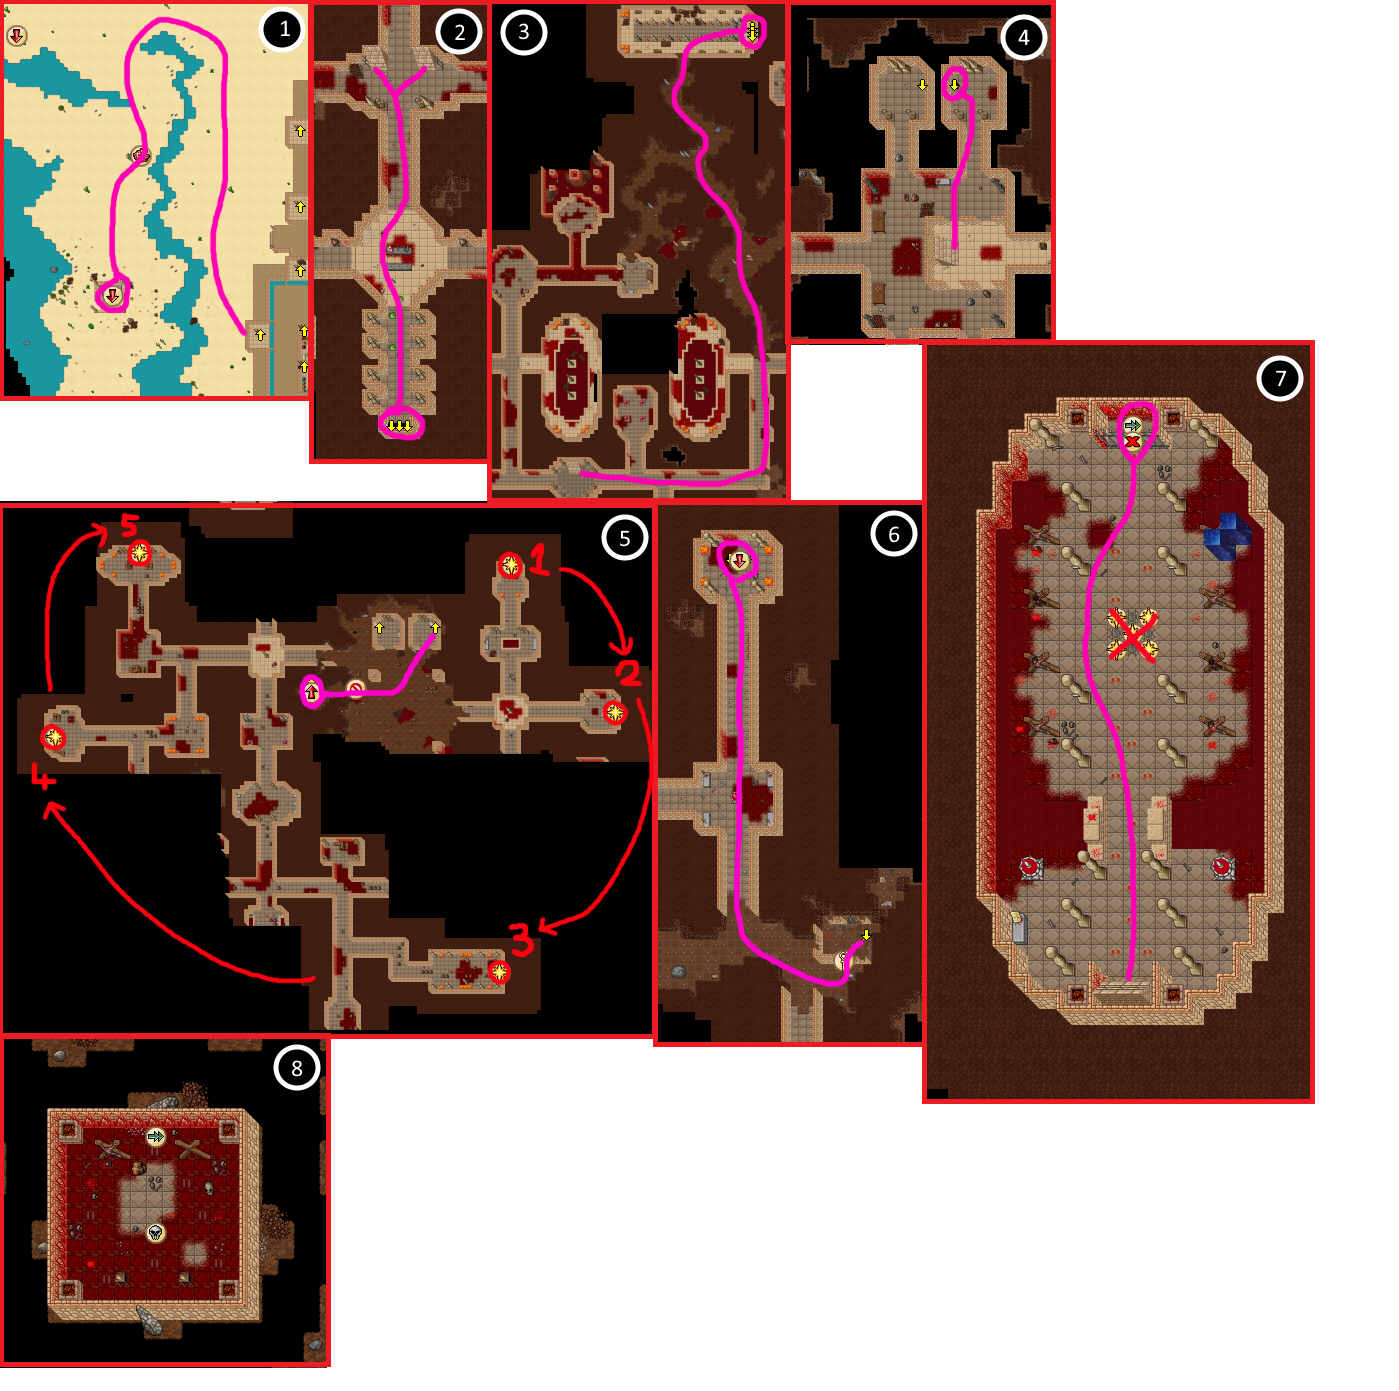
Map for Rel'tir
Bedhin tells you to go to the Fiery Tomb and kill Rel'tir. There are 3 secret pickholes in the Fiery Tomb that you will need to find and pull the levers inside of them. Once all 3 have been pulled a stone blocking the path to Rel'tir will be removed and you can continue.
Once you have killed Rel'tir and taken the Right Horn return to Bedhin in Osaris and talk to him about Rel'tir.
Player: Rel'Tir
Bedhin: That was fast, Player, but it's good for all of us...
Bedhin: Now, as you killed Rel'Tir, there is only one last omen to go. One last monster to be free. We are almost there Player...
Bedhin: Now you need to kill Holibar, Elyon of Dream. Or should I say - Omen of Nightmares. Adn tihs nightmare is coming to an end Player...
Bedhin: Holibar knows we are after him, and he is making proper preparations, so you need to be fast, hero. Look for the caverns of madness.
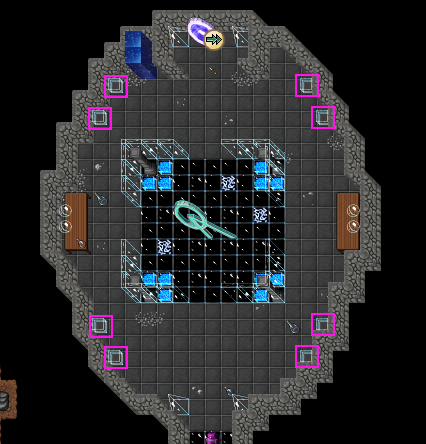
Dream Tomb and Holibar
Map for Holibar
You will require at least 8 charges of Magic Wall.
Bedhin tells you to go to the Dream Tomb and kill Holibar. Once you pass the level door you'll meet with 6 levers. Pull them in this order:
- Top-left
- Bottom-middle
- Bottom-right
- Top-right
- Bottom-left
- Top-middle
Once reaching the final room you will notice bars covering Holibar's teleporter. You must shoot magic walls on some glass pedestals found around the room. In total there are 8 and you must have magic walls on all of them at the same time. Once that is done, the bars will be removed and you can enter Holibar's chamber.
Once you have killed Holibar and taken the Helmet Adornment return to Bedhin in Osaris and talk to him about Holibar. He will tell you to visit Glechoma in Garrogat and to talk about Omens.
Player: Holibar
Bedhin: God Bless you, Player, you are back carrying good news. We are finally free, I can't wait to tell Caliph about that. You are our saviour, thank you so much...
Bedhin: Now before you leave, I have to ask you one last thing - travel to Garrogat and meet Glechoma, he is a demonologist, he would be glad to hear about this...
Bedhin: It's important Glechoma is keeping track of all demonic activity, maybe he will tell you something about these items you collected too...
Bedhin: Once again, thanks Player.
Player: Elyons
Glechoma: These fools think they are safe by now? Ha!...
Glechoma: As you know, Azeran was 'killed' by hero named Karvos. The fatal blow hit his head, but only a few people remember about a helmet Azeran was wearing...
Glechoma: Helmet of the Fallen King. The story behind the helmet is as long as the stry of demon lord Azeran, but what is important is that a blow to the head destroyed the helmet...
Glechoma: Helmet split into seven parts, and that gave Azeran an opportunity to fake his death. He split his soul in seven pieces...
Glechoma: Five of them were roaming htis world as Elyons, tricking people into believing they are good. Each one of Omens had a piece of helmet as it gives great power...
Glechoma: Now you may think - what about other two souls? One of them, Zurishatoz got into the weapon Karvos was using. The weapon is now a relic, people are praying to it, but the truth is - this thing is cursed...
Glechoma: If you want to kill all the Omens you need to steal the weapon held in a Sacred Shrine...
Glechoma: The last Omen, Dodruk managed to get into the mind of Karvos. People tend to say killing demons made h im crazy. He was doing things a good King would never do...
Glechoma: This was because he completely lost his mind. It was Dodruk controlling him. Karvos is dead by now, but Dodruk is not. You must find his grave and kill him there...
Glechoma: It is located in Burrows of the Cursed King. Good Luck Player. Remember to take parts of the helmet, maybe we can restore it's power.
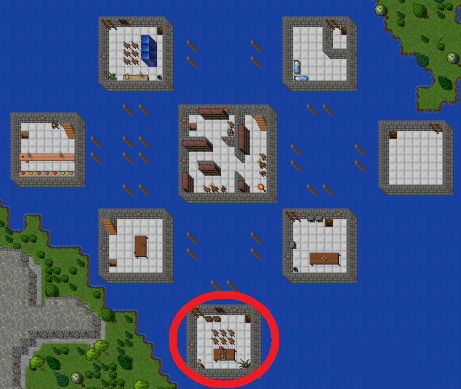
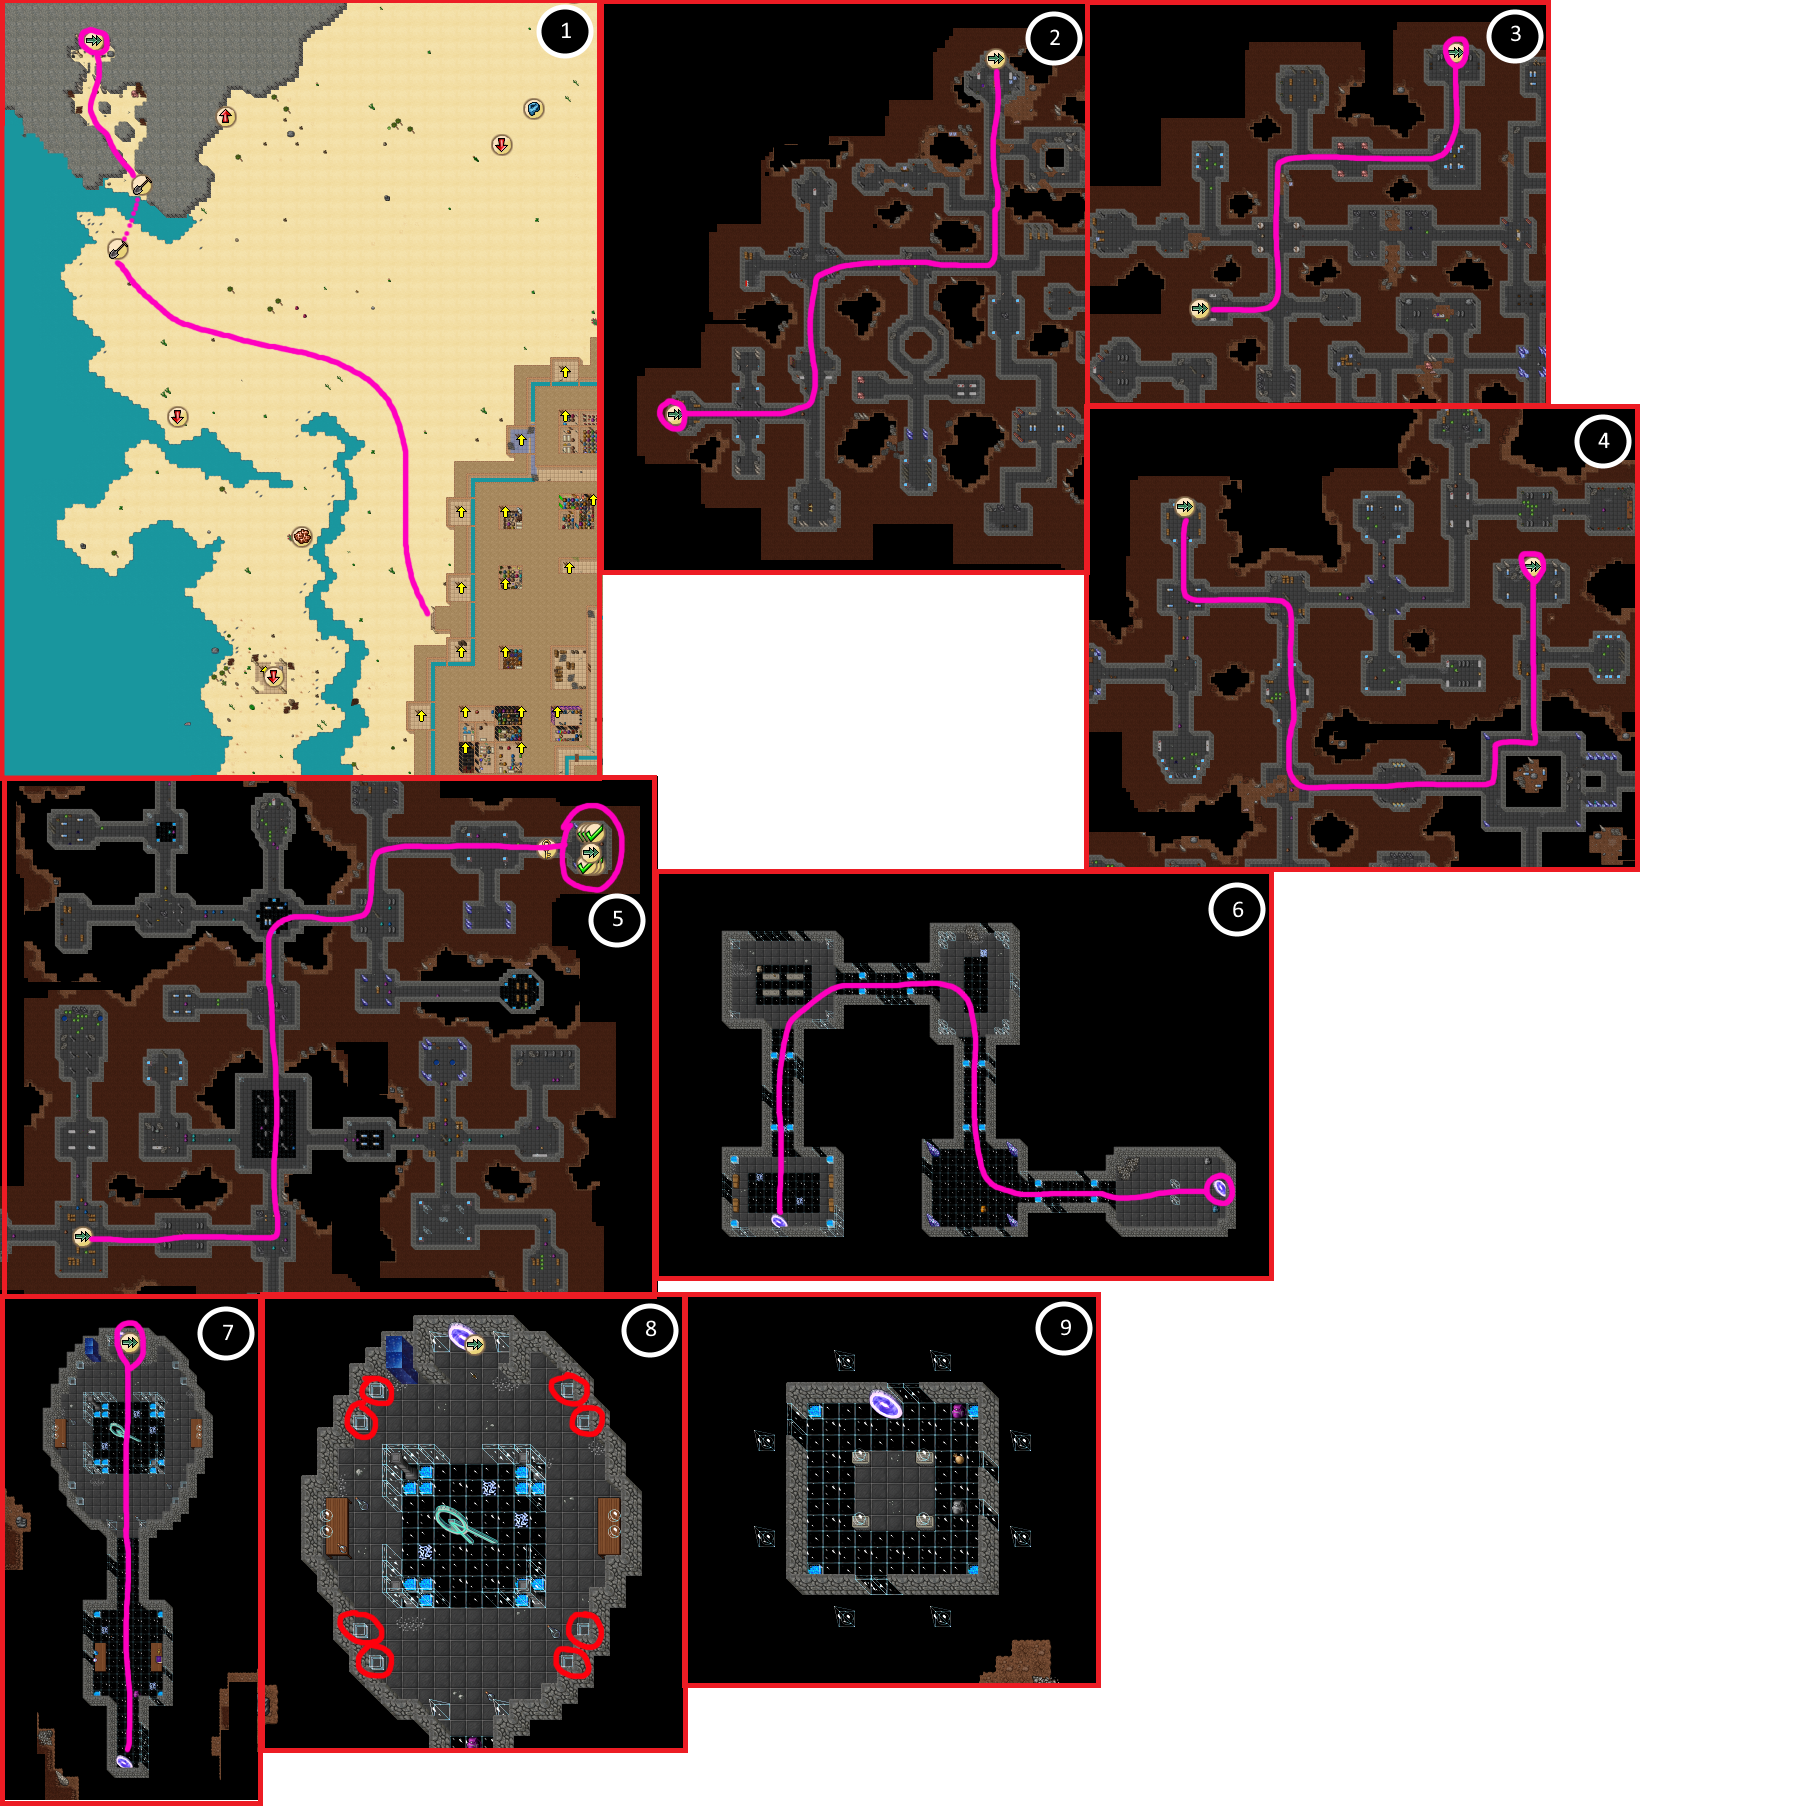
Sacred Shrine and Zurishatoz
Map for Zurishatoz
You will require a Machete.
Glechoma tells you to go to the Sacred Shrine and kill Zurishatoz. To access the deeper section of this tomb, you must first use a Poison Statue that will open a hole by some Necromancers and Vampires. Once through the level door, you want to head south towards Zurishatoz but before you do that you should head both west then east where you will see 4 dice hiding behind some walls. Keep track of the numbers in this way:
- Left-Topside
- Left-Bottomside
- Right-Topside
- Right-Bottomside
For example the numbers may be 1-4-2-6. This number changes every day and you will need to remember it for the next area.
Moving onwards you will find a set of bars blocking the teleporter for Zurishatoz. There are also 4 rectangles full of boxes, you must turn these boxes into the formation of your 4 numbers. Once inside the final chamber, you will be met with a Hammer sitting on top of a counter in the centre of the room. If you use the hammer, it will spawn Zurishatoz.
Once you have killed Zurishatoz and obtained a Left Horn you can continue to the next part - you do not have to speak to any NPC.
Ice Tomb and Dodruk
Map for Dodruk
It is required to bring some Great Fireball Rune or Heavy Frozen Missile as Dodruk can only be damaged by Ice or Fire.
Glechoma tells you to go to the Ice Tomb and kill Dodruk. To enter the Ice Tomb you'll need to venture to the top of the mountains where a hiddle tile sits. Stepping on that tile will open some pieces of ice that block the entrance. Further in by the level door there are some stones blocking the way to the last floor. To remove these stones there are Ice Pillars set around the bottom 2 floors that you must use in order to destroy them. Once all are destroyed you can move to the final floor. The order of the levers to open Dodruk's teleporter goes as follows:
- Top-left
- Top-middle
- Top-right
- Bottom-left
- Bottom-middle
- Bottom-right
After that, you should speak to Spirit of Karvos. All you must do is say Hi and he will talk for a while before allowing you through the quest door and wishing you luck on defeating Dodruk.
Once you have defeated Dodruk and obtained a Gem Holder you should return to Glechoma and talk to him about Dodruk.
- NOTE: You need to have all 7 helmet pieces on you or Glechoma won't respond!
Glechoma will forward you to Sabri who is found in the temple of Yehsha where you must learn about Heaven.
Sabri will teach you about Heaven and tell you to seek out Pharaoh Anhamtap about Eashal. He will ask you if you wish to go to Eashal to which you must say Yes.
Finally you are before Rashed in Eashal. Tell him you wish to fight Azeran. He will offer his help which you should say Yes to. Now that you are ready to fight Azeran you should ask Rashed to take you back to Yehsha.
Player: Hi
Spirit of Karvos: Welcome, starcher. No, don't try to swing your weapon at me, I'm a spirit...
Spirit of Karvos: I suppose you are here to kill me. That is very good. Listen to me mortal, Dodruk managed to take over my mind but he couldn't control my spirit after my death...
Spirit of Karvos: I'm bound to this place, I cannot escape it unless Dodruk is killed, but before you do it, Player, listen...
Spirit of Karvos: He had everything - libraries, corpses, faith of people, their trust, whole armies at their hands. They feared about restoring the Hammer I used to kill the Demon...
Spirit of Karvos: I was watching Omens actions, I know what they were doing. They were making special preparations to restore Azeran's power...
Spirit of Karvos: But they decided to sacrifice Zurishatoz and let him get defeated by your hands, so the weapon is of no power.
Spirit of Karvos: I don't know how you can kill Azeran without my Hammer, but if I figured out a way, you can do it too...
Spirit of Karvos: By the moment you kill Dodruk, you awake Azeran. But it must be done, and Azeran must be defeated, because if we don't do it, Dodruk would do enough to make Azeran even more powerful...
Spirit of Karvos: And trust me - you don't want to live with this thing at your side. Go Player, go in there and kill the monster.
Player: Dodruk
Glechoma: What do you say?!...
Glechoma: Azeran is alive?!...
Glechoma: That is really bad news...
Glechoma: Good thing Karvos didn't lose all of his mind...
Glechoma: Hmm...
Glechoma: How?.. Hmm.. Maybe we can.. well that can work...
Glechoma: Listen to me Player, there is no time, you must gather your equipment and come with me, we have to make special preparations...
Glechoma: The last time Azeran was a threat, he got killed with a weapon made of Ettenflame - a warhammer - as it is destroyed we can't use it of course...
Glechoma: Nor can we buy new ones, but there is one idea that I think may work, so listen to me carefully...
Glechoma: You see, I don't believe in Gods, these are just different types of Devoks, but this means we can please for Rashed help...
Glechoma: Yes, you must take your belongings and meet Sabri, ask her about Eashal or Heaven. Now go!
Player: Eashal
Sabri: Azeran is walking in the deserts? Can't be. That is terrible news... but answering your question yes, Glechoma is right...
Sabri: There is a way to find a weapon capable of killing Azeran, altough I won't really say Rashed is a demon, that's just Glechomas obsession...
Sabri: What we can do now, is meet Rashed, and I know a way to do it. We need to have his emissary, and we are lucky to have one...
Sabri: Pharaoh, Player, Pharaoh. It's the only way. Go Player, ask Pharaoh about Eashal.
Player: Eashal
Pharaoh Anhamtap: Considering what you say, I would be a fool to stop you now from killing Azeran...
Pharaoh Anhamtap: Yes, I am able to send you to Eashal. I believe you won't try anything stupid in there, although I think I should not care. If you behave wrong in front of God Rashed, you will return in ashes...
Pharaoh Anhamtap: So, are you ready to venture itno Eashal, our Heaven to meet Rashed?
Player: Yes
Player: Azeran
Rashed: Yes, I know you came here because of that. You want to kill Azeran? Of course you do...
Rashed: I suppose you are aware of the fact it is not easy to kill him. Not only because of his strenght, but also his flesh...
Rashed: When Karvos was young, he used weapons made of Ettenflame to accomplish it, but there is no longer any obtainable weapon made of this mateiral...
Rashed: But, I think I might help you...
Rashed: Player, I will bless you with the same power I used to kill dragon Umos with. You will be able to get inside his soul...
Rashed: You will have to stop the corruption from spreading across his body, and seal his soul there...
Rashed: So, Player, are you ready to bear the blessing of Rashed and kill the creature?
Player: Yes
Rashed: Then I bless you with my power, Player! Take it and go to Azeran's Lair in The Catacombs of Kings. Destroy him and return here. I wish you good luck Player.
Player: Yehsha
Rashed: Do you want me to send you back to your world, mortal?
Player: Yes
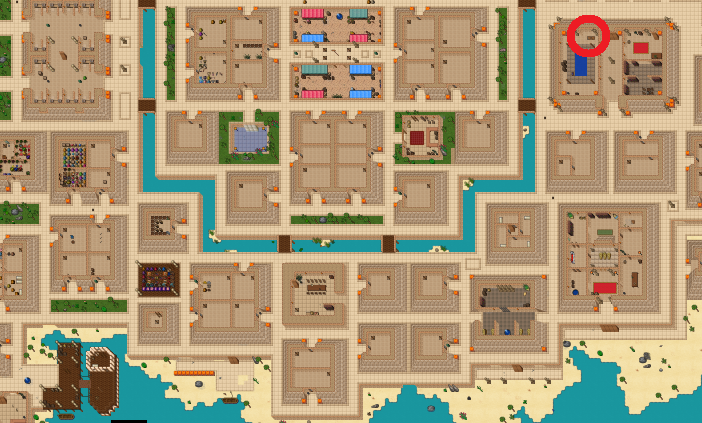
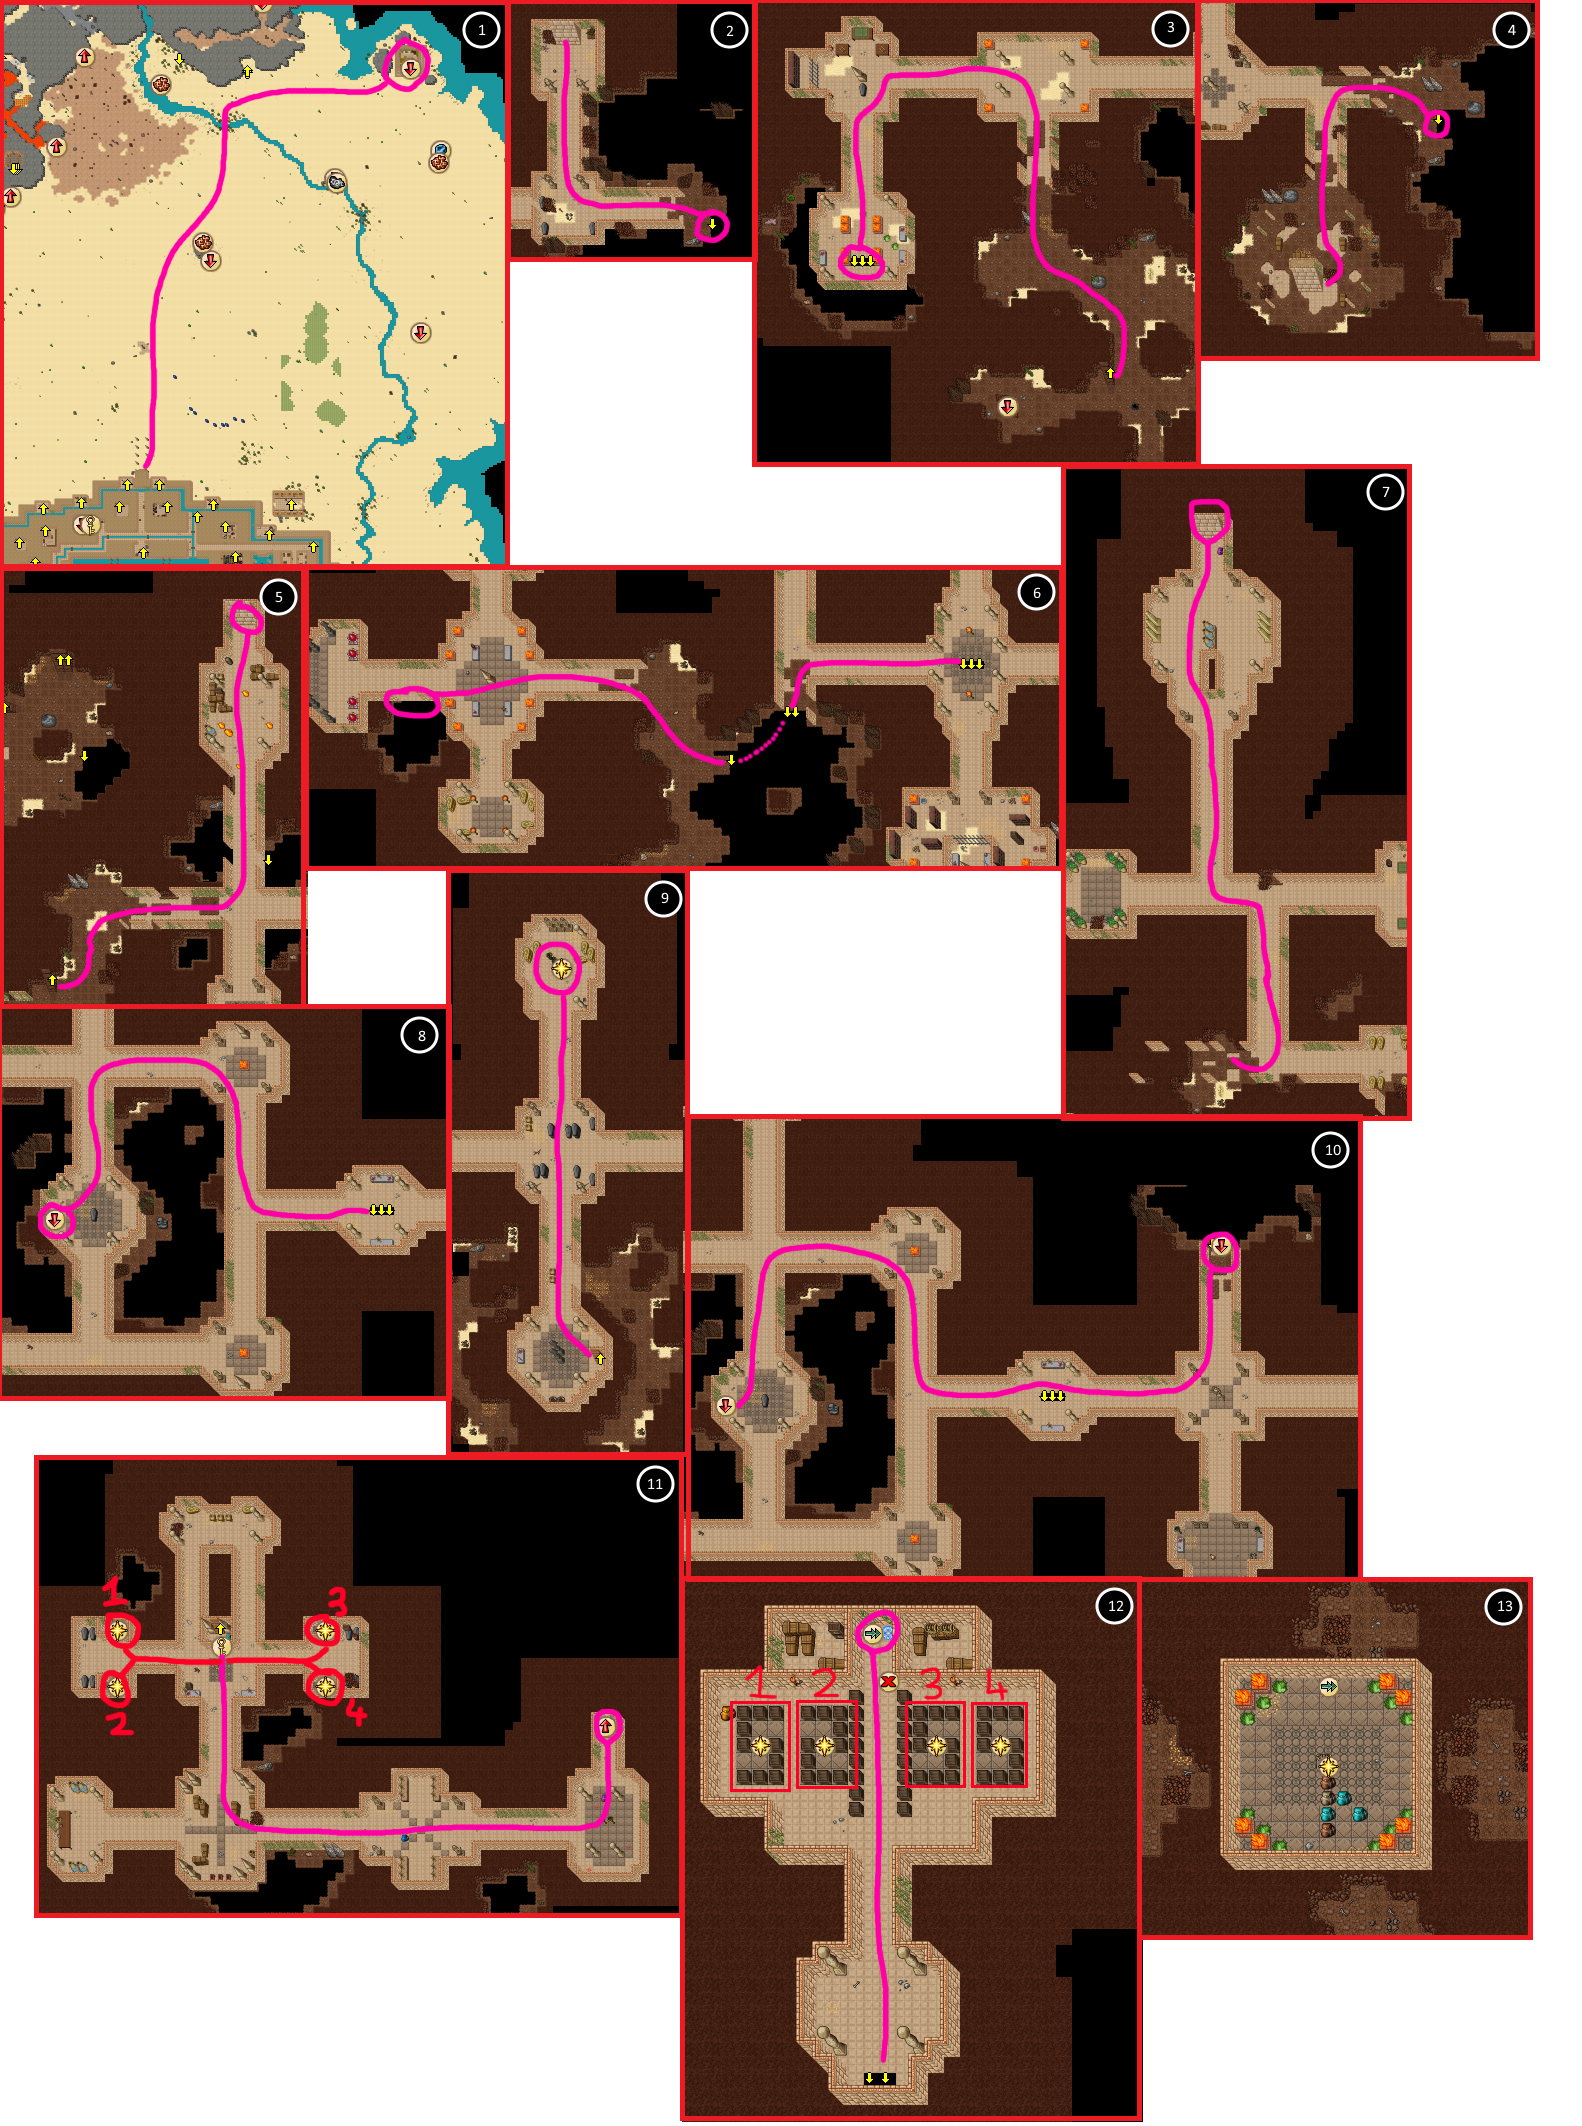
Ancient Prison and Azeran
Map for Azeran
Rashed tells you to go to the Ancient Prison and kill Azeran. Before heading to the Ancient Prison you should make sure the lever by Pharaoh Anhamtap (On the floor one below the Pharaoh) is pulled to the right. Once that is done, it is time to wade through the Prison below Yehsha.
On the way down you will encounter some Purple Flames. This area is extremely dangerous to lower levels, especially mages! Every hit deals 300 damage, but fortunately the flames repeat a pattern of being on or off. When the flames are off you can pass safely without taking damage, although when they turn from off to on, they deal 600 damage. Mages are recommended to use Magic Shield and a Might Ring to make sure they do not die.
After the purple flames, there is a room nearby down some stairs that has many creatures, including several Deathkiss Watcher, Priestess, Demon Skeleton, and a Warlock. To the north, east, and west of this room are teleporters that lead to 3 levers that must be pulled. Once they are pulled you can head south - but DO NOT go up the stairs in this southern corridor, they are traps that can kill people if they are not prepared.
Through the teleporter you will arrive in Azeran's Chambers, but this room does not contain a live version of Azeran, but in fact just his body. When you use the body you are teleported into the real chamber. To the north is a teleporter that leads to the exit.
Once you have braved Azeran and come out victorious, you should return to Rashed and tell him you defeated Azeran, just make sure you are holding all of the boss pieces and you will be rewarded with a Helmet of the Fallen King.
- You will also now be able to obtain the 2nd Executioner Outfit addon if you go through the outfit quest.
Player: Azeran
Rashed: I know what you did. You do not have to say this...
Rashed: Player, you have to be aware of the fact that some day there might be a statue of you in the mightiest city of Najira...
Rashed: You killed Azeran, and you did a great favor for the world...
Rashed: I personally thank you for what you've done...
Rashed: Mhmm...
Rashed: Thank you. Now, I can't let you go without a proper reward. Here, I will connect pieces of Azerans helmet and clean it from his evil shade...
Rashed: Do you have the pieces?
Player: Yes
Rashed: Here, take this helmet Player, bear it with pride, and walk this lands as long as you can.


