Difference between revisions of "Sheol"
From Medivia Online Wiki
m (Text replacement - "|RTENOTITLE]]" to "]]") |
|||
| (157 intermediate revisions by 7 users not shown) | |||
| Line 1: | Line 1: | ||
Sheol is known as the realm of demons, a world which they invaded, ripped apart and tore out of the hands of its original inhabitants, the watchers, thus causing their exodus into the world of Medivia. Now, the demonic hosts have their sights set on Medivia itself and are mustering their forces for an inevitable assault.<br><br> | __TOC__ | ||
Sheol is known as the realm of demons, a world which they invaded, ripped apart and tore out of the hands of its original inhabitants, the watchers, thus causing their exodus into the world of Medivia. Now, the demonic hosts have their sights set on Medivia itself and are mustering their forces for an inevitable assault. Your task is to fight the scourge of [[Baalerun]] in the [[Demonic Faction]].<br> | |||
{| class="mainpage1" | |||
|- | |||
| valign="top" width="35%" | | |||
| valign="top" width="30%" | | |||
{| class="wikitable" | |||
|- | |||
! style="text-align: center;" | [[File:Demon Head.png]] | |||
! style="text-align: center;" | [[Demonic Faction|The Demonic Faction]] | |||
|} | |||
| valign="top" width="35%" | | |||
|} | |||
<br> | |||
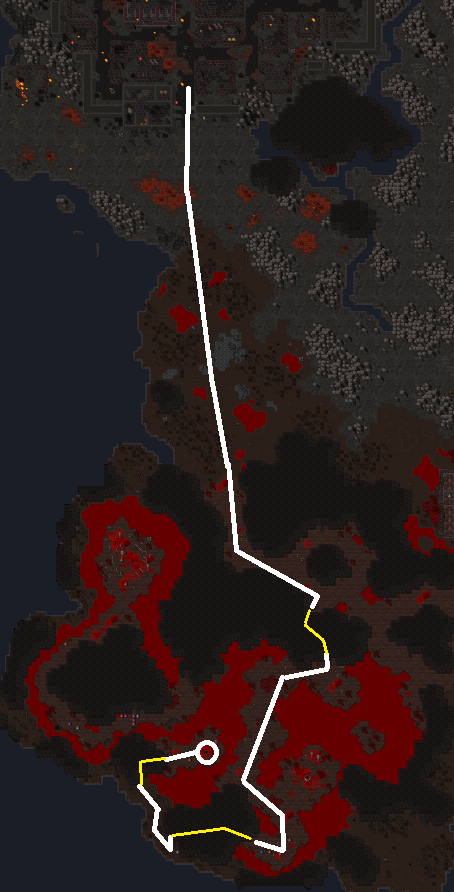
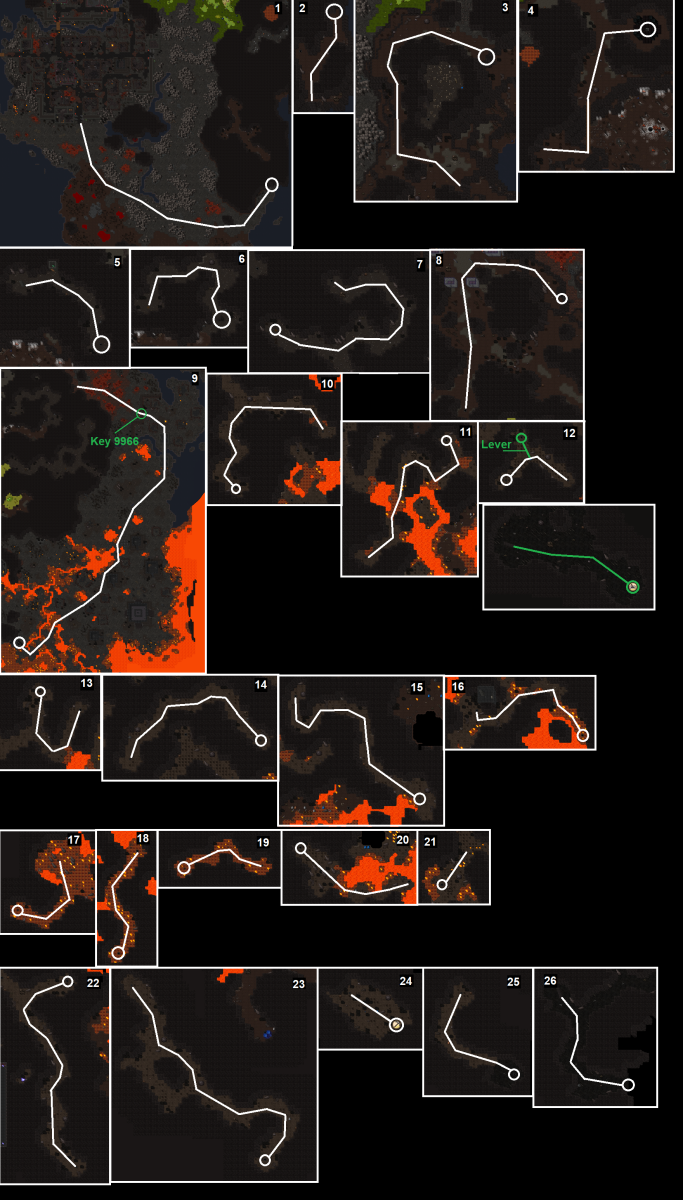
[[File:SheolMap2.png]] | |||
<br><br> | <br><br> | ||
[[File: | <div style="text-align:center"><h1>'''Sheol Hunting Places'''</h1></div> | ||
{| class="wikitable sortable" | |||
|- | |||
! style="text-align: left; width: 25%" | '''Image:''' | |||
! style="text-align: left; width: 25%" | '''Name:''' | |||
! style="text-align: left; width: 25%" | '''Creatures:''' | |||
! style="text-align: left; width: 25%" | '''Location:''' | |||
|- | |||
| style="text-align: center" | [[File:Blue_Fungi.png]] | |||
| style="text-align: left; width: 195px" | [[Fungi Spawn]] | |||
| style="text-align: left; width: 69px" | [[File:Blue_Fungi.png|link=Blue Fungi]] | |||
| style="text-align: left; width: 58px" | [ here] | |||
|- | |||
| style="text-align: center" | [[File:Bedsore.png]] | |||
| style="text-align: left; width: 195px" | [[Bedsore Lair]] | |||
| style="text-align: left; width: 69px" | [[File:Bedsore.png|link=Bedsore]] [[File:Nightmare.png|link=Nightmare]] | |||
| style="text-align: left; width: 58px" | [ here] | |||
|- | |||
| style="text-align: center" | [[File:Skeleton_Warlord.png]] | |||
| style="text-align: left; width: 195px" | [[Skeleton Warlord Hell]] | |||
| style="text-align: left; width: 69px" | [[File:Skeleton_Warlord.png|link=Skeleton Warlord]] [[File:Undead_Titan.png|link=Undead Titan]] [[File:Skeleton_Mage.png|link=Skeleton Mage]] | |||
| style="text-align: left; width: 58px" | [https://i.gyazo.com/19b01e0b1cd4d5817e2af8cf2683af62.png here] | |||
|- | |||
| style="text-align: center" | [[File:Gorgon.png]] | |||
| style="text-align: left; width: 195px" | [[Sheol Gorgon Spawn]] | |||
| style="text-align: left; width: 69px" | [[File:Gorgon.png|link=Gorgon]] | |||
| style="text-align: left; width: 58px" | [ here] | |||
|- | |||
| style="text-align: center" | [[File:Black_Widow.png]] | |||
| style="text-align: left; width: 195px" | [[Black Widow Nest]] | |||
| style="text-align: left; width: 69px" | [[File:Black_Widow.png|link=Black Widow]] | |||
| style="text-align: left; width: 58px" | [https://i.gyazo.com/bef40e1bc681d2f16adc0eb798c569f5.png here] | |||
|- | |||
| style="text-align: center" | [[File:Blasphemer.png]] | |||
| style="text-align: left; width: 195px" | [[Sheol Elevator]] | |||
| style="text-align: left; width: 69px" | [[File:Blasphemer.png|link=Blasphemer]] [[File:Ashlord.png|link=Ashlord]] [[File:Black_Widow.png|link=Black Widow]] [[File:Deranger.png|link=Deranger]] | |||
| style="text-align: left; width: 58px" | [https://i.gyazo.com/0b5fecd979aaff1db93717274a918805.png here] | |||
|- | |||
| style="text-align: center" | [[File:Blood_Witch.png]] | |||
| style="text-align: left; width: 195px" | [[North Blood Witch Spawn]] | |||
| style="text-align: left; width: 69px" | [[File:Blood_Witch.png|link=Blood Witch]] [[File:Chaos_Fiend.png|link=Chaos Fiend]] [[File:Black_Widow.png|link=Black Widow]] [[File:Animated_Blood.gif|link=Animated Blood]] [[File:Deranger.png|link=Deranger]] | |||
| style="text-align: left; width: 58px" | [https://i.gyazo.com/3c9eecb2aac688c2294c402638eac0e0.png here] | |||
|- | |||
| style="text-align: center" | [[File:Blood_Witch.png]] | |||
| style="text-align: left; width: 195px" | [[South Blood Witch Spawn]] | |||
| style="text-align: left; width: 69px" | [[File:Blood_Witch.png|link=Blood Witch]] [[File:Chaos_Fiend.png|link=Chaos Fiend]] [[File:Deranger.png|link=Deranger]] [[File:Animated_Blood.gif|link=Animated Blood]] | |||
| style="text-align: left; width: 58px" | [https://i.gyazo.com/08d6aebee50eb4f35af09abd3d5c6742.png here] | |||
|- | |||
| style="text-align: center" | [[File:Blasphemer.png]] | |||
| style="text-align: left; width: 195px" | [[Torem's Court]] | |||
| style="text-align: left; width: 69px" | [[File:Blasphemer.png|link=Blasphemer]] [[File:Cursed_Skull_(Creature).gif|link=Cursed Skull (Creature)]] [[File:Soulless.png|link=Soulless]] [[File:Bedsore.png|link=Bedsore]] [[File:Incidamus.png|link=Incidamus]] [[File:Ashlord.png|link=Ashlord]] [[File:Corruptor.png|link=Corruptor]] | |||
| style="text-align: left; width: 58px" | [https://i.gyazo.com/2c3f1d05a7dadd5caeef3fe3339723b8.png here] | |||
|- | |||
| style="text-align: center" | [[File:Ashlord.png]] | |||
| style="text-align: left; width: 195px" | [[Ashlord Volcano]] | |||
| style="text-align: left; width: 69px" | [[File:Ashlord.png|link=Ashlord]] [[File:Cerberus.png|link=Cerberus]] [[File:Giant_Fire_Elemental.gif|link=Giant Fire Elemental]] | |||
| style="text-align: left; width: 58px" | [https://i.gyazo.com/f3d6357697caa96e26b0ec404f274b5a.png here] | |||
|- | |||
| style="text-align: center" | [[File:Demorc.png]] | |||
| style="text-align: left; width: 195px" | [[Demorc Entrance Spawn]] | |||
| style="text-align: left; width: 69px" | [[File:Demorc.png|link=Demorc]] [[File:Demorc_Brute.png|link=Demorc Brute]] | |||
| style="text-align: left; width: 58px" | [https://i.gyazo.com/635232b9ca32d13e3343aeeffd895928.png here] | |||
|- | |||
| style="text-align: center" | [[File:Demorc_Warchief.png]] | |||
| style="text-align: left; width: 195px" | [[Demorc Main Spawn]] | |||
| style="text-align: left; width: 69px" | [[File:Demorc.png|link=Demorc]] [[File:Demorc_Brute.png|link=Demorc Brute]] [[File:Demorc_Warchief.png|link=Demorc Warchief]] [[File:Huntsman_Spider.png|link=Huntsman Spider]] | |||
| style="text-align: left; width: 58px" | [https://i.gyazo.com/41e0914b267813d5664370e232a8d5ca.png here] | |||
|- | |||
| style="text-align: center" | [[File:Incidamus.png]] | |||
| style="text-align: left; width: 195px" | [[Drowner's Lake]] | |||
| style="text-align: left; width: 69px" | [[File:Incidamus.png|link=Incidamus]] [[File:Shade.png|link=Shade]] | |||
| style="text-align: left; width: 58px" | Check route from [[Drowner's Lake]] | |||
|- | |||
| style="text-align: center" | [[File:Deranger.png]] | |||
| style="text-align: left; width: 195px" | [[Deranger Cave]] | |||
| style="text-align: left; width: 69px" | [[File:Deranger.png|link=Deranger]] | |||
| style="text-align: left; width: 58px" | [ here] | |||
|- | |||
| style="text-align: center" | [[File:Incidamus.png]] | |||
| style="text-align: left; width: 195px" | [[Corruptor Hell Entrance]] | |||
| style="text-align: left; width: 69px" | [[File:Incidamus.png|link=Incidamus]] [[File:Ashlord.png|link=Ashlord]] [[File:Soulless.png|link=Soulless]] | |||
| style="text-align: left; width: 58px" | [https://i.gyazo.com/eb3488e957212ed476bb48c14f490058.png here] | |||
|- | |||
| style="text-align: center" | [[File:Corruptor.png]] | |||
| style="text-align: left; width: 195px" | [[Corruptor Hell]] | |||
| style="text-align: left; width: 69px" | [[File:Corruptor.png|link=Corruptor]] [[File:Ashlord.png|link=Ashlord]] [[File:Nightmare.png|link=Nightmare]] [[File:Shade.png|link=Shade]] | |||
| style="text-align: left; width: 58px" | [https://i.gyazo.com/3fe9012e342a498961c54d6c13de7e63.png here] | |||
|- | |||
| style="text-align: center" | [[File:Venerator.png]] | |||
| style="text-align: left; width: 195px" | [[Sheol Library]] | |||
| style="text-align: left; width: 69px" | [[File:Venerator.png|link=Venerator]] [[File:Bookwarden.png|link=Bookwarden]] [[File:Blasphemer.png|link=Blasphemer]] [[File:Cursed_Skull_(Creature).gif|link=Cursed Skull (Creature)]] | |||
| style="text-align: left; width: 58px" | [https://i.gyazo.com/73925bd69728e8b262a02502b2caabb7.png here] | |||
|- | |||
| style="text-align: center" | [[File:Shadow_Phoenix.png]] | |||
| style="text-align: left; width: 195px" | [[Shadow Phoenix Spawn]] | |||
| style="text-align: left; width: 69px" | [[File:Shadow_Phoenix.png|link=Shadow Phoenix]] | |||
| style="text-align: left; width: 58px" | [ here] | |||
|- | |||
| style="text-align: center" | [[File:Typhon.png]] | |||
| style="text-align: left; width: 195px" | [[Typhon Island]] | |||
| style="text-align: left; width: 69px" | [[File:Typhon.png|link=Typhon]] | |||
| style="text-align: left; width: 58px" | [ here] | |||
|- | |||
| style="text-align: center" | [[File:Typhon.png]] | |||
| style="text-align: left; width: 195px" | [[Triple Typhon Spawn]] | |||
| style="text-align: left; width: 69px" | [[File:Typhon.png|link=Typhon]] | |||
| style="text-align: left; width: 58px" | [https://i.gyazo.com/1b54f4b85ce552214fddf6a4b20e4894.png here] | |||
|- | |||
| style="text-align: center" | [[File:Cerberus.png]] | |||
| style="text-align: left; width: 195px" | [[Cerberus Hell]] | |||
| style="text-align: left; width: 69px" | [[File:Cerberus.png|link=Cerberus]] | |||
| style="text-align: left; width: 58px" | [https://i.gyazo.com/3b06a928e0ced68ec60d6575210b39b6.png here] | |||
|- | |||
| style="text-align: center" | [[File:Flamebringer.png]] | |||
| style="text-align: left; width: 195px" | [[Flamebringer Hell]] | |||
| style="text-align: left; width: 69px" | [[File:Flamebringer.png|link=Flamebringer]] [[File:Succubus.png|link=Succubus]] [[File:Cerberus.png|link=Cerberus]] [[File:Hellion.png|link=Hellion]] | |||
| style="text-align: left; width: 58px" | [https://i.gyazo.com/74ba150c4f5a3fb18f1444bf6f39cf2a.png here] | |||
|- | |||
| style="text-align: center" | [[File:Dreadlord.png]] | |||
| style="text-align: left; width: 195px" | [[Triple Dreadlord Spawn]] | |||
| style="text-align: left; width: 69px" | [[File:Dreadlord.png|link=Dreadlord]] [[File:Giant_Fire_Elemental.gif|link=Giant Fire Elemental]] | |||
| style="text-align: left; width: 58px" | [https://i.gyazo.com/f85c86ad2054502cb086d5b7fefe51a6.png here] | |||
|- | |||
| style="text-align: center" | [[File:Dreadlord.png]] | |||
| style="text-align: left; width: 195px" | [[Dreadlord Citadel]] | |||
| style="text-align: left; width: 69px" | [[File:Dreadlord.png|link=Dreadlord]] | |||
| style="text-align: left; width: 58px" | [ here] | |||
|- | |||
| style="text-align: center" | [[File:Chaos_Hydra.png]] | |||
| style="text-align: left; width: 195px" | [[Chaos Hydra Lair]] | |||
| style="text-align: left; width: 69px" | [[File:Chaos_Hydra.png|link=Chaos Hydra]] [[File:Blasphemer.png|link=Blasphemer]] [[File:Soulless.png|link=Soulless]] | |||
| style="text-align: left; width: 58px" | [https://i.gyazo.com/589ad0146e07ba950f6ead34e1c8493d.png here] | |||
|} | |||
<br><br> | <br><br> | ||
<div style="text-align:center">< | <div style="text-align:center"><h1>'''Sheol Creatures'''</h1></div> | ||
{| class="wikitable sortable" | {| class="wikitable sortable" | ||
|- | |- | ||
! '''Image:''' | ! style="text-align: left; width: 25%" | '''Image:''' | ||
! '''Name:''' | ! style="text-align: left; width: 25%" | '''Name:''' | ||
! '''Experience:''' | ! style="text-align: left; width: 25%" | '''Experience:''' | ||
! '''Hitpoints:''' | ! style="text-align: left; width: 25%" | '''Hitpoints:''' | ||
|- | |||
| style="text-align: center" | [[File:Possessed Chicken.png]] | |||
| style="text-align: left; width: 195px" | [[Possessed Chicken]] | |||
| style="text-align: center; width: 69px" | ? <small>Exp</small> | |||
| style="text-align: center; width: 58px" | ? <small>HP</small> | |||
|- | |||
| style="text-align: center" | [[File:Plagueworm.png]] | |||
| style="text-align: left; width: 195px" | [[Plagueworm]] | |||
| style="text-align: center; width: 69px" | 0 <small>Exp</small> | |||
| style="text-align: center; width: 58px" | 1000 <small>HP</small> | |||
|- | |||
| style="text-align: center" | [[File:Armored Skeleton.png]] | |||
| style="text-align: left; width: 195px" | [[Armored Skeleton]] | |||
| style="text-align: center; width: 69px" | 70 <small>Exp</small> | |||
| style="text-align: center; width: 58px" | 50 <small>HP</small> | |||
|- | |||
| style="text-align: center" | [[File:Grey Ghost.gif]] | |||
| style="text-align: left; width: 195px" | [[Ghost (Grey)|Ghost]] | |||
| style="text-align: center; width: 69px" | 240 <small>Exp</small> | |||
| style="text-align: center; width: 58px" | 150 <small>HP</small> | |||
|- | |||
| style="text-align: center" | [[File:Hellish Skeleton.png]] | |||
| style="text-align: left; width: 195px" | [[Hellish Skeleton]] | |||
| style="text-align: center; width: 69px" | 360 <small>Exp</small> | |||
| style="text-align: center; width: 58px" | 250 <small>HP</small> | |||
|- | |||
| style="text-align: center" | [[File:Armored Hellish Skeleton.png]] | |||
| style="text-align: left; width: 195px" | [[Armored Hellish Skeleton]] | |||
| style="text-align: center; width: 69px" | 500 <small>Exp</small> | |||
| style="text-align: center; width: 58px" | 380 <small>HP</small> | |||
|- | |||
| style="text-align: center" | [[File:Ash Imp.png]] | |||
| style="text-align: left; width: 195px" | [[Ash Imp]] | |||
| style="text-align: center; width: 69px" | 500 <small>Exp</small> | |||
| style="text-align: center; width: 58px" | 400 <small>HP</small> | |||
|- | |||
| style="text-align: center" | [[File:Swamp Leech.png]] | |||
| style="text-align: left; width: 195px" | [[Swamp Leech]] | |||
| style="text-align: center; width: 69px" | 580 <small>Exp</small> | |||
| style="text-align: center; width: 58px" | 375 <small>HP</small> | |||
|- | |||
| style="text-align: center" | [[File:Slime (Grey).gif]] | |||
| style="text-align: left; width: 195px" | [[Slime (Grey)|Slime]] | |||
| style="text-align: center; width: 69px" | 620 <small>Exp</small> | |||
| style="text-align: center; width: 58px" | 450 <small>HP</small> | |||
|- | |||
| style="text-align: center" | [[File:Blue Fungi2.png]] | |||
| style="text-align: left; width: 195px" | [[Blue Fungling]] | |||
| style="text-align: center; width: 69px" | 800 <small>Exp</small> | |||
| style="text-align: center; width: 58px" | 650 <small>HP</small> | |||
|- | |||
| style="text-align: center" | [[File:Skeleton Mage.png]] | |||
| style="text-align: left; width: 195px" | [[Skeleton Mage]] | |||
| style="text-align: center; width: 69px" | 1800 <small>Exp</small> | |||
| style="text-align: center; width: 58px" | 800 <small>HP</small> | |||
|- | |||
| style="text-align: center" | [[File:Soulless.png]] | |||
| style="text-align: left; width: 195px" | [[Soulless]] | |||
| style="text-align: center; width: 69px" | 2800 <small>Exp</small> | |||
| style="text-align: center; width: 58px" | 1850 <small>HP</small> | |||
|- | |||
| style="text-align: center" | [[File:Giant Fire Elemental.gif]] | |||
| style="text-align: left; width: 195px" | [[Hellfire]] | |||
| style="text-align: center; width: 69px" | 0 <small>Exp</small> | |||
| style="text-align: center; width: 58px" | 7600 <small>HP</small> | |||
|- | |||
| style="text-align: center" | [[File:Demorc.png]] | |||
| style="text-align: left; width: 195px" | [[Demorc]] | |||
| style="text-align: center; width: 69px" | 6400 <small>Exp</small> | |||
| style="text-align: center; width: 58px" | 6300 <small>HP</small> | |||
|- | |- | ||
| style="text-align: center | | style="text-align: center" | [[File:Blue Fungi.png]] | ||
| style="text-align: left; width: 195px" | [[ | | style="text-align: left; width: 195px" | [[Blue Fungi]] | ||
| style="text-align: center; width: 69px" | | | style="text-align: center; width: 69px" | 6600 <small>Exp</small> | ||
| style="text-align: center; width: 58px" | | | style="text-align: center; width: 58px" | 4000 <small>HP</small> | ||
|- | |- | ||
| style="text-align: center" | [[File:Cursed Skull (Creature).gif]] | | style="text-align: center" | [[File:Cursed Skull (Creature).gif]] | ||
| style="text-align: left; width: 195px" | [[Cursed Skull (Creature)|Cursed Skull]] | | style="text-align: left; width: 195px" | [[Cursed Skull (Creature)|Cursed Skull]] | ||
| style="text-align: center; width: 69px" | | | style="text-align: center; width: 69px" | 7200 <small>Exp</small> | ||
| style="text-align: center; width: 58px" | | | style="text-align: center; width: 58px" | 6000 <small>HP</small> | ||
| style="text-align: center; width: | |- | ||
| style="text-align: center; width: | | style="text-align: center" | [[File:Hellion.png]] | ||
| style="text-align: left; width: 195px" | [[Hellion]] | |||
| style="text-align: center; width: 69px" | 7300 <small>Exp</small> | |||
| style="text-align: center; width: 58px" | 5650 <small>HP</small> | |||
|- | |||
| style="text-align: center" | [[File:Shade.png]] | |||
| style="text-align: left; width: 195px" | [[Shade]] | |||
| style="text-align: center; width: 69px" | 7700 <small>Exp</small> | |||
| style="text-align: center; width: 58px" | 6200 <small>HP</small> | |||
|- | |||
| style="text-align: center" | [[File:Deranger.png]] | |||
| style="text-align: left; width: 195px" | [[Deranger]] | |||
| style="text-align: center; width: 69px" | 8200 <small>Exp</small> | |||
| style="text-align: center; width: 58px" | 5750 <small>HP</small> | |||
|- | |||
| style="text-align: center" | [[File:Bedsore.png]] | |||
| style="text-align: left; width: 195px" | [[Bedsore]] | |||
| style="text-align: center; width: 69px" | 8800 <small>Exp</small> | |||
| style="text-align: center; width: 58px" | 5800 <small>HP</small> | |||
|- | |- | ||
| style="text-align: center" | [[File:Black Widow.png]] | | style="text-align: center" | [[File:Black Widow.png]] | ||
| style="text-align: left; width: 195px" | [[Black Widow]] | | style="text-align: left; width: 195px" | [[Black Widow]] | ||
| style="text-align: center; width: 69px" | | | style="text-align: center; width: 69px" | 9600 <small>Exp</small> | ||
| style="text-align: center; width: 58px" | ? <small>HP</small> | | style="text-align: center; width: 58px" | ? <small>HP</small> | ||
| style="text-align: center; width: | |- | ||
| style="text-align: center; width: | | style="text-align: center" | [[File:Skeleton Warlord.png]] | ||
| style="text-align: left; width: 195px" | [[Skeleton Warlord]] | |||
| style="text-align: center; width: 69px" | 10300 <small>Exp</small> | |||
| style="text-align: center; width: 58px" | 7300 <small>HP</small> | |||
|- | |||
| style="text-align: center; height: 75px" | [[File:Bookwarden.png]] | |||
| style="text-align: left; width: 195px" | [[Bookwarden]] | |||
| style="text-align: center; width: 69px" | 11720 <small>Exp</small> | |||
| style="text-align: center; width: 58px" | 9800 <small>HP</small> | |||
|- | |||
| style="text-align: center" | [[File:Demorc Brute.png]] | |||
| style="text-align: left; width: 195px" | [[Demorc Brute]] | |||
| style="text-align: center; width: 69px" | 12000 <small>Exp</small> | |||
| style="text-align: center; width: 58px" | 10800 <small>HP</small> | |||
|- | |- | ||
| style="text-align: center" | [[File:Blood Witch.png]] | | style="text-align: center" | [[File:Blood Witch.png]] | ||
| style="text-align: left; width: 195px" | [[Blood Witch]] | | style="text-align: left; width: 195px" | [[Blood Witch]] | ||
| style="text-align: center; width: 69px" | | | style="text-align: center; width: 69px" | 13000 <small>Exp</small> | ||
| style="text-align: center; width: 58px" | | | style="text-align: center; width: 58px" | 9400 <small>HP</small> | ||
|- | |- | ||
| style="text-align: center" | [[File:Cerberus.png]] | | style="text-align: center" | [[File:Cerberus.png]] | ||
| style="text-align: left; width: 195px" | [[Cerberus]] | | style="text-align: left; width: 195px" | [[Cerberus]] | ||
| style="text-align: center; width: 69px" | | | style="text-align: center; width: 69px" | 14600 <small>Exp</small> | ||
| style="text-align: center; width: 58px" | | | style="text-align: center; width: 58px" | 12200 <small>HP</small> | ||
| style="text-align: center; width: | |- | ||
| style="text-align: center; width: | | style="text-align: center; height: 75px" | [[File:Blasphemer.png]] | ||
| style="text-align: left; width: 195px" | [[Blasphemer]] | |||
| style="text-align: center; width: 69px" | 16400 <small>Exp</small> | |||
| style="text-align: center; width: 58px" | 12000 <small>HP</small> | |||
|- | |||
| style="text-align: center" | [[File:Succubus.png]] | |||
| style="text-align: left; width: 195px" | [[Succubus]] | |||
| style="text-align: center; width: 69px" | 19600 <small>Exp</small> | |||
| style="text-align: center; width: 58px" | 18000 <small>HP</small> | |||
|- | |||
| style="text-align: center; height: 75px" | [[File:Ashlord.png]] | |||
| style="text-align: left; width: 195px" | [[Ashlord]] | |||
| style="text-align: center; width: 69px" | 21300 <small>Exp</small> | |||
| style="text-align: center; width: 58px" | 14800 <small>HP</small> | |||
|- | |||
| style="text-align: center" | [[File:Demorc Warchief.png]] | |||
| style="text-align: left; width: 195px" | [[Demorc Warchief]] | |||
| style="text-align: center; width: 69px" | 22000 <small>Exp</small> | |||
| style="text-align: center; width: 58px" | 15515 <small>HP</small> | |||
|- | |||
| style="text-align: center" | [[File:Venerator.png]] | |||
| style="text-align: left; width: 195px" | [[Venerator]] | |||
| style="text-align: center; width: 69px" | 24510 <small>Exp</small> | |||
| style="text-align: center; width: 58px" | 16750 <small>HP</small> | |||
|- | |||
| style="text-align: center" | [[File:Zarguth.png]] | |||
| style="text-align: left; width: 195px" | [[Incidamus]] | |||
| style="text-align: center; width: 69px" | 28500 <small>Exp</small> | |||
| style="text-align: center; width: 58px" | 18600 <small>HP</small> | |||
|- | |||
| style="text-align: center" | [[File:Flamebringer.png]] | |||
| style="text-align: left; width: 195px" | [[Flamebringer]] | |||
| style="text-align: center; width: 69px" | 33600 <small>Exp</small> | |||
| style="text-align: center; width: 58px" | 28000 <small>HP</small> | |||
|- | |||
| style="text-align: center" | [[File:Typhon.png]] | |||
| style="text-align: left; width: 195px" | [[Typhon]] | |||
| style="text-align: center; width: 69px" | 39900 <small>Exp</small> | |||
| style="text-align: center; width: 58px" | 31550 <small>HP</small> | |||
|- | |||
| style="text-align: center" | [[File:Shadow Phoenix.png]] | |||
| style="text-align: left; width: 195px" | [[Shadow Phoenix]] | |||
| style="text-align: center; width: 69px" | 40350 <small>Exp</small> | |||
| style="text-align: center; width: 58px" | 48000 <small>HP</small> | |||
|- | |||
| style="text-align: center" | [[File:Corruptor.png]] | |||
| style="text-align: left; width: 195px" | [[Corruptor]] | |||
| style="text-align: center; width: 69px" | 35700 <small>Exp</small> | |||
| style="text-align: center; width: 58px" | 33500 <small>HP</small> | |||
|- | |||
| style="text-align: center" | [[File:Thor'garak.png]] | |||
| style="text-align: left; width: 195px" | [[Dreadlord]] | |||
| style="text-align: center; width: 69px" | 47100 <small>Exp</small> | |||
| style="text-align: center; width: 58px" | 37000 <small>HP</small> | |||
|- | |- | ||
| style="text-align: center" | [[File:Chaos Hydra.png]] | | style="text-align: center" | [[File:Chaos Hydra.png]] | ||
| style="text-align: left; width: 195px" | [[Chaos Hydra]] | | style="text-align: left; width: 195px" | [[Chaos Hydra]] | ||
| style="text-align: center; width: 69px" | 170000 <small>Exp</small> | |||
| style="text-align: center; width: 58px" | 350000 <small>HP</small> | |||
|} | |||
<div style="text-align:center"><h2><big>'''Sheol Bosses'''</big></h2></div> | |||
{| class="wikitable sortable" | |||
|- | |||
! style="text-align: left; width: 25%" | '''Image:''' | |||
! style="text-align: left; width: 25%" | '''Name:''' | |||
! style="text-align: left; width: 25%" | '''Experience:''' | |||
! style="text-align: left; width: 25%" | '''Hitpoints:''' | |||
|- | |||
| style="text-align: center; height: 75px" | [[File:Zarguth.png]] | |||
| style="text-align: left; width: 195px" | [[Zarguth]] | |||
| style="text-align: center; width: 69px" | ? <small>Exp</small> | | style="text-align: center; width: 69px" | ? <small>Exp</small> | ||
| style="text-align: center; width: 58px" | ? <small>HP</small> | | style="text-align: center; width: 58px" | ? <small>HP</small> | ||
|- | |- | ||
| style="text-align: center" | [[File: | | style="text-align: center; height: 75px" | [[File:Flamebringer.png]] | ||
| style="text-align: left; width: 195px" | [[ | | style="text-align: left; width: 195px" | [[Belrekath]] | ||
| style="text-align: center; width: 69px" | ? <small>Exp</small> | | style="text-align: center; width: 69px" | ? <small>Exp</small> | ||
| style="text-align: center; width: 58px" | ? <small>HP</small> | | style="text-align: center; width: 58px" | ? <small>HP</small> | ||
|- | |- | ||
| style="text-align: center" | [[File: | | style="text-align: center; height: 75px" | [[File:Typhon.png]] | ||
| style="text-align: left; width: 195px" | [[ | | style="text-align: left; width: 195px" | [[Velranos]] | ||
| style="text-align: center; width: 69px" | ? <small>Exp</small> | | style="text-align: center; width: 69px" | ? <small>Exp</small> | ||
| style="text-align: center; width: 58px" | ? <small>HP</small> | | style="text-align: center; width: 58px" | ? <small>HP</small> | ||
|- | |- | ||
| style="text-align: center" | [[File: | | style="text-align: center; height: 75px" | [[File:Succubus.png]] | ||
| style="text-align: left; width: 195px" | [[ | | style="text-align: left; width: 195px" | [[Qyreva]] | ||
| style="text-align: center; width: 69px" | ? <small>Exp</small> | | style="text-align: center; width: 69px" | ? <small>Exp</small> | ||
| style="text-align: center; width: 58px" | ? <small>HP</small> | | style="text-align: center; width: 58px" | ? <small>HP</small> | ||
|- | |- | ||
| style="text-align: center" | [[File: | | style="text-align: center; height: 75px" | [[File:Zarguth.png]] | ||
| style="text-align: left; width: 195px" | [[ | | style="text-align: left; width: 195px" | [[Ozgalluch]] | ||
| style="text-align: center; width: 69px" | ? <small>Exp</small> | | style="text-align: center; width: 69px" | ? <small>Exp</small> | ||
| style="text-align: center; width: 58px" | ? <small>HP</small> | | style="text-align: center; width: 58px" | ? <small>HP</small> | ||
|- | |- | ||
| style="text-align: center" | [[File: | | style="text-align: center; height: 75px" | [[File:Corruptor.png]] | ||
| style="text-align: left; width: 195px" | [[ | | style="text-align: left; width: 195px" | [[Tagthoder]] | ||
| style="text-align: center; width: 69px" | ? <small>Exp</small> | | style="text-align: center; width: 69px" | ? <small>Exp</small> | ||
| style="text-align: center; width: 58px" | ? <small>HP</small> | | style="text-align: center; width: 58px" | ? <small>HP</small> | ||
|- | |- | ||
| style="text-align: center" | [[File: | | style="text-align: center; height: 75px" | [[File:Succubus.png]] | ||
| style="text-align: left; width: 195px" | [[ | | style="text-align: left; width: 195px" | [[Jaenira]] | ||
| style="text-align: center; width: 69px" | ? <small>Exp</small> | | style="text-align: center; width: 69px" | ? <small>Exp</small> | ||
| style="text-align: center; width: 58px" | ? <small>HP</small> | | style="text-align: center; width: 58px" | ? <small>HP</small> | ||
|- | |- | ||
| style="text-align: center" | [[File: | | style="text-align: center; height: 75px" | [[File:Blood Witch.png]] | ||
| style="text-align: left; width: 195px" | [[ | | style="text-align: left; width: 195px" | [[Delora Sanguis]] | ||
| style="text-align: center; width: 69px" | ? <small>Exp</small> | | style="text-align: center; width: 69px" | ? <small>Exp</small> | ||
| style="text-align: center; width: 58px" | ? <small>HP</small> | | style="text-align: center; width: 58px" | ? <small>HP</small> | ||
| style="text-align: center; width: | |} | ||
| style="text-align: center; | <br><br> | ||
<div style="text-align:center"><h1>'''Sheol NPCs'''</h1></div> | |||
{| class="wikitable sortable" | |||
|- | |||
! style="text-align: left; width: 33%" | '''Image:''' | |||
! style="text-align: left; width: 33%" | '''Name:''' | |||
! style="text-align: left; width: 33%" | '''Job:''' | |||
|- | |||
| style="text-align: center" | <div style="font-family: Tahoma; font-weight: normal; word-spacing: -2px; font-size: 11pt; color: #ff9448; text-align: center; text-shadow: #000 1px 0px 1px, #000 0px 0px 1px, #000 0px 0px 1px, #000 0px 0px 1px, #000 0px 0px 1px, #000 0px 0px 1px;text-align: center">Malran, the guard [[File:DemonicFactionIcon.png]]</div>[[File:AncientWatcher.png]] | |||
| style="text-align: left" | [[Malran, the guard]] | |||
| style="text-align: center" | Guard of Zarrith | |||
|- | |||
| style="text-align: center" | <div style="font-family: Tahoma; font-weight: normal; word-spacing: -2px; font-size: 11pt; color: #ff9448; text-align: center; text-shadow: #000 1px 0px 1px, #000 0px 0px 1px, #000 0px 0px 1px, #000 0px 0px 1px, #000 0px 0px 1px, #000 0px 0px 1px;text-align: center">Troggon, the guard [[File:DemonicFactionIcon.png]]</div>[[File:AncientWatcher.png]] | |||
| style="text-align: left" | [[Troggon, the guard]] | |||
| style="text-align: center" | Guard of Zarrith | |||
|- | |||
| style="text-align: center" | <div style="font-family: Tahoma; font-weight: normal; word-spacing: -2px; font-size: 11pt; color: #ff9448; text-align: center; text-shadow: #000 1px 0px 1px, #000 0px 0px 1px, #000 0px 0px 1px, #000 0px 0px 1px, #000 0px 0px 1px, #000 0px 0px 1px;text-align: center">Duganes, the guard [[File:DemonicFactionIcon.png]]</div>[[File:AncientWatcher.png]] | |||
| style="text-align: left" | [[Duganes, the guard]] | |||
| style="text-align: center" | Guard of Zarrith | |||
|- | |- | ||
| style="text-align: center" | [[File: | | style="text-align: center" | <div style="font-family: Tahoma; font-weight: normal; word-spacing: -2px; font-size: 11pt; color: #ff9448; text-align: center; text-shadow: #000 1px 0px 1px, #000 0px 0px 1px, #000 0px 0px 1px, #000 0px 0px 1px, #000 0px 0px 1px, #000 0px 0px 1px;text-align: center">Urgaris, the guard [[File:DemonicFactionIcon.png]]</div>[[File:AncientWatcher.png]] | ||
| style="text-align: left | | style="text-align: left" | [[Urgaris, the guard]] | ||
| style="text-align: center | | style="text-align: center" | Guard of Zarrith | ||
|- | |||
| style="text-align: | | style="text-align: center" | <div style="font-family: Tahoma; font-weight: normal; word-spacing: -2px; font-size: 11pt; color: #ff9448; text-align: center; text-shadow: #000 1px 0px 1px, #000 0px 0px 1px, #000 0px 0px 1px, #000 0px 0px 1px, #000 0px 0px 1px, #000 0px 0px 1px;text-align: center">Arbiter Kerrin [[File:DemonicFactionIcon.png]]</div>[[File:WhiteAncientWatcher.png]] | ||
| style="text-align: center | | style="text-align: left" | [[Arbiter Kerrin]] | ||
| style="text-align: center" | Arbiter, Watcher Resistance Leader | |||
|- | |- | ||
| style="text-align: center" | | | style="text-align: center" | <div style="font-family: Tahoma; font-weight: normal; word-spacing: -2px; font-size: 11pt; color: #ff9448; text-align: center; text-shadow: #000 1px 0px 1px, #000 0px 0px 1px, #000 0px 0px 1px, #000 0px 0px 1px, #000 0px 0px 1px, #000 0px 0px 1px;text-align: center">Drolgruth [[File:MerchantIcon.png]]</div>[[File:Drolgruth.png]] | ||
| style="text-align: left" | [[Drolgruth]] | |||
| style="text-align: center" | Rare Item Merchant | |||
| style="text-align: | |||
| style="text-align: center | |||
|- | |- | ||
| style="text-align: center" | | | style="text-align: center" | <div style="font-family: Tahoma; font-weight: normal; word-spacing: -2px; font-size: 11pt; color: #ff9448; text-align: center; text-shadow: #000 1px 0px 1px, #000 0px 0px 1px, #000 0px 0px 1px, #000 0px 0px 1px, #000 0px 0px 1px, #000 0px 0px 1px;text-align: center">Oarus</div>[[File:AncientWatcher.png]] | ||
| style="text-align: left" | [[Oarus]] | |||
| style="text-align: center" | ? | |||
| style="text-align: | |||
| style="text-align: center | |||
|- | |- | ||
| style="text-align: center" | | | style="text-align: center" | <div style="font-family: Tahoma; font-weight: normal; word-spacing: -2px; font-size: 11pt; color: #ff9448; text-align: center; text-shadow: #000 1px 0px 1px, #000 0px 0px 1px, #000 0px 0px 1px, #000 0px 0px 1px, #000 0px 0px 1px, #000 0px 0px 1px;text-align: center">Molgorth</div>[[File:Molgorth.png]] | ||
| style="text-align: left" | [[Molgorth]] | |||
| style="text-align: center" | ? | |||
| style="text-align: | |||
| style="text-align: center | |||
|} | |} | ||
Latest revision as of 20:46, 15 July 2024
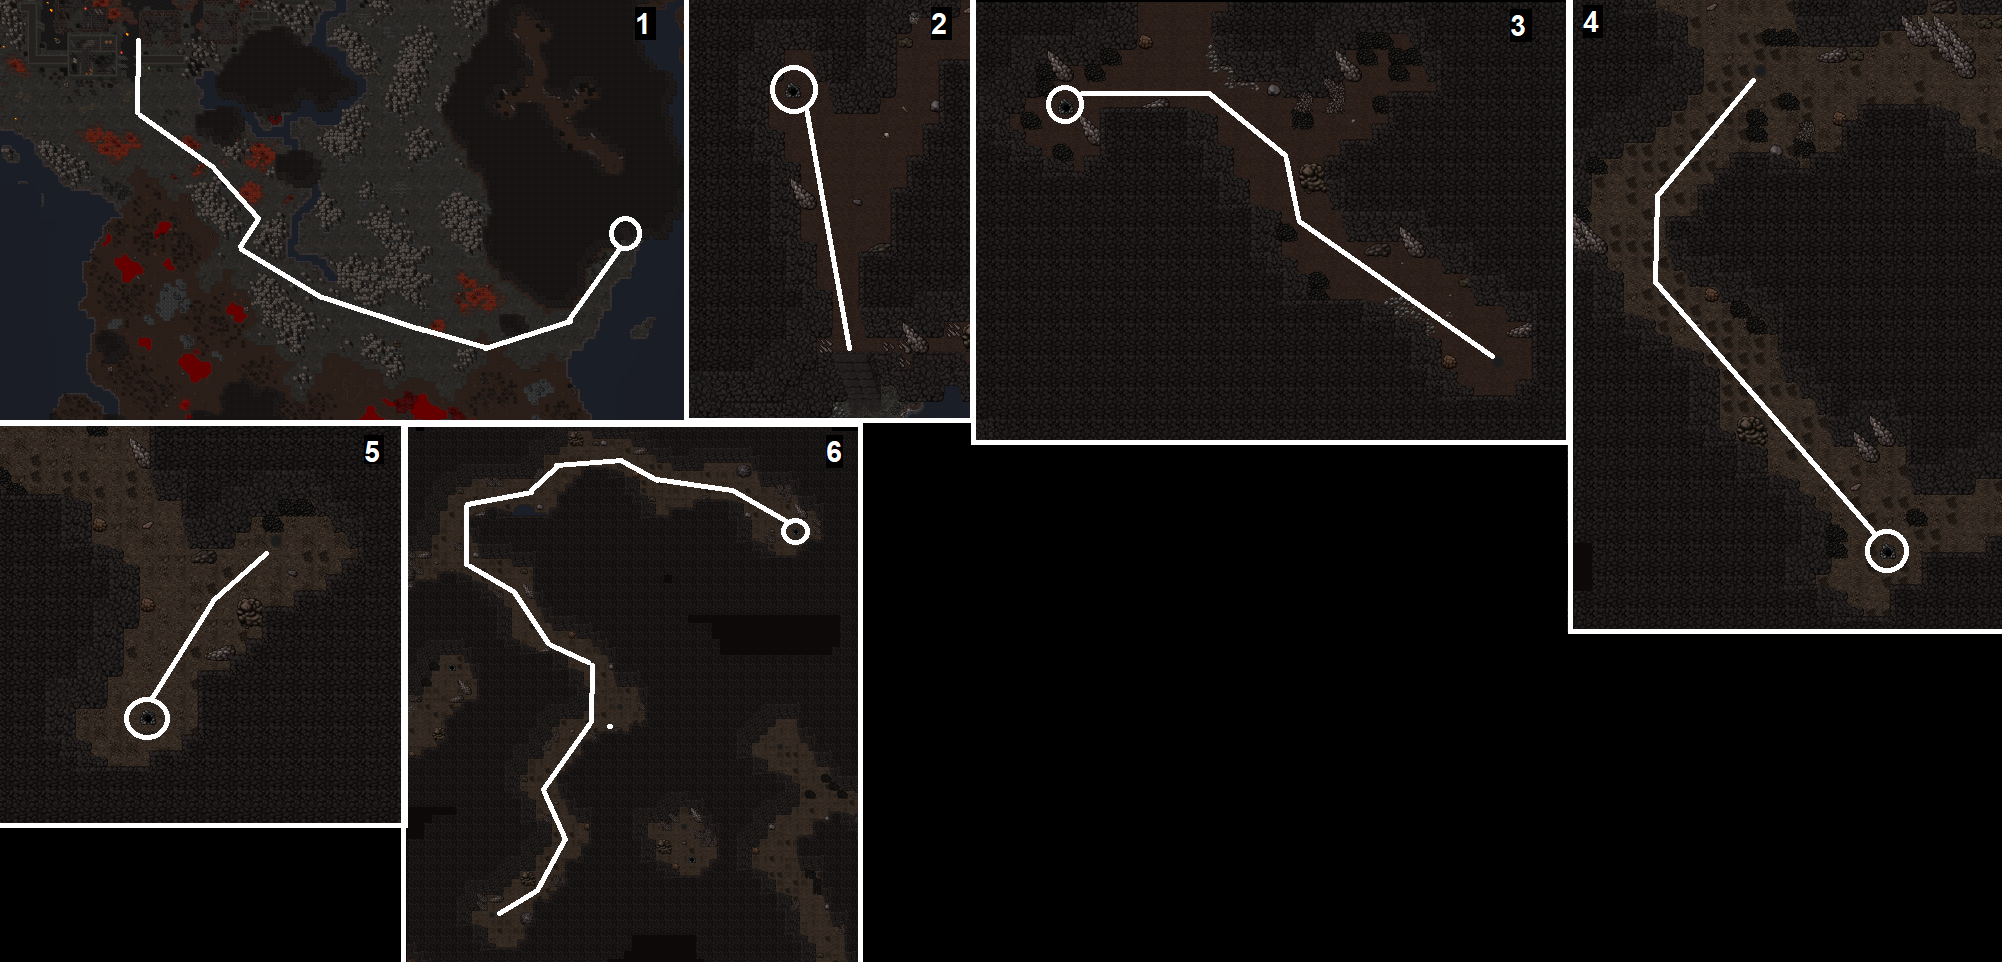
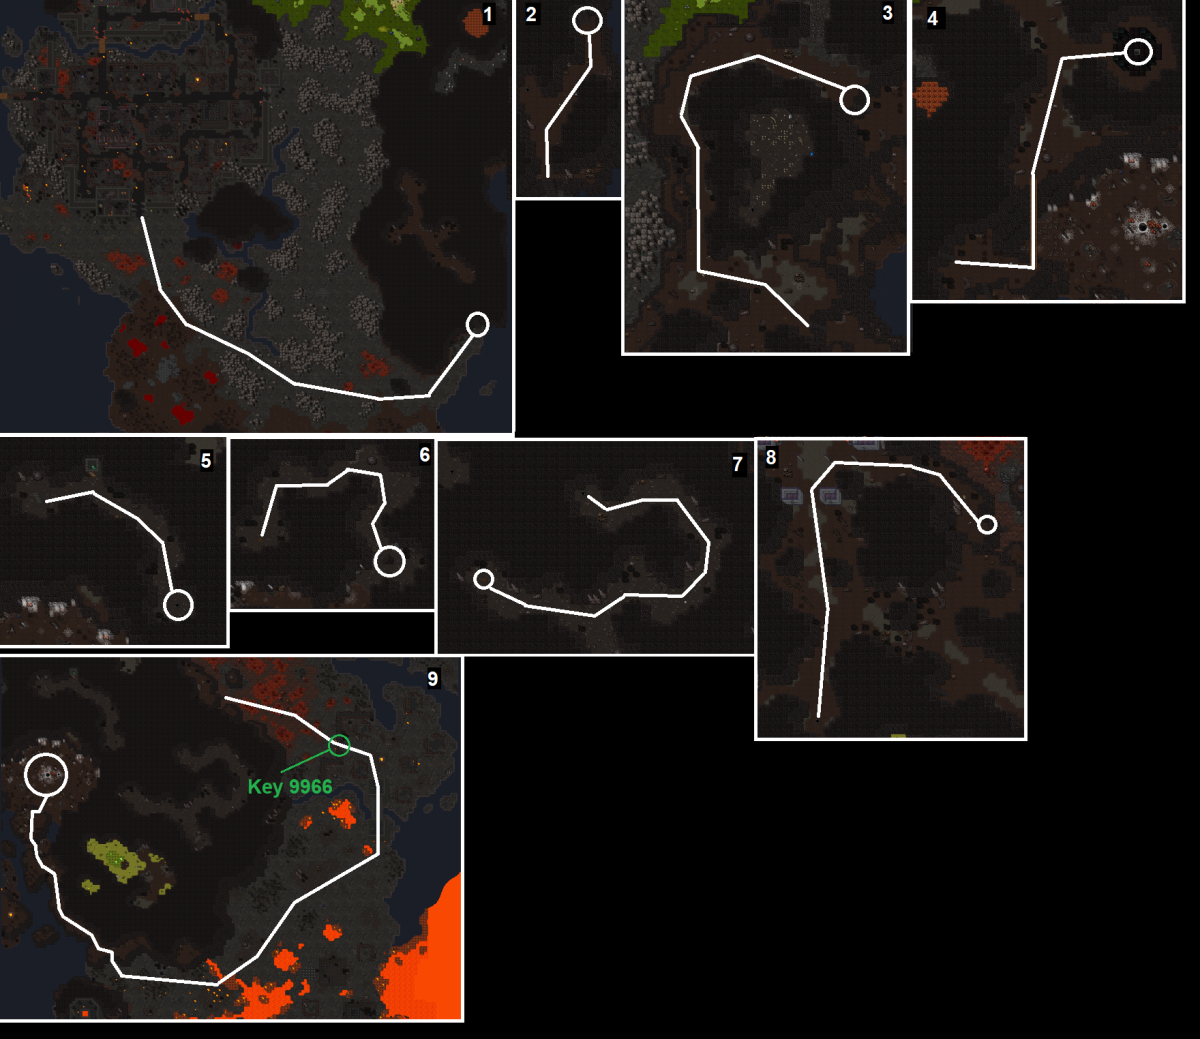
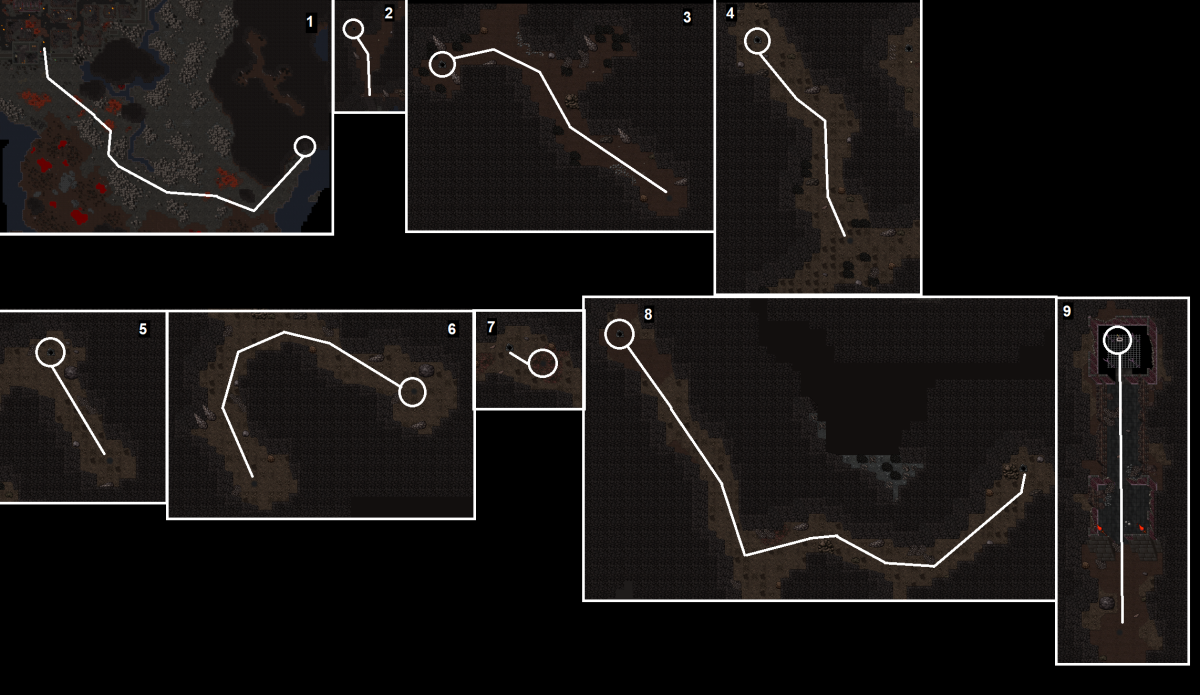
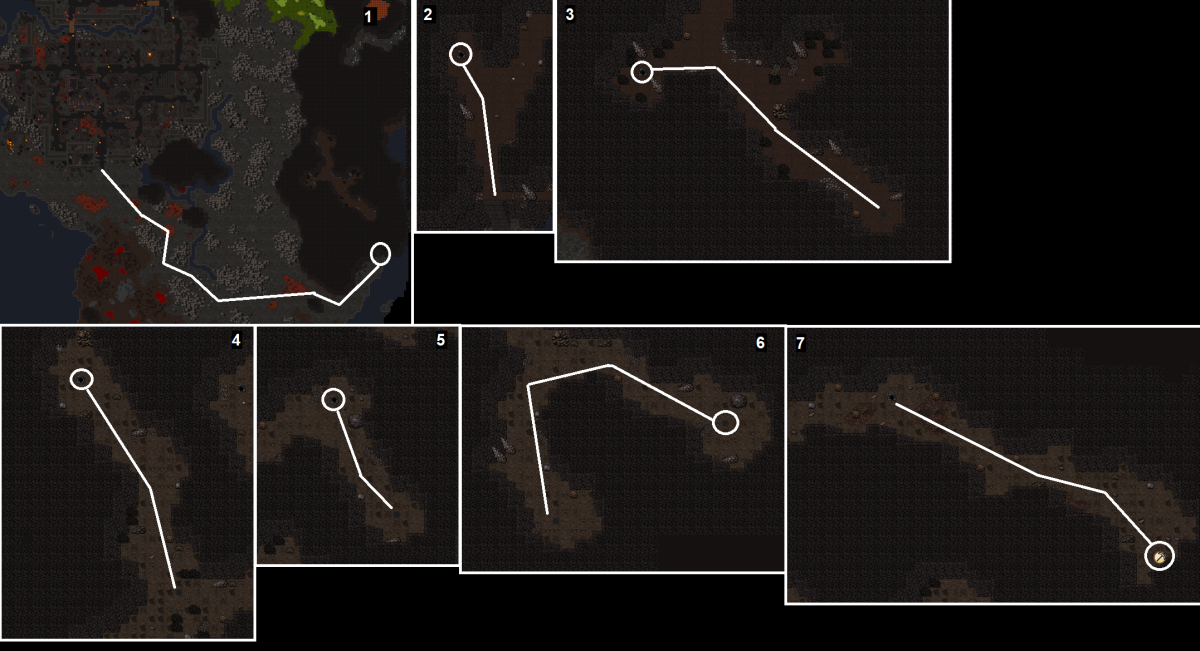
Sheol is known as the realm of demons, a world which they invaded, ripped apart and tore out of the hands of its original inhabitants, the watchers, thus causing their exodus into the world of Medivia. Now, the demonic hosts have their sights set on Medivia itself and are mustering their forces for an inevitable assault. Your task is to fight the scourge of Baalerun in the Demonic Faction.
|

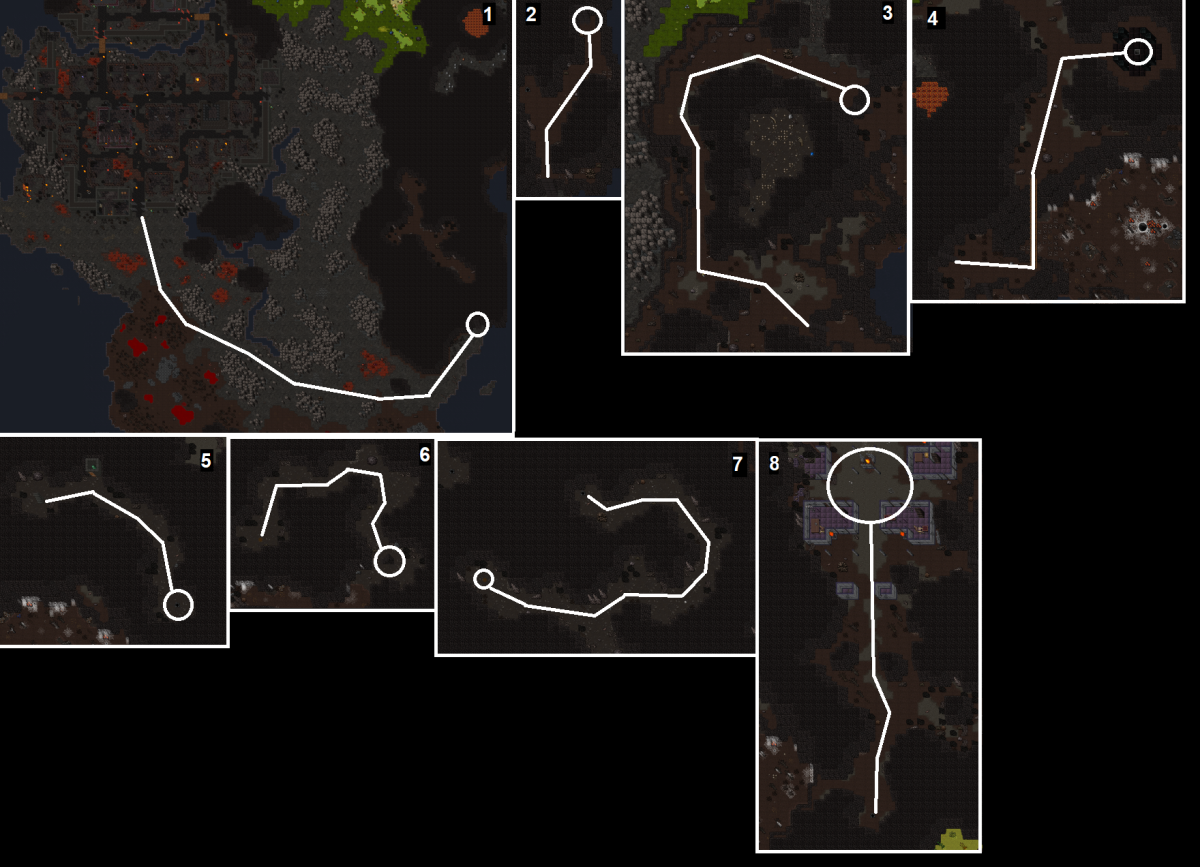
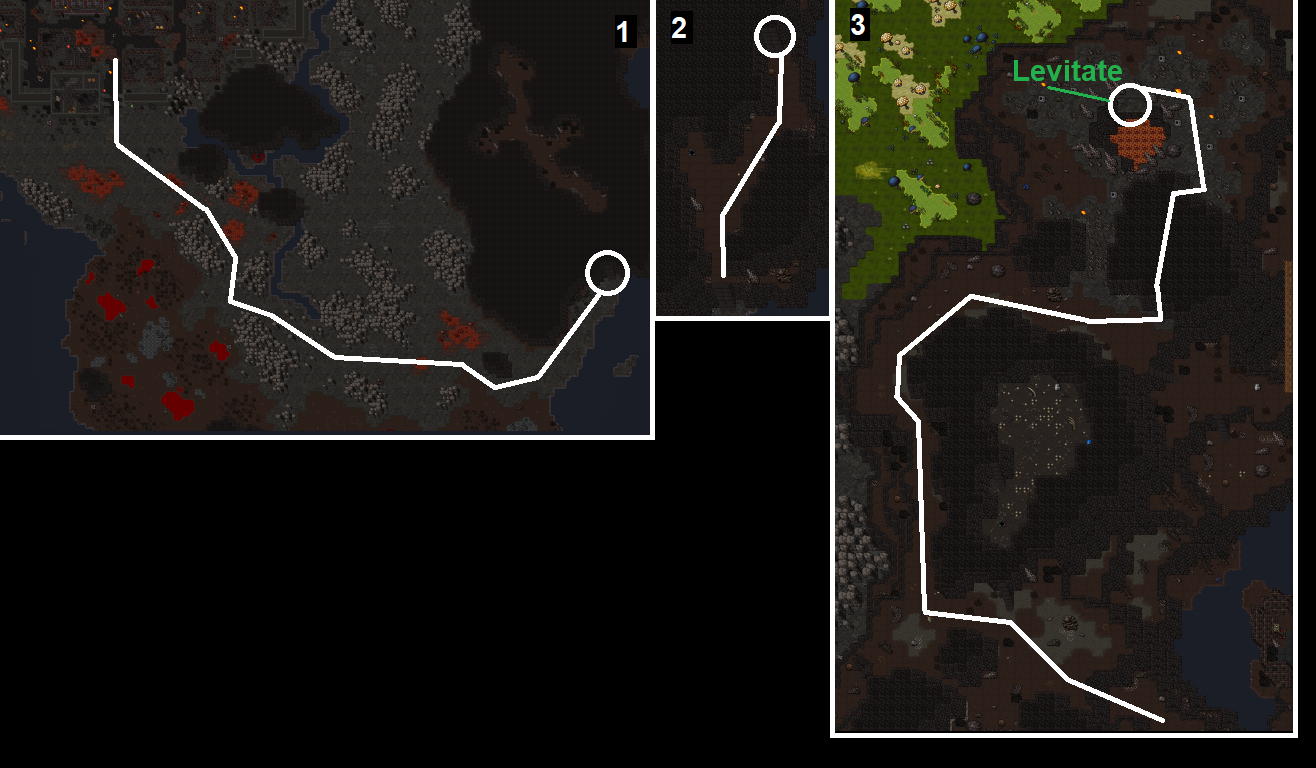
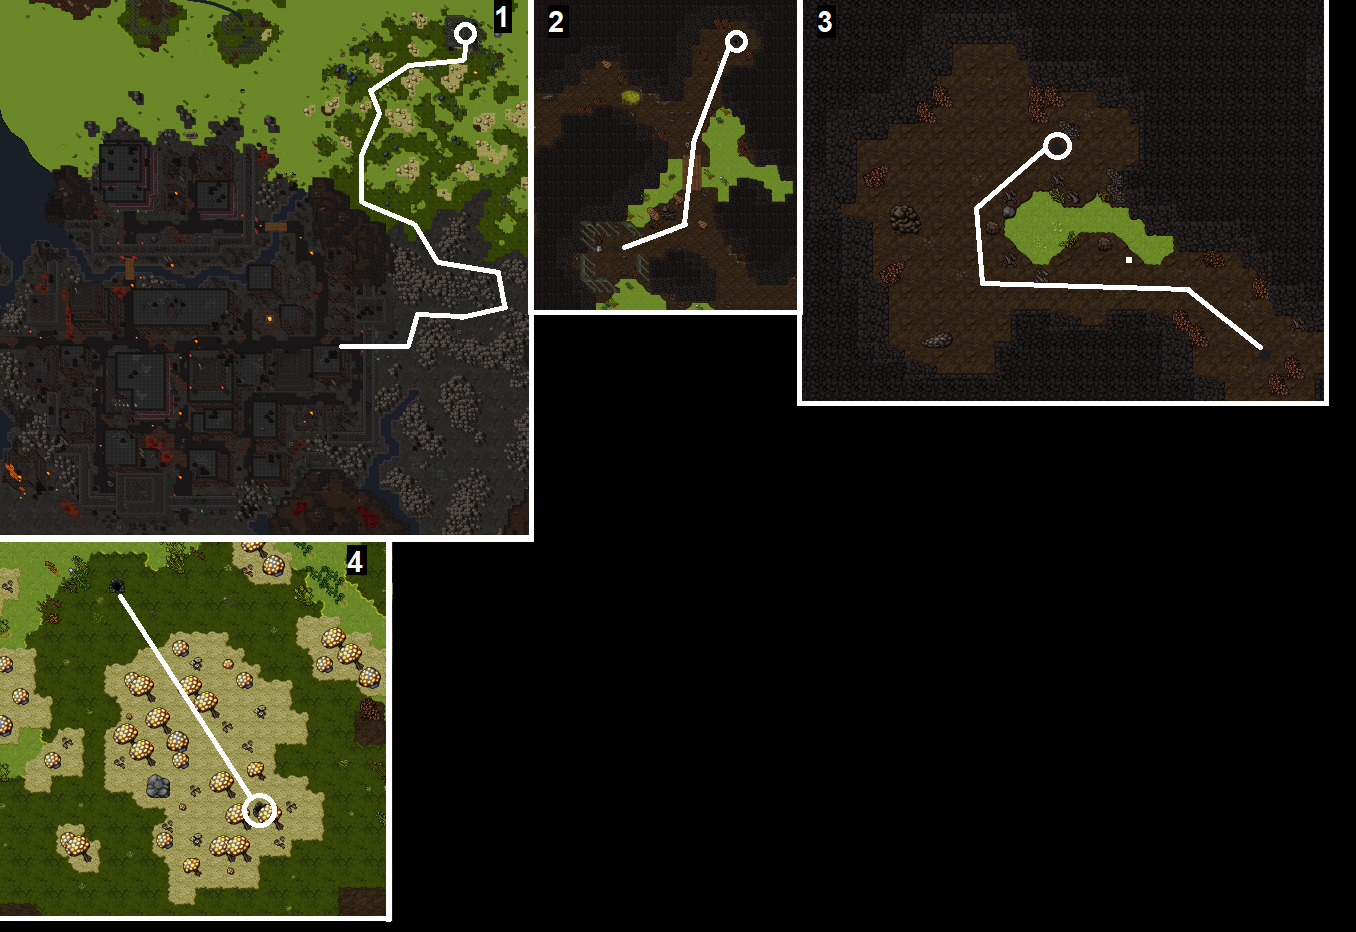
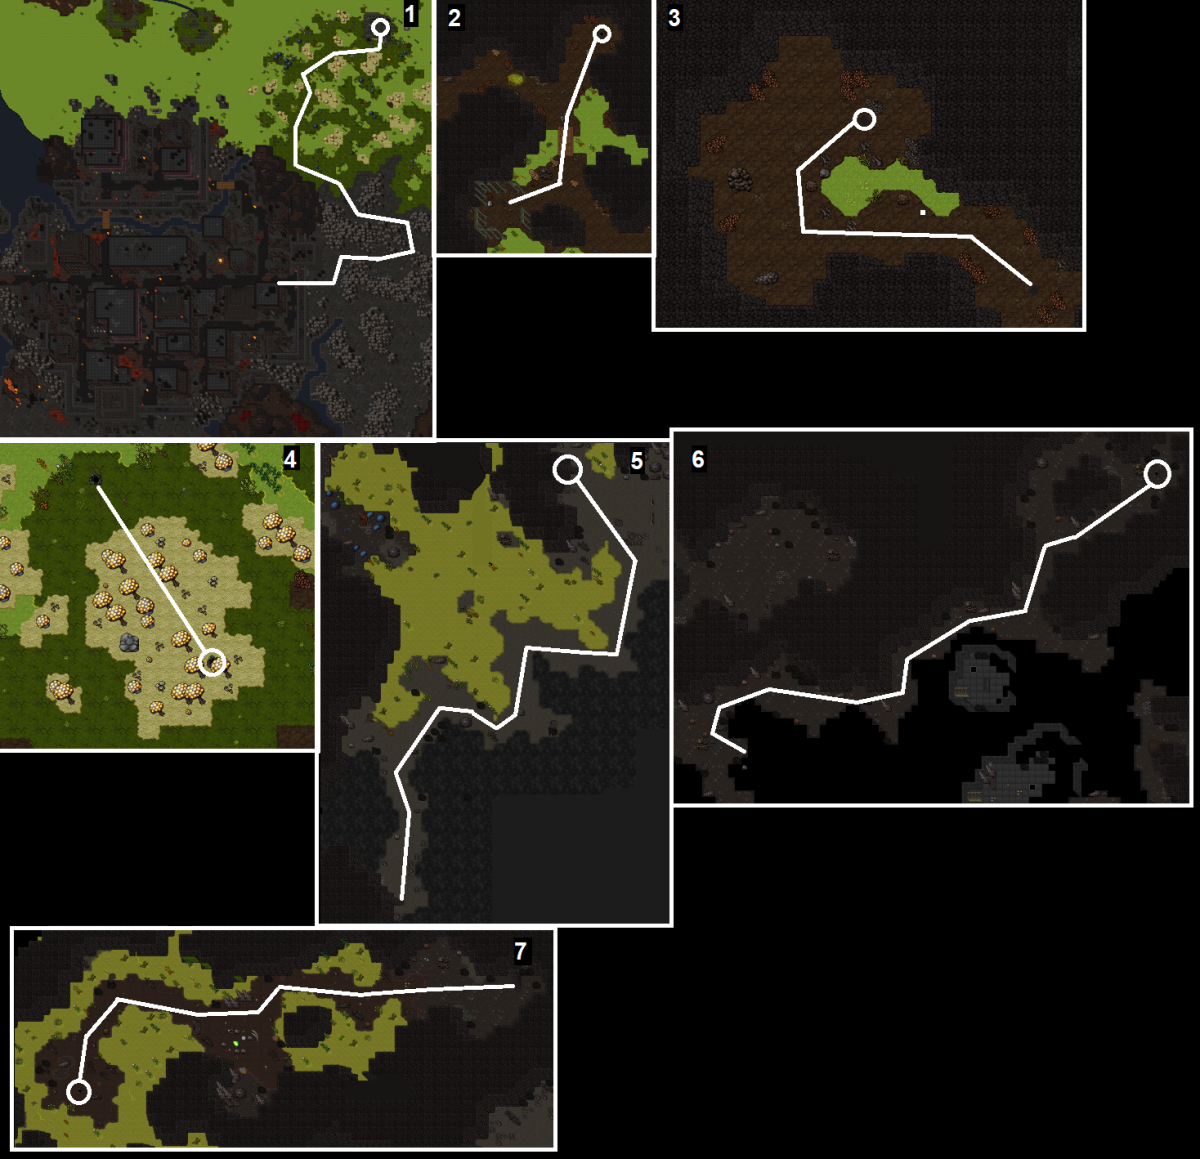
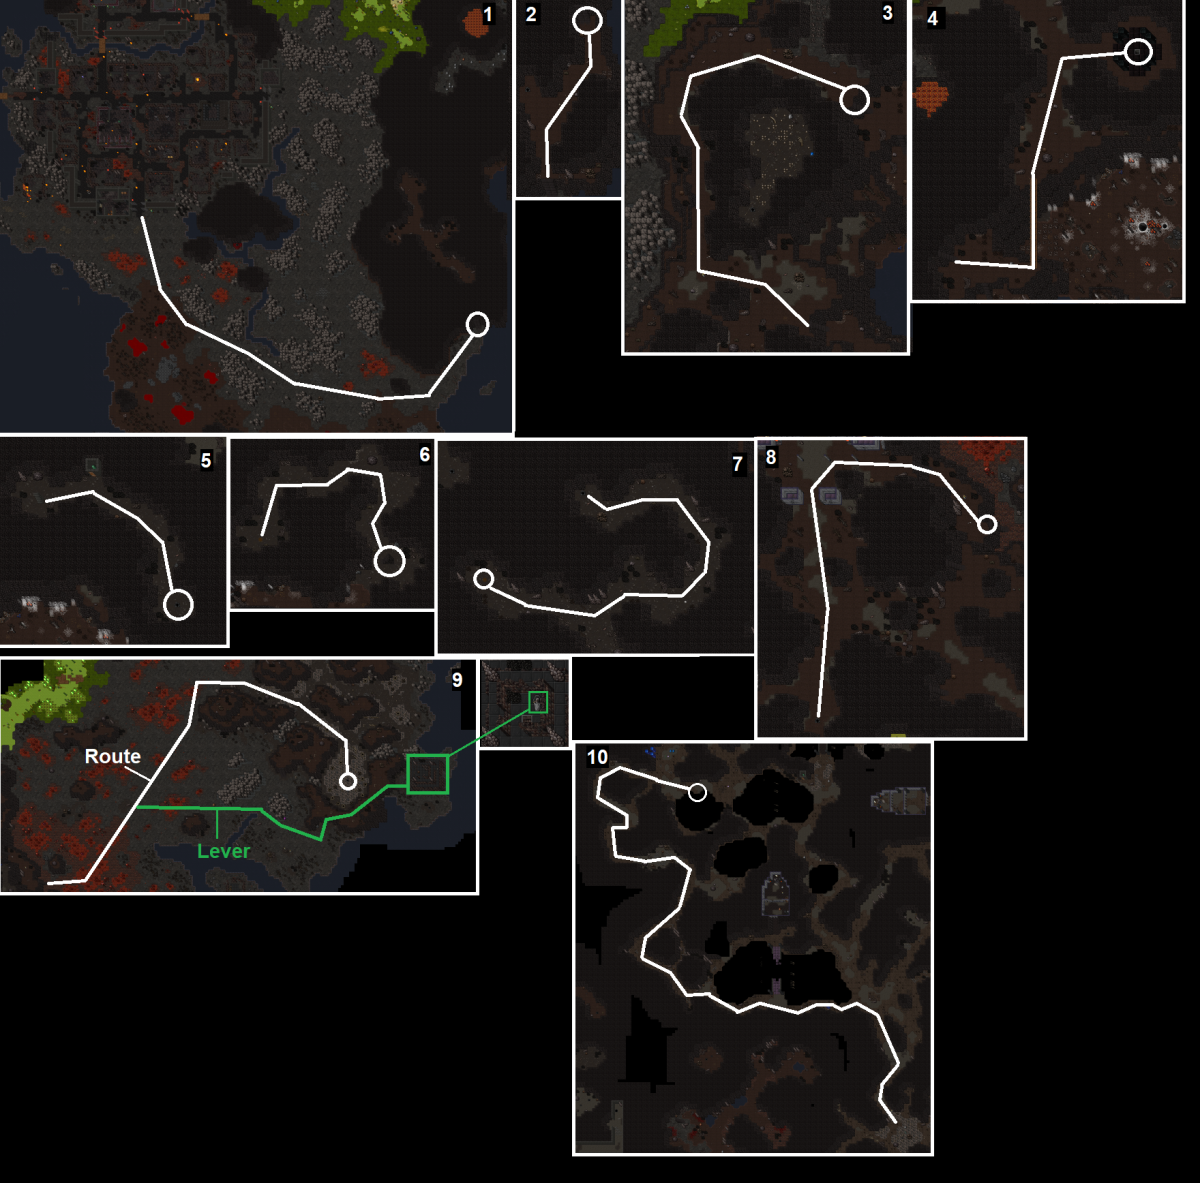
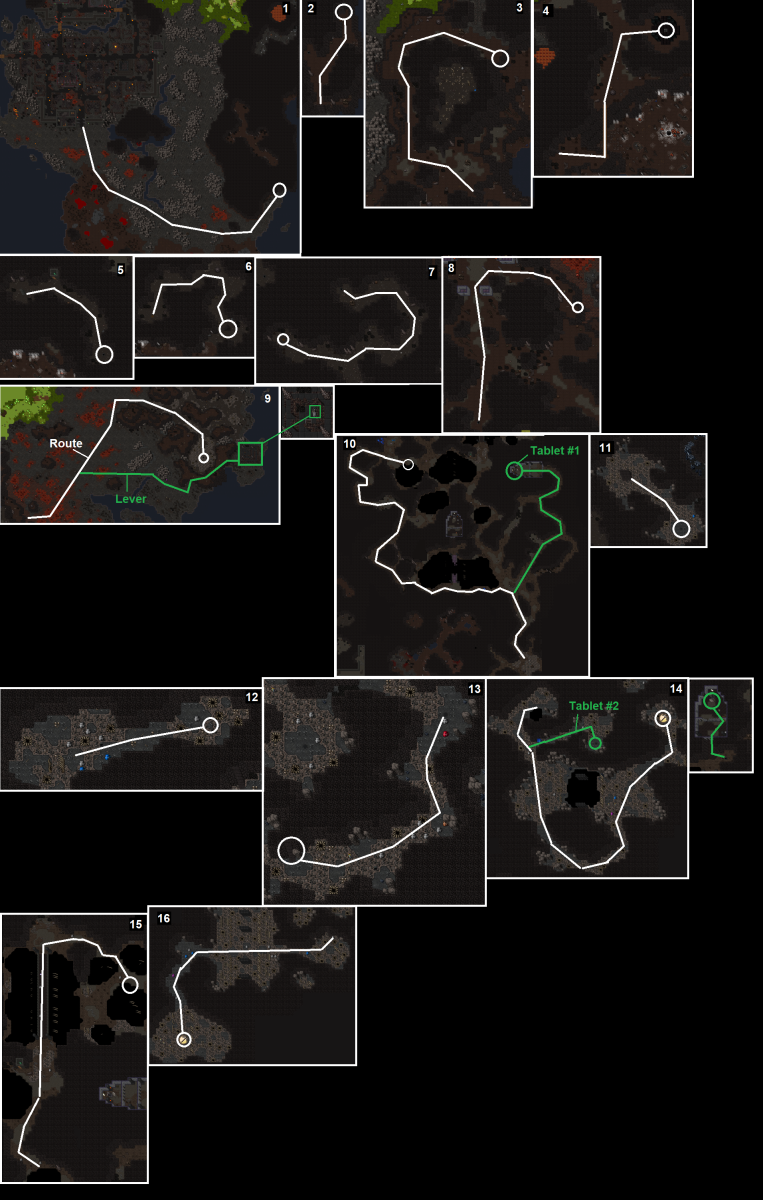
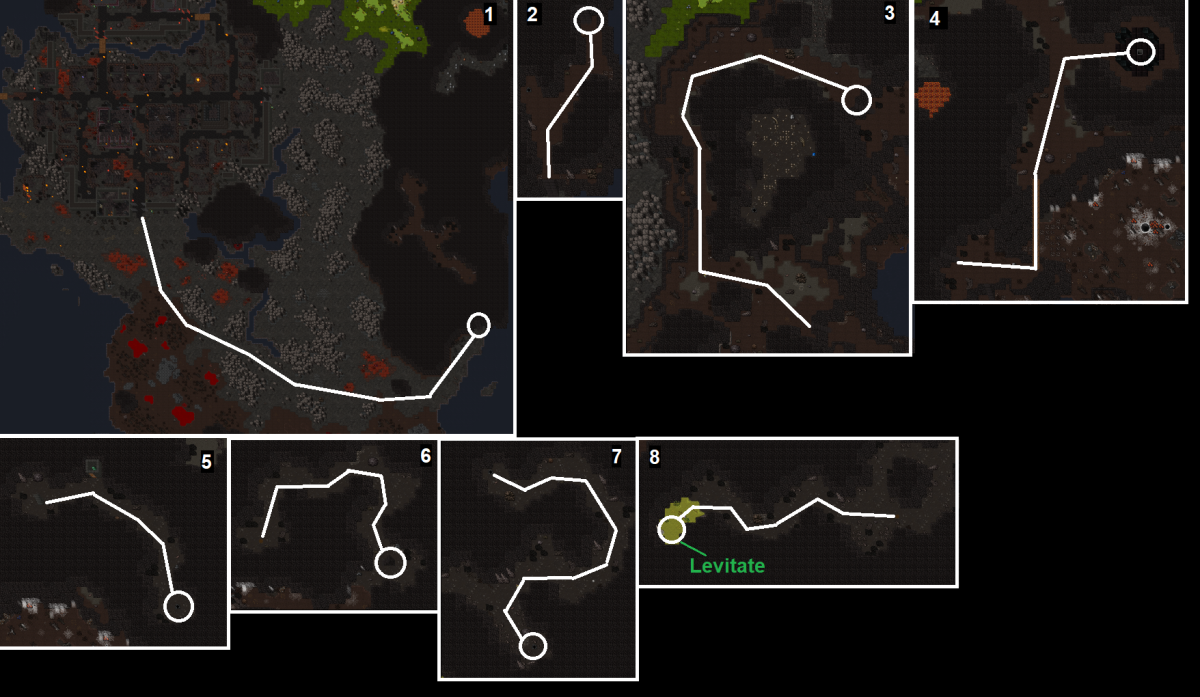
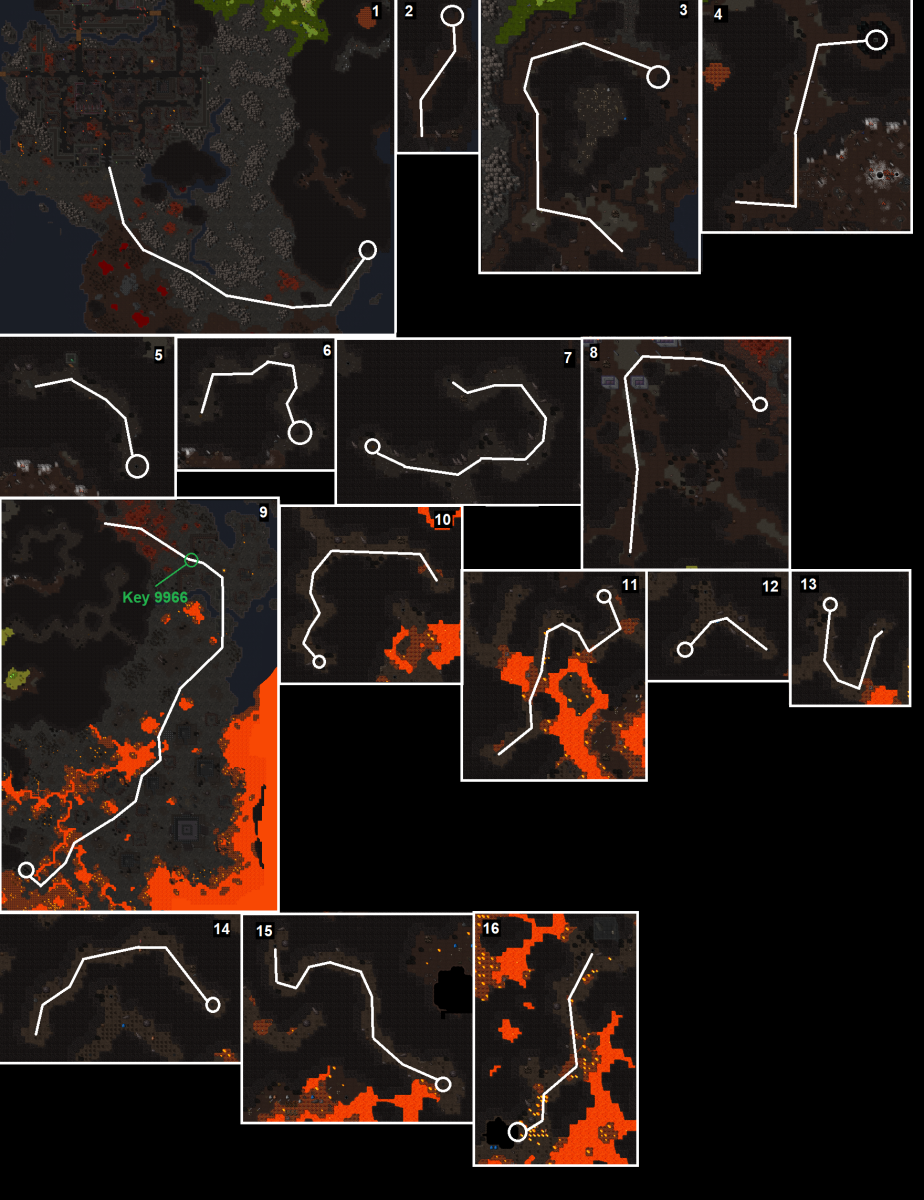
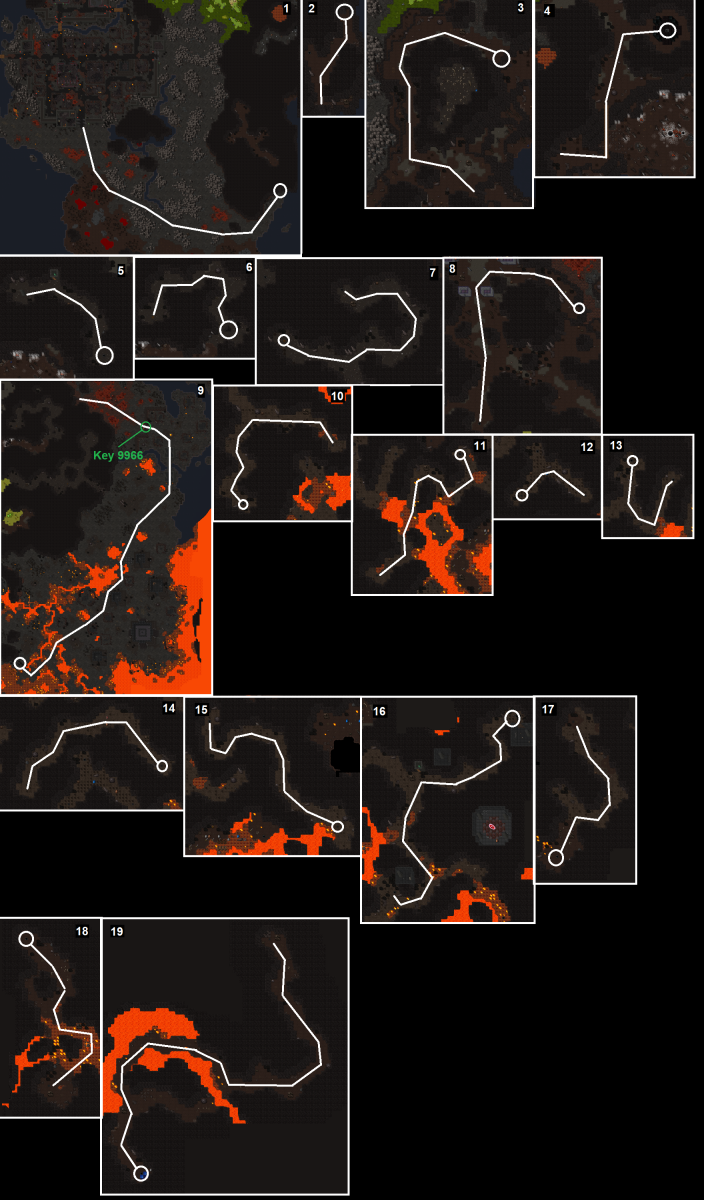
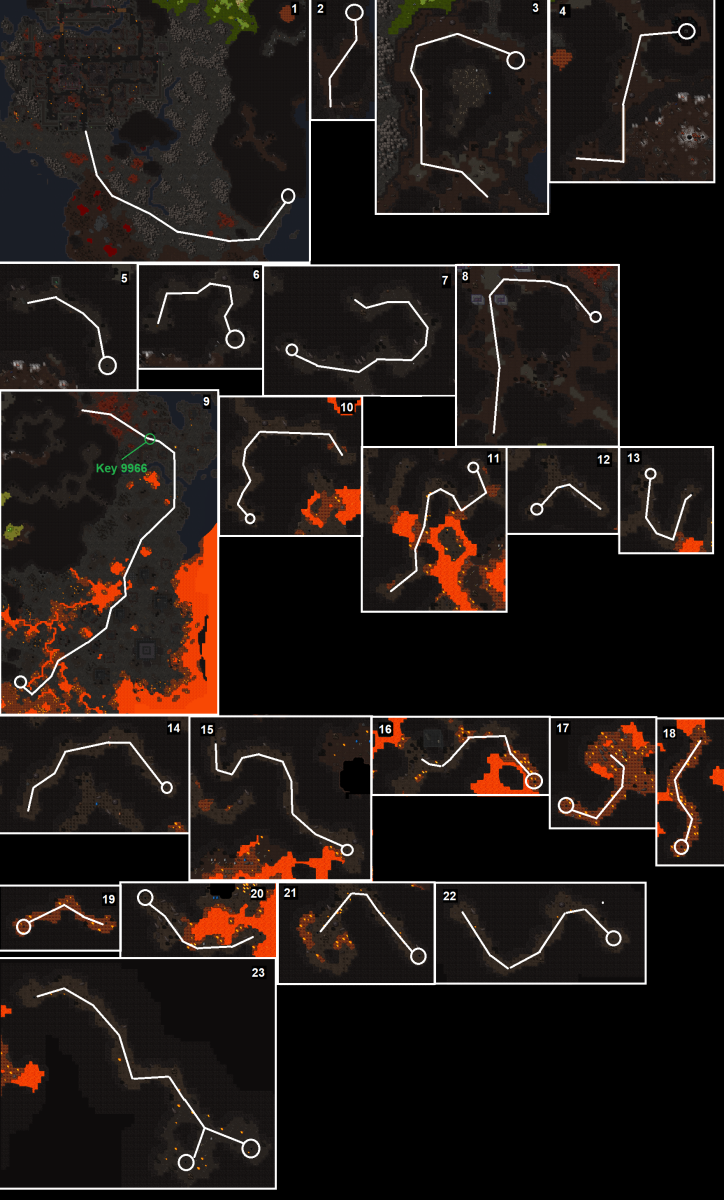
Sheol Hunting Places
| Image: | Name: | Creatures: | Location: |
|---|---|---|---|
| Fungi Spawn | [ here] | ||
| Bedsore Lair | [ here] | ||
| Skeleton Warlord Hell |  |
here | |
| Sheol Gorgon Spawn | [ here] | ||

|
Black Widow Nest | 
|
here |

|
Sheol Elevator |   
|
here |

|
North Blood Witch Spawn | 
|
here |
|
|
South Blood Witch Spawn | |
here |
|
|
Torem's Court | 
|
here |

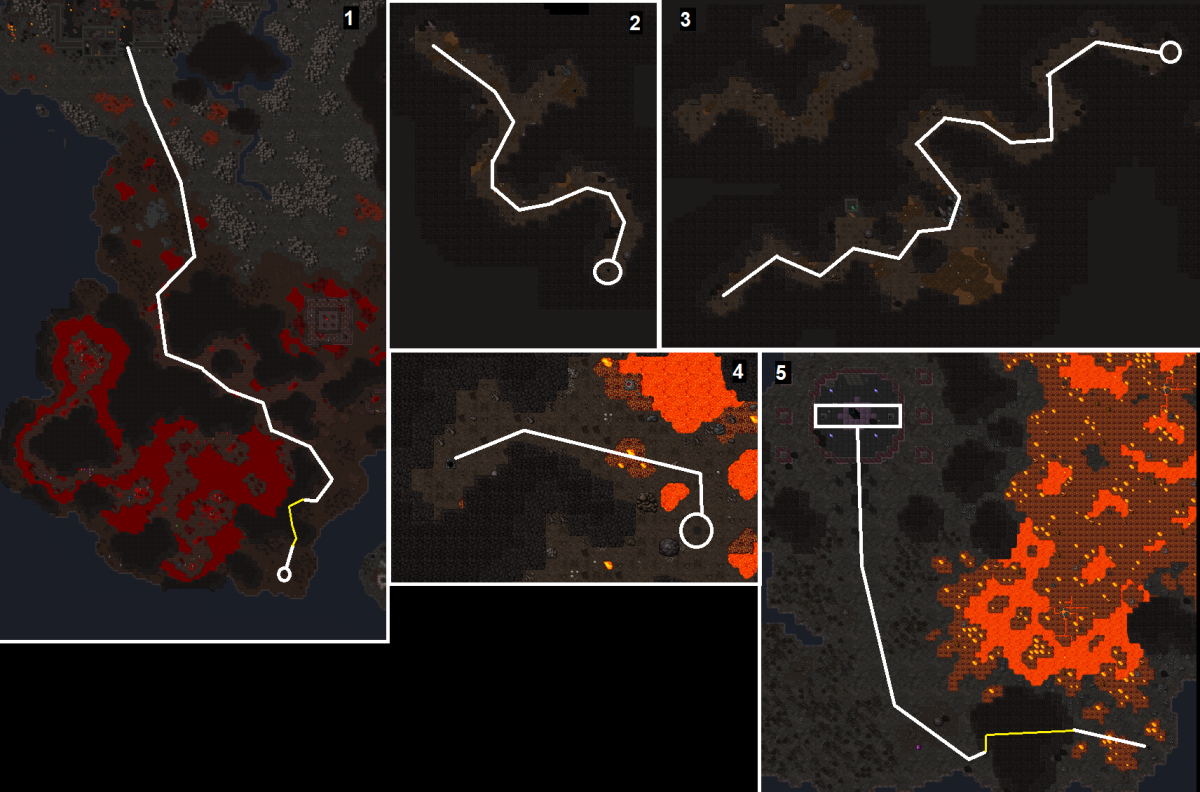
|
Ashlord Volcano | 
|
here |

|
Demorc Entrance Spawn |  
|
here |

|
Demorc Main Spawn |  
|
here |
| Drowner's Lake | 
|
Check route from Drowner's Lake | |

|
Deranger Cave |
|
[ here] |
| Corruptor Hell Entrance | |
here | |

|
Corruptor Hell |
|
here |

|
Sheol Library |   |
here |
| Shadow Phoenix Spawn | [ here] | ||

|
Typhon Island | 
|
[ here] |
|
|
Triple Typhon Spawn |
|
here |
| Cerberus Hell | here | ||

|
Flamebringer Hell |   |
here |

|
Triple Dreadlord Spawn | 
|
here |
|
|
Dreadlord Citadel |
|
[ here] |

|
Chaos Hydra Lair |  |
here |
Sheol Creatures
| Image: | Name: | Experience: | Hitpoints: |
|---|---|---|---|
| Possessed Chicken | ? Exp | ? HP | |
| Plagueworm | 0 Exp | 1000 HP | |
| Armored Skeleton | 70 Exp | 50 HP | |
| Ghost | 240 Exp | 150 HP | |
| Hellish Skeleton | 360 Exp | 250 HP | |
| Armored Hellish Skeleton | 500 Exp | 380 HP | |
| Ash Imp | 500 Exp | 400 HP | |
| Swamp Leech | 580 Exp | 375 HP | |
| Slime | 620 Exp | 450 HP | |
| Blue Fungling | 800 Exp | 650 HP | |
| Skeleton Mage | 1800 Exp | 800 HP | |
| Soulless | 2800 Exp | 1850 HP | |

|
Hellfire | 0 Exp | 7600 HP |
|
|
Demorc | 6400 Exp | 6300 HP |
| Blue Fungi | 6600 Exp | 4000 HP | |
| Cursed Skull | 7200 Exp | 6000 HP | |
| Hellion | 7300 Exp | 5650 HP | |

|
Shade | 7700 Exp | 6200 HP |
|
|
Deranger | 8200 Exp | 5750 HP |
| Bedsore | 8800 Exp | 5800 HP | |
|
|
Black Widow | 9600 Exp | ? HP |
| Skeleton Warlord | 10300 Exp | 7300 HP | |

|
Bookwarden | 11720 Exp | 9800 HP |

|
Demorc Brute | 12000 Exp | 10800 HP |
|
|
Blood Witch | 13000 Exp | 9400 HP |
| Cerberus | 14600 Exp | 12200 HP | |
|
|
Blasphemer | 16400 Exp | 12000 HP |

|
Succubus | 19600 Exp | 18000 HP |
|
|
Ashlord | 21300 Exp | 14800 HP |
|
|
Demorc Warchief | 22000 Exp | 15515 HP |
|
|
Venerator | 24510 Exp | 16750 HP |
| Incidamus | 28500 Exp | 18600 HP | |
|
|
Flamebringer | 33600 Exp | 28000 HP |
|
|
Typhon | 39900 Exp | 31550 HP |
| Shadow Phoenix | 40350 Exp | 48000 HP | |
|
|
Corruptor | 35700 Exp | 33500 HP |
|
|
Dreadlord | 47100 Exp | 37000 HP |
|
|
Chaos Hydra | 170000 Exp | 350000 HP |
Sheol Bosses
| Image: | Name: | Experience: | Hitpoints: |
|---|---|---|---|
| Zarguth | ? Exp | ? HP | |
|
|
Belrekath | ? Exp | ? HP |
|
|
Velranos | ? Exp | ? HP |
|
|
Qyreva | ? Exp | ? HP |
| Ozgalluch | ? Exp | ? HP | |
|
|
Tagthoder | ? Exp | ? HP |
|
|
Jaenira | ? Exp | ? HP |
|
|
Delora Sanguis | ? Exp | ? HP |
Sheol NPCs
| Image: | Name: | Job: |
|---|---|---|
Malran, the guard 
|
Malran, the guard | Guard of Zarrith |
Troggon, the guard
|
Troggon, the guard | Guard of Zarrith |
Duganes, the guard
|
Duganes, the guard | Guard of Zarrith |
Urgaris, the guard
|
Urgaris, the guard | Guard of Zarrith |
Arbiter Kerrin 
|
Arbiter Kerrin | Arbiter, Watcher Resistance Leader |
Drolgruth 
|
Drolgruth | Rare Item Merchant |
Oarus
|
Oarus | ? |
Molgorth 
|
Molgorth | ? |
