Difference between revisions of "PALADIN TERAZ NA SERIO XD"
IlikeTurtles (talk | contribs) (Created page with "File:Paladin.png") |
m (Text replacement - "Precise" to "Dexterity") |
||
| (25 intermediate revisions by one other user not shown) | |||
| Line 1: | Line 1: | ||
[[File:Paladin.png]] | |||
{| class="mainpage1" | |||
|- | |||
| valign="top" width="15%" | | |||
| valign="top" width="70%" | | |||
{| class="wikitable" | |||
|- | |||
! Heya, few words before you start | |||
|- | |||
| style="text-align: center" | It's Kopek, creator of vocation guides on wiki. <br> | |||
Keep in mind I created these having unexperienced players in mind, under level 200. <br> | |||
These guides are not made to show all or even the best possibilities out there. <br> | |||
I tried to show a path that is both comfortable and easy to follow for a newcomer. <br> | |||
The game has much more to offer than stuff listed below, go explore and have fun! | |||
|} | |||
| valign="top" width="15%" | | |||
|} | |||
<center> | |||
[[File:Paladin.png|link=Archer Guide]] [[File:Vocation choice.png|link=Archer Guide]] | |||
<br> | |||
[[File:Tipspally.png|link=Archer Guide]] | |||
{| class="mainpage1" | |||
|- | |||
| valign="top" width="15%" | | |||
| valign="top" width="70%" | | |||
{| class="wikitable" | |||
|- | |||
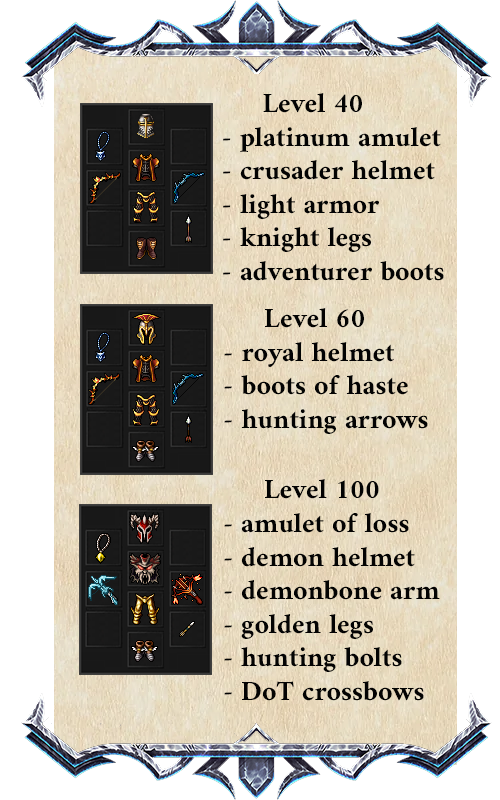
! Typical equipment choice | |||
|- | |||
| style="text-align: center" | | |||
A small warning - items listed below are meant as not attributed. <br> | |||
Very rarely you can find items with for example [[Attributes|Dexterity attribute]] - extra distance fighting skill, <br> | |||
which would be better than "clean" items. | |||
|} | |||
| valign="top" width="15%" | | |||
|} | |||
[[File:Eq rsp.png|link=Archer Guide]] [[File:Eq ssrp.png|link=Archer Guide]] | |||
<br> | |||
[[File:Rp 2300.png|link=Archer Guide]] | |||
</center> | |||
{| class="mainpage1" | |||
|- | |||
| valign="top" width="15%" | | |||
| valign="top" width="70%" | | |||
{| class="wikitable" | |||
|- | |||
! Hunting Zones | |||
|- | |||
| style="text-align: center" | | |||
Spawns listed below are focused on solo hunting. <br> | |||
I also skipped most of faction tasks, since sadly the alternatives are usually much better. <br> | |||
I recommend doing factions early for RPG players, <br> | |||
because it's a lot more entertaining to do on intended level stage. | |||
|} | |||
| valign="top" width="15%" | | |||
|} | |||
{| class="mainpage1" | |||
|- | |||
| valign="top" width="3%" | | |||
| valign="top" width="28%" | | |||
{{GuideMob| | |||
name=| | |||
image=| | |||
notes=| | |||
location=| | |||
method=}} | |||
| valign="top" width="5%" | | |||
| valign="top" width="28%" | | |||
{{GuideMob| | |||
name=| | |||
image=| | |||
notes=| | |||
location=| | |||
method=}} | |||
| valign="top" width="5%" | | |||
| valign="top" width="28%" | | |||
{{GuideMob| | |||
name=| | |||
image=| | |||
notes=| | |||
location=| | |||
method=}} | |||
| valign="top" width="3%" | | |||
|} | |||
Latest revision as of 02:00, 24 February 2024
|
|


|
|
|
|
||||||||||||||||||||||||||||||||||||||||
|
|
|
||||||||||||||||||||||||||||||||||||||||
|
|
|
||||||||||||||||||||||||||||||||||||||||
|
|
|
||||||||||||||||||||||||||||||||||||||||
|
|
|
||||||||||||||||||||||||||||||||||||||||
|
|
|
||||||||||||||||||||||||||||||||||||||||
|
|
|
||||||||||||||||||||||||||||||||||||||||
|
|
|
||||||||||||||||||||||||||||||||||||||||
|
|
|
||||||||||||||||||||||||||||||||||||||||
|
|
|
||||||||||||||||||||||||||||||||||||||||
