Difference between revisions of "Route to Minoras"
From Medivia Online Wiki
m (Text replacement - "Grorlam" to "Gromm") |
|||
| (3 intermediate revisions by one other user not shown) | |||
| Line 1: | Line 1: | ||
__TOC__ | |||
< | <br><br><big>'''Be aware there is a chance of encountering [[Gromm|Gromm]] at various points on this route!'''</big><br><br> | ||
=='''Quickest way'''== | |||
<br | *'''Make sure to bring with you a rope and a shovel at least for this route.''' | ||
*Go to [[Eschen]]'s ancient temple ([https://mediviastats.info/mapper.php?y=3130&x=1098&z=7&zoom=3 here] [[File:Map.png|link=https://mediviastats.info/mapper.php?y=3130&x=1098&z=7&zoom=3]]) and go down 2 times.<br> | |||
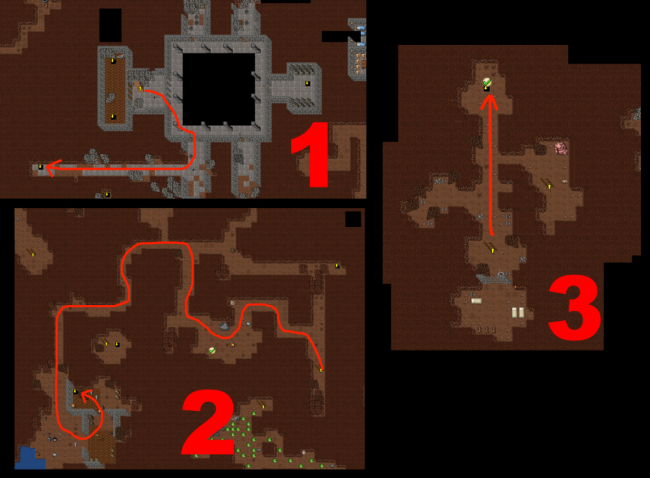
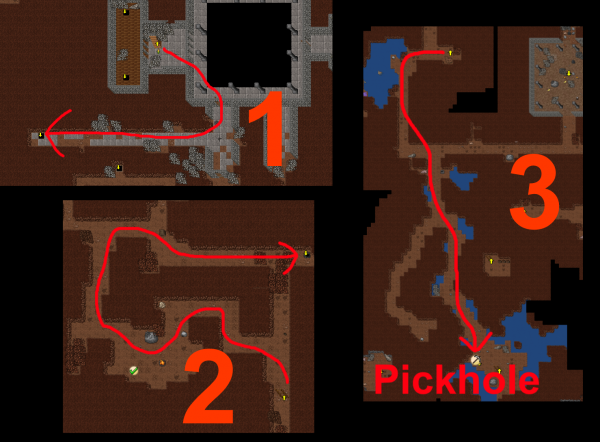
* | *Now just follow the red path in the image below:<br><br> | ||
[[File:Madfromsurf1.png|650px]]<br><br> | |||
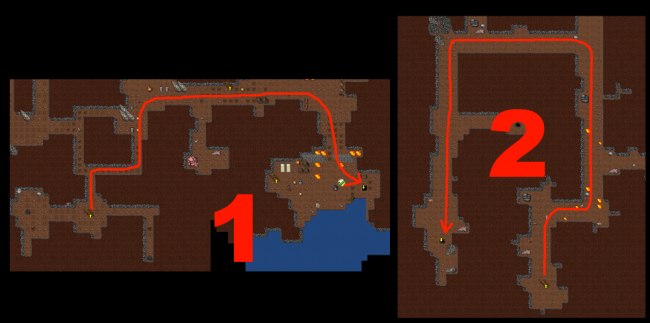
=='''Alternative | *After going down the stairs on image 3, just go the only direction there is (another set of stairs going down).<br><br> | ||
[[File:Madfromsurf2.png|650px]]<br><br> | |||
= | *Again, after going down the hole on image 2 above, keep going the only direction there is until you get to the next room:<br><br> | ||
[[File:Waytomin.png|550px]]<br><br> | |||
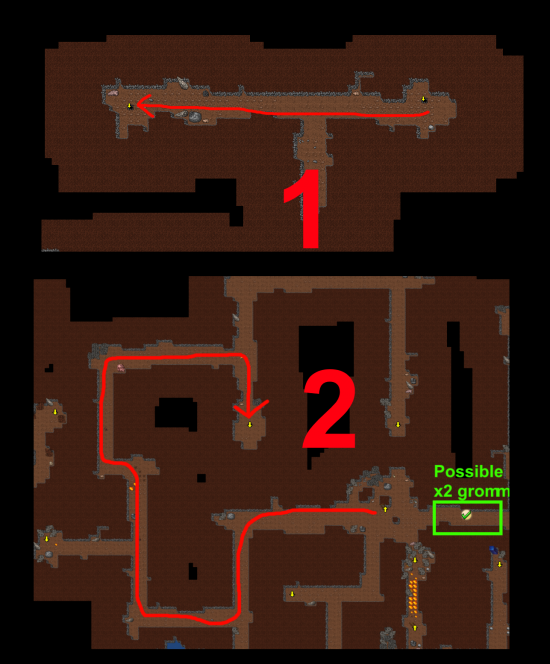
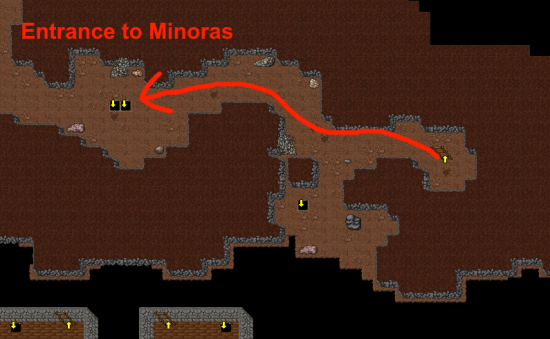
*Finally, keep going the only direction there is until you get to the next room, then follow the red path below:<br><br> | |||
[[File:Waytomin2.png|550px]]<br> | |||
<br /> | |||
=='''Alternative Way (pickhole)'''== | |||
*Go to [[Eschen]]'s ancient temple ([https://mediviastats.info/mapper.php?y=3130&x=1098&z=7&zoom=3 here] [[File:Map.png|link=https://mediviastats.info/mapper.php?y=3130&x=1098&z=7&zoom=3]]) and go down 2 times. | |||
*Now just follow the red path in the image below:<br><br> | |||
[[File:Altmin.png|600px]]<br><br> | |||
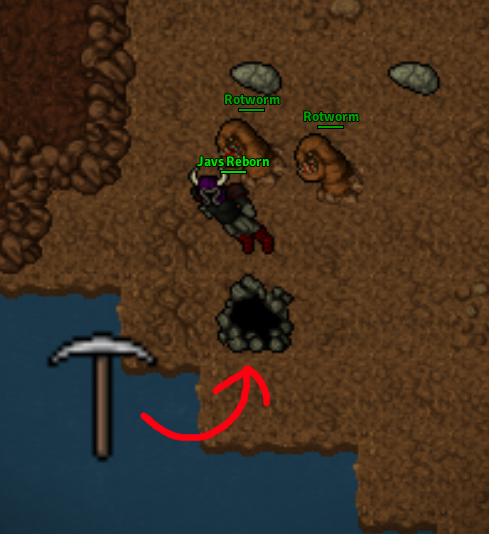
*Once you get to number 3, you will have to use the pick as shown below:<br><br> | |||
[[File:Altmin2.png]]<br><br> | |||
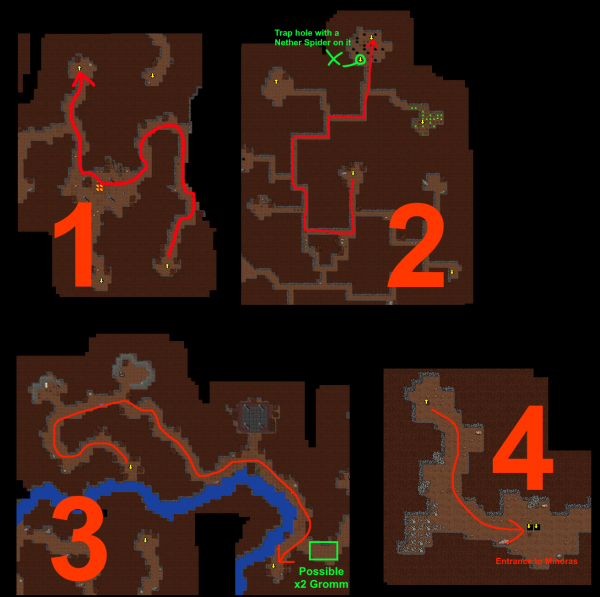
*Go down the hole and keep going the only way there is until you're in the next room, then just follow the red path below (note that between pictures 2-3 and 3-4 there are more rooms but it's only one way, you won't get lost):<br><br> | |||
[[File:Altmin3.png|600px]] | |||
<br> | |||
=='''Way back'''== | |||
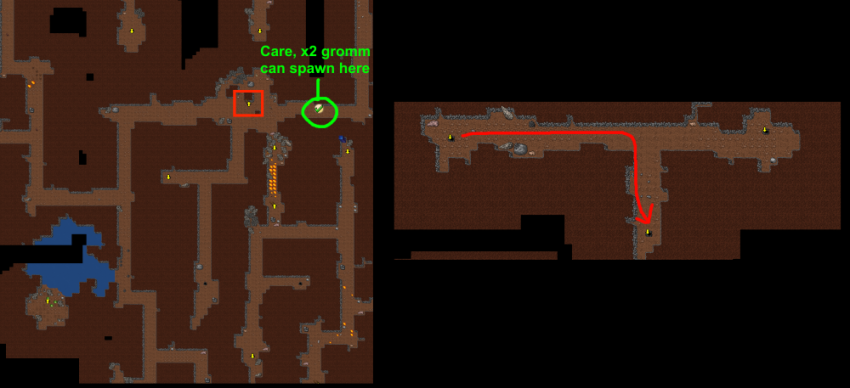
If you want to go back by foot, go up this ladder and go to the hole marked in the image below, it will take you two levels below in a room with some war wolves, then just go back up and follow the same way you came.<br><br> | |||
[[File:Wayback.png|850px|centre]] | |||
Latest revision as of 18:54, 13 February 2022
Be aware there is a chance of encountering Gromm at various points on this route!
Quickest way
- Make sure to bring with you a rope and a shovel at least for this route.
- Go to Eschen's ancient temple (here
 ) and go down 2 times.
 - Now just follow the red path in the image below:
- After going down the stairs on image 3, just go the only direction there is (another set of stairs going down).
- Again, after going down the hole on image 2 above, keep going the only direction there is until you get to the next room:
- Finally, keep going the only direction there is until you get to the next room, then follow the red path below:
Alternative Way (pickhole)
- Go to Eschen's ancient temple (here
 ) and go down 2 times.
 - Now just follow the red path in the image below:
- Once you get to number 3, you will have to use the pick as shown below:
- Go down the hole and keep going the only way there is until you're in the next room, then just follow the red path below (note that between pictures 2-3 and 3-4 there are more rooms but it's only one way, you won't get lost):
Way back
If you want to go back by foot, go up this ladder and go to the hole marked in the image below, it will take you two levels below in a room with some war wolves, then just go back up and follow the same way you came.
