Difference between revisions of "The Plaguebringers of Abukir"
(Some basic info and maps added) |
(Lots of info added) |
||
| Line 12: | Line 12: | ||
==='''[https://www.youtube.com/watch?v=IK5T1bz25zE Video of the quest]'''=== | ==='''[https://www.youtube.com/watch?v=IK5T1bz25zE Video of the quest]'''=== | ||
=='''Requirements'''== | |||
*Rope | *Rope | ||
*Shovel | *Shovel | ||
| Line 22: | Line 22: | ||
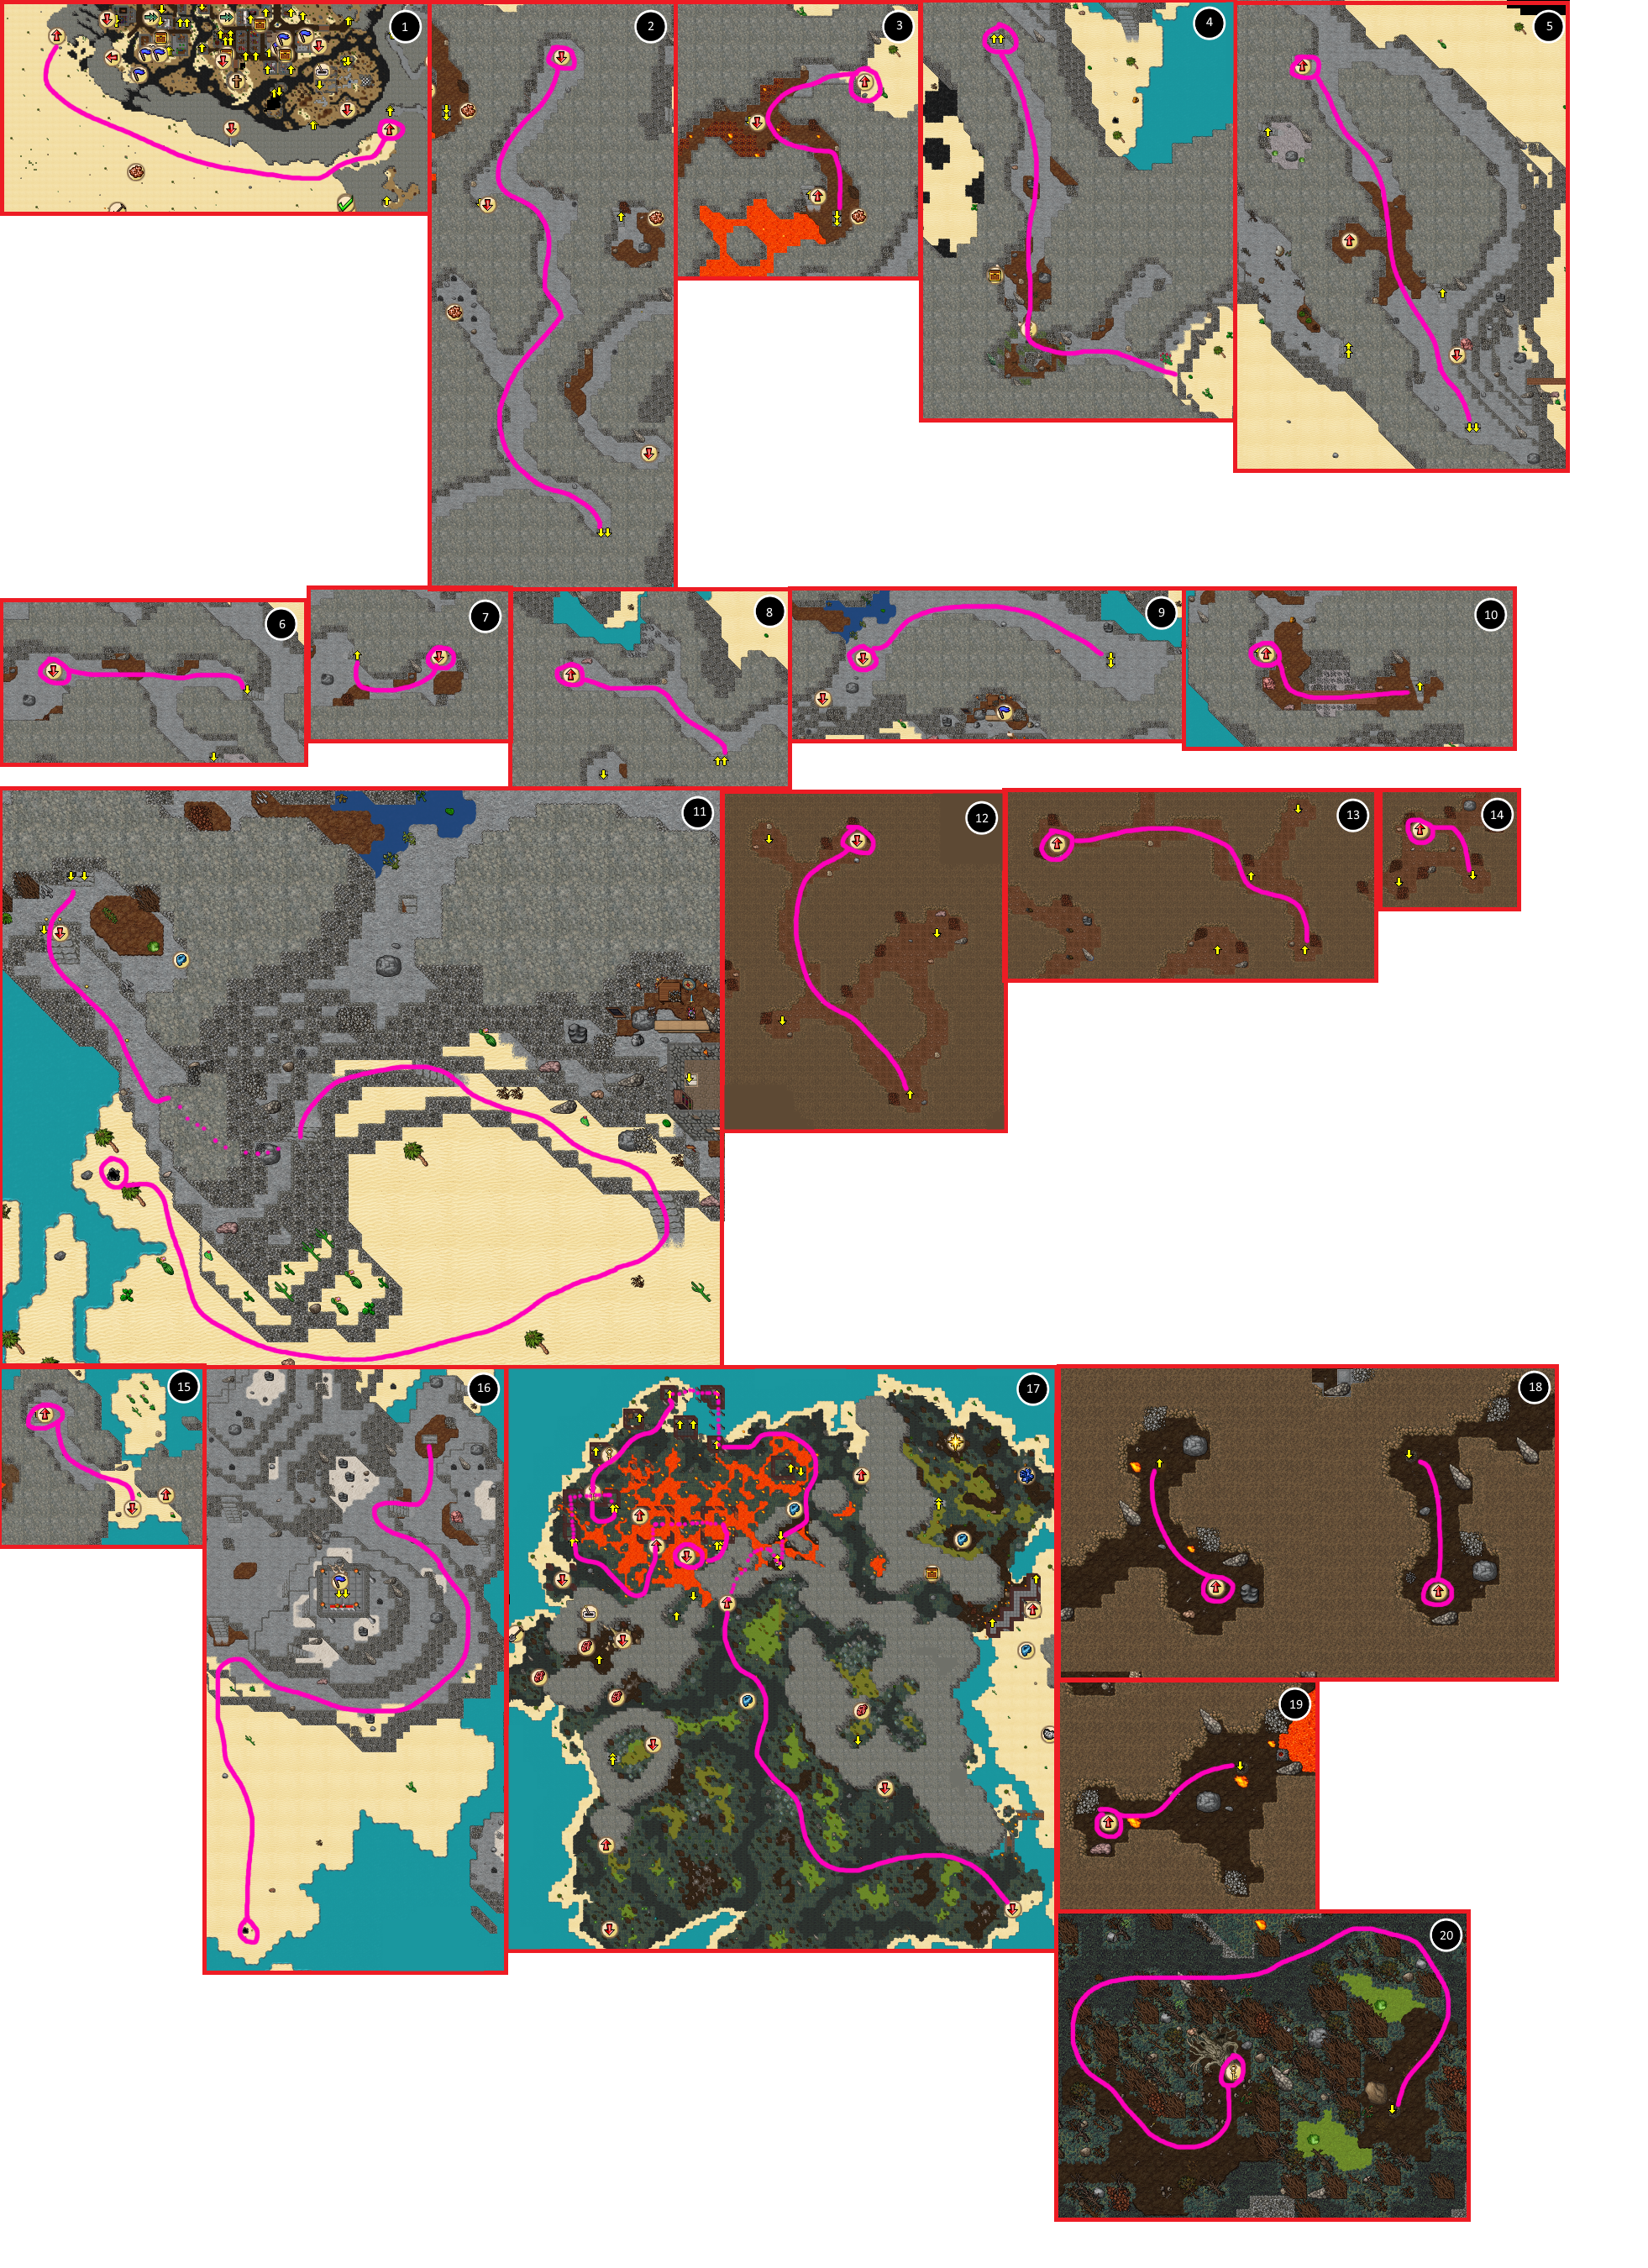
=='''Route to PoA area and entrance part'''== | |||
[[Media:Routetopoa.png|Route to PoA]] | *[[Media:Routetopoa.png|Route to PoA]] | ||
*[[Media:Poaentrancemap.png|Poa Entrance Map]] - [https://www.youtube.com/watch?v=0aDUDL8GBnY& Video] | |||
<br>You will require [[Key 7009]] and [[Key 7010]] although you obtain them inside of PoA itself. | <br />You will require [[Key 7009]] and [[Key 7010]] although you can obtain them inside of PoA itself. | ||
=='''Mountain Seal & Mons'''== | |||
[[Media:Mountainsealmap.png|Seal Map]] - [https://www.youtube.com/watch?v=dg_0vW38Ato& Video] | *[[Media:Mountainsealmap.png|Seal Map]] - [https://www.youtube.com/watch?v=dg_0vW38Ato& Video] | ||
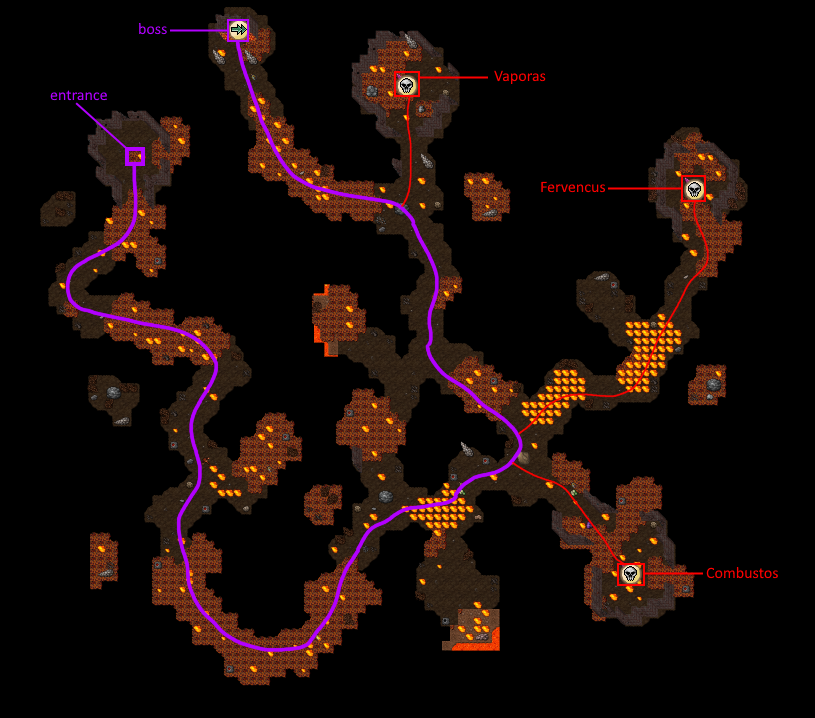
=='''Fire Seal & Ignis'''== | |||
[[Media:Firesealmap.png|Seal Map]] - [https://www.youtube.com/watch?v=ch8JV6UV-cs Video] | *[[Media:Firesealmap.png|Seal Map]] - [https://www.youtube.com/watch?v=ch8JV6UV-cs Video] | ||
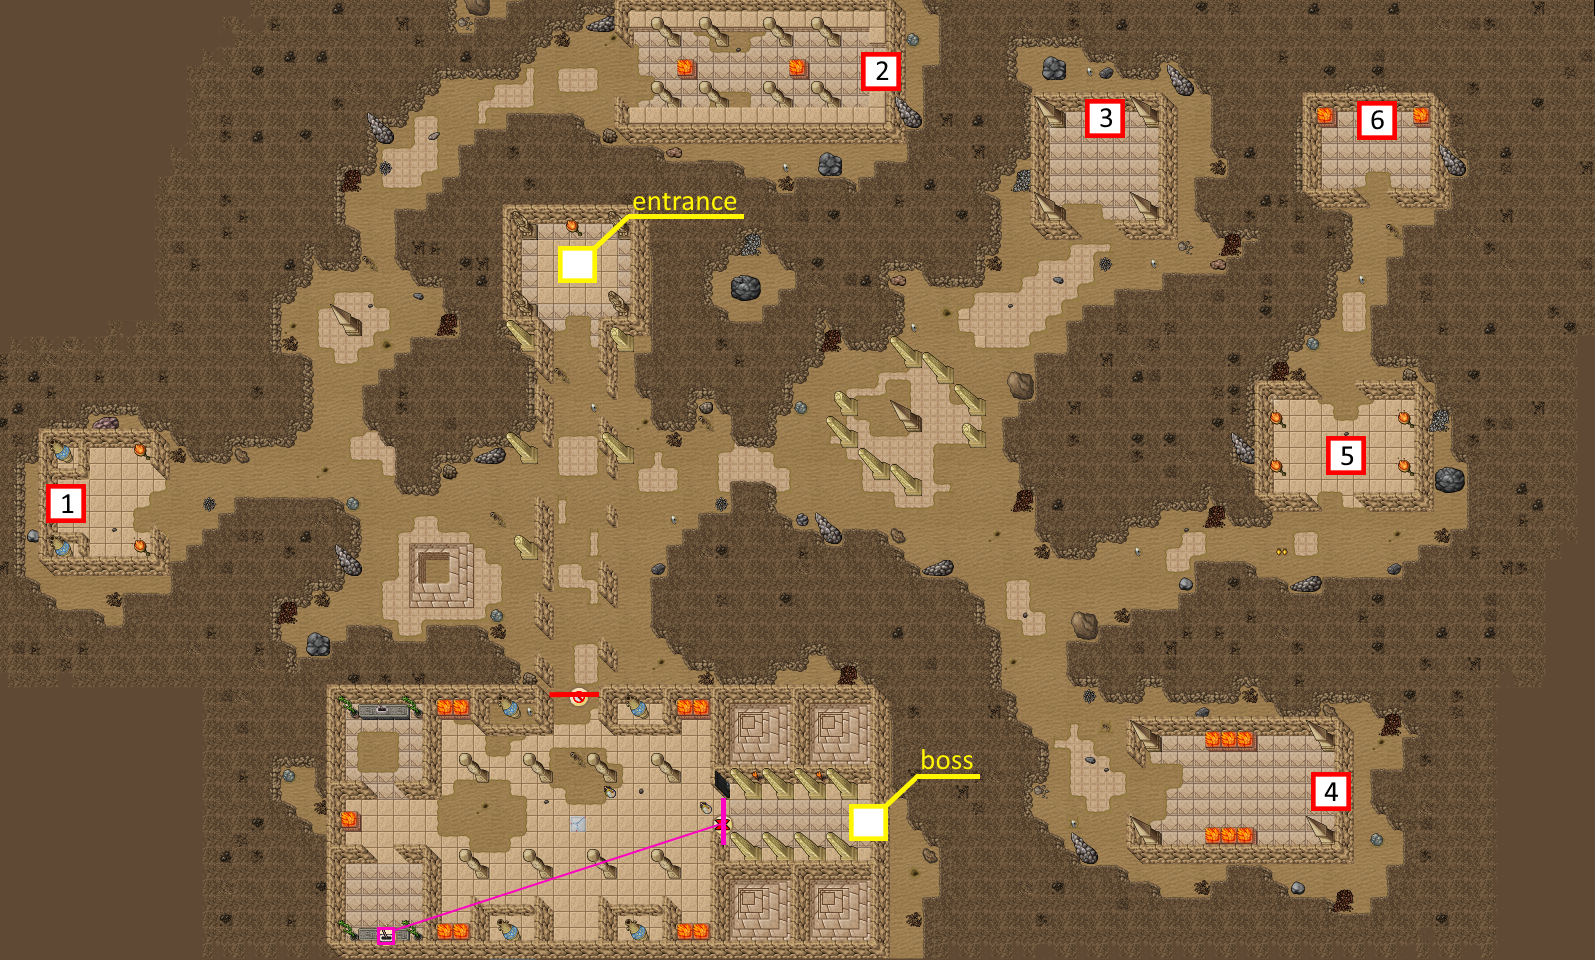
=='''Sand Seal & Harenam'''== | |||
[[Media:Sandsealmap.png|Seal Map]] - [ Video] | *[[Media:Sandsealmap.png|Seal Map]] - [ Video] | ||
<br> | <br /> | ||
=='''Tar Seal & Suffocent'''== | |||
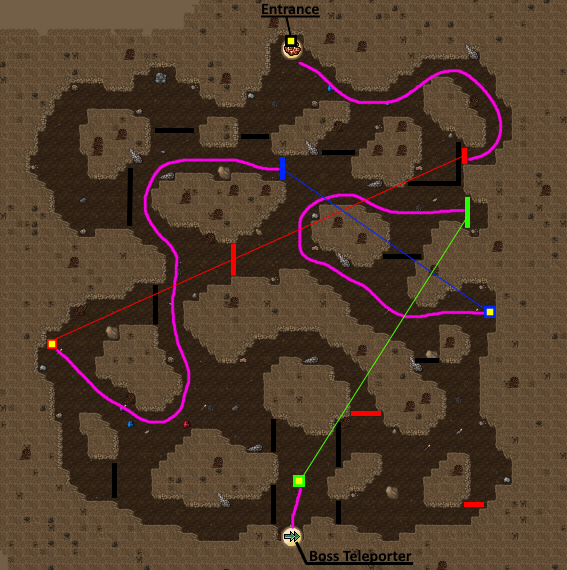
[[Media:Tarsealmap.png|Seal Map]] - [https://www.youtube.com/watch?v=1FsbkfzLl3g Video] | *[[Media:Tarsealmap.png|Seal Map]] - [https://www.youtube.com/watch?v=1FsbkfzLl3g Video] | ||
<br | <br /> | ||
The constant natural [[Tar Monstrosity|Tar Monstrosities]] can make it difficult unless you have a mage prepared to wave them. There are also many [[Tar Priest]]s although they are simpler to deal with. There are not any surprises in this seal, simply clear it room by room, hit the levers, and keep moving forward. | The constant natural [[Tar Monstrosity|Tar Monstrosities]] can make it difficult unless you have a mage prepared to wave them. There are also many [[Tar Priest]]s although they are simpler to deal with. There are not any surprises in this seal, simply clear it room by room, hit the levers, and keep moving forward. | ||
<br> | <br /> | ||
<br> | <br /> | ||
If you are following the seal map above, the following areas are usually where people have the most difficulty due to many [[Tar Priest]]s: 7, 9, 10. | If you are following the seal map above, the following areas are usually where people have the most difficulty due to many [[Tar Priest]]s: 7, 9, 10. | ||
<br> | <br /> | ||
<br> | <br /> | ||
[[Suffocent]] is considered one of the easier bosses as long as you have a mage to wave the blocker and kill the monstrosities when they become too much. | [[Suffocent]] is considered one of the easier bosses as long as you have a mage to wave the blocker and kill the monstrosities when they become too much. | ||
<br> | <br /> | ||
'''Quest Service Help'''<br> | '''Quest Service Help'''<br> | ||
Keep the shooters stacked on the teleport instead of spreading around. If the blocker is in a vertical line from the stacked shooters, the boss will be in range for them to shoot and the blocker in a good position. | Keep the shooters stacked on the teleport instead of spreading around. If the blocker is in a vertical line from the stacked shooters, the boss will be in range for them to shoot and the blocker in a good position. | ||
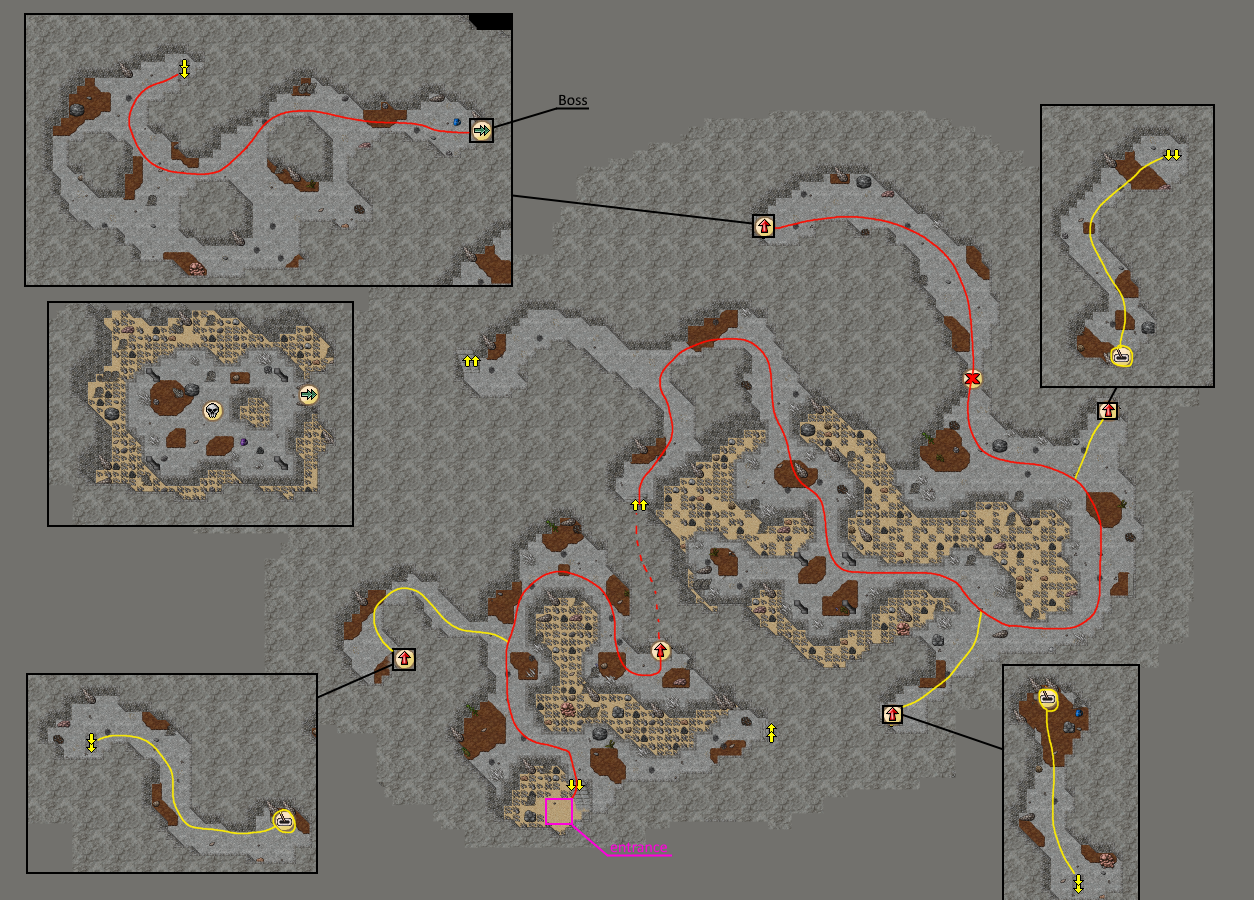
=='''Earth Seal & Terraemotus'''== | |||
[[Media:Earthsealmap.png|Seal Map]] - [https://www.youtube.com/watch?v=Kj84AIL6tMc& Video] | *[[Media:Earthsealmap.png|Seal Map]] - [https://www.youtube.com/watch?v=Kj84AIL6tMc& Video] | ||
<br | <br /> | ||
This seal is a giant maze with invisible teleporters spread all over it. There are high amounts of [[Colossal Beast]]s and [[Ancient Scarab]]s with extremely high respawn rates. If you get lost, split up, or take your time, you will find yourself easily being overwhelmed by them. The Colossal Beasts are similar to Titans but just generally stronger and with the ability to heal themselves. | This seal is a giant maze with invisible teleporters spread all over it. There are high amounts of [[Colossal Beast]]s and [[Ancient Scarab]]s with extremely high respawn rates. If you get lost, split up, or take your time, you will find yourself easily being overwhelmed by them. The Colossal Beasts are similar to Titans but just generally stronger and with the ability to heal themselves. | ||
<br> | <br /> | ||
<br> | <br /> | ||
[[Terraemotus]] himself is fairly easy - provided you follow 2 simple rules: | [[Terraemotus]] himself is fairly easy - provided you follow 2 simple rules: | ||
1. Make sure the blocker is in a good position to keep agro of the boss but also not become surrounded by his summons and take extra damage. | 1. Make sure the blocker is in a good position to keep agro of the boss but also not become surrounded by his summons and take extra damage. | ||
| Line 68: | Line 66: | ||
Keeping those in mind, he does not have high combos like some of the other seal bosses have, just a lot of health to power through. | Keeping those in mind, he does not have high combos like some of the other seal bosses have, just a lot of health to power through. | ||
<br> | <br /> | ||
'''Quest Service Help'''<br> | '''Quest Service Help'''<br /> | ||
Place gold coins where players should follow to keep them on the right track. In the boss fight use more gold coins, or poison/fire/energy bombs (to prevent pushing) to keep shooters out of the range of his aoe. | Place gold coins where players should follow to keep them on the right track. In the boss fight use more gold coins, or poison/fire/energy bombs (to prevent pushing) to keep shooters out of the range of his aoe. | ||
<br /> | |||
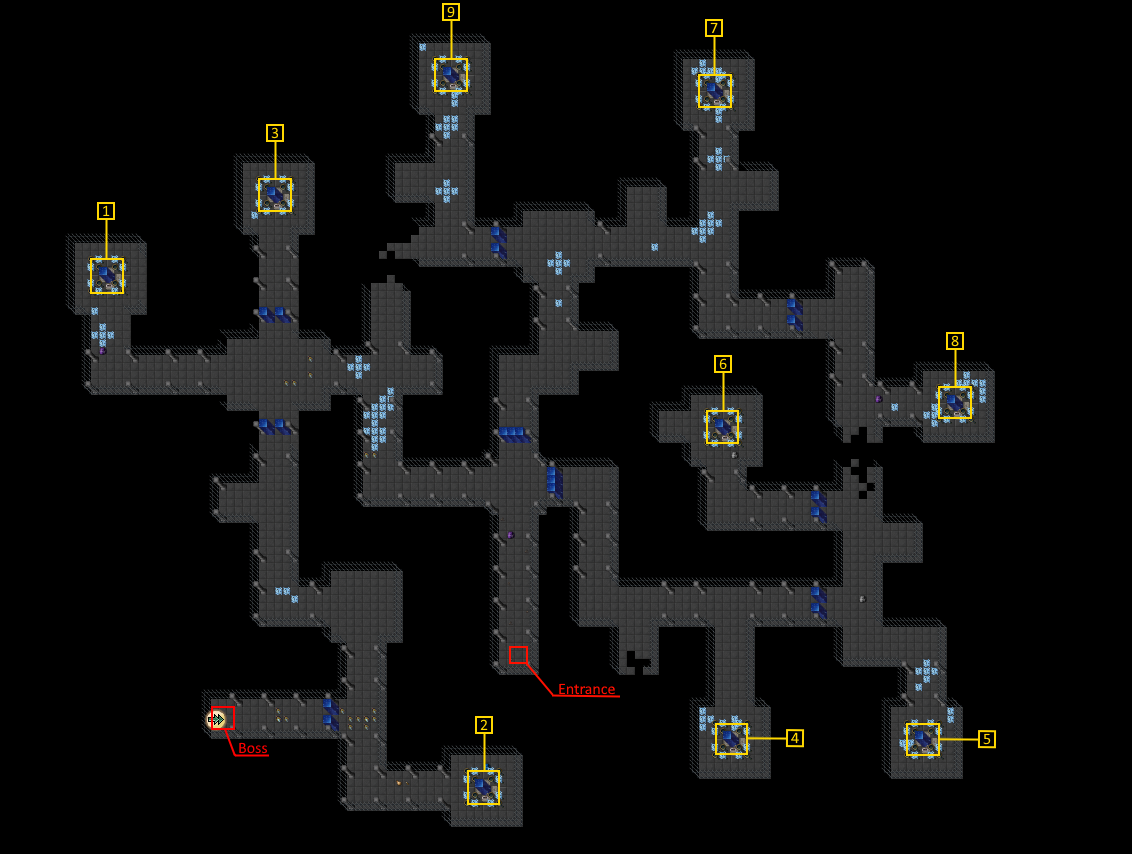
[[Media:Energysealmap.png|Seal Map]] - [https://www.youtube.com/watch?v=tnjN-TTE-U8 Video] | =='''Energy Seal & Tempestas'''== | ||
*[[Media:Energysealmap.png|Seal Map]] - [https://www.youtube.com/watch?v=tnjN-TTE-U8 Video] | |||
<br /> | |||
<br /> | |||
'''Quest Service Help'''<br /> | |||
The seal isn't particularly dangerous for people to help shoot here and there, just mind the invisible [[Warlock]]s and [[Unstable Electricity]]'s aoe damage and fast movement speed. When inside [[Tempestas]]' chamber, it is easiest to keep the shooters stacked on the teleport and have someone use [[Mass Healing]] to keep them alive when the stack gets hit. As each hit will deal 350 energy damage and it's possible to be hit from both the X and Y axis, low level mages can instantly die in an unlucky combo for 700 damage. If you don't have much firepower, give them a [[Might Ring]] and [[Strange Talisman]] to survive, otherwise just let them use [[Mana Shield]] and pray the boss dies first. | |||
<br /> | |||
=='''Death Seal & Mortem'''== | |||
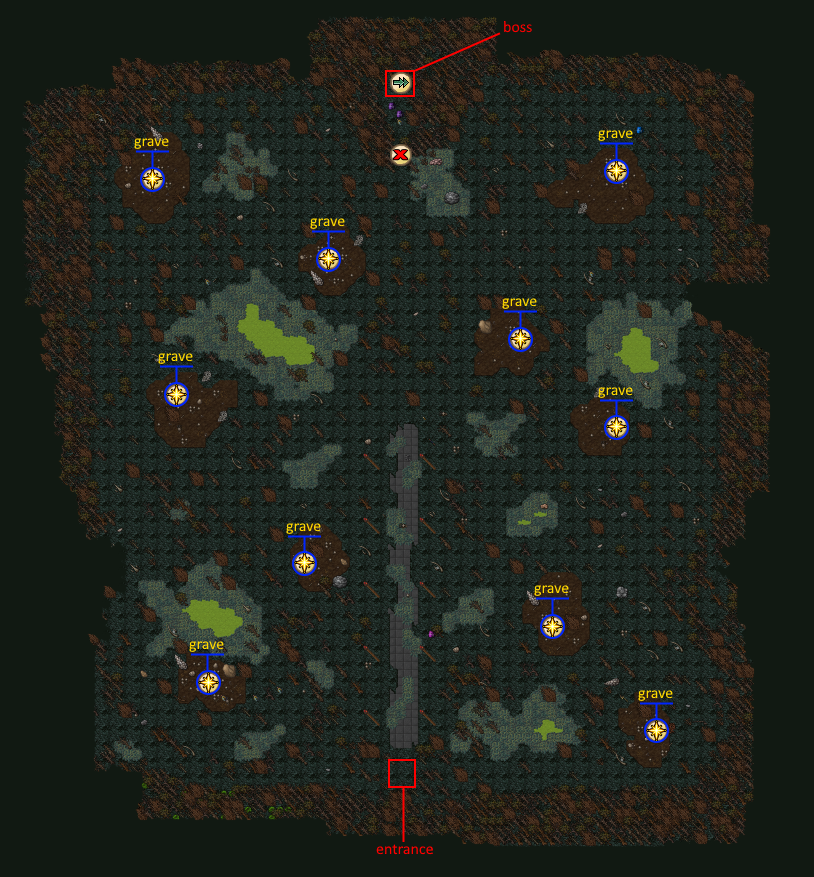
*[[Media:Deathsealmap.png|Seal Map]] - [https://www.youtube.com/watch?v=RBrZ6YvsaSI Video] | |||
In order to enter this seal you must have completed the previous 6 seals. This doesn't need to be on the same day, just that at some point you need to have completed the other seals. | |||
[[ | <br /> | ||
To enter Mortem's chamber you must open the 10 graves (5 on the left side, 5 on the right side) littered around the map. By clicking on each grave, 5-6 monsters will spawn from this list: | |||
*0-3 [[Necromancer]] | |||
*0-3 [[Banshee]] | |||
*0-3 [[Lich]] | |||
*0-3 [[Abomination]] | |||
*0-2 [[Wight]] | |||
*0-1 [[Undead Dragon]] | |||
It's likely that you could find up to 3 of anything on this list, but this is what I have found personally. | |||
<br /> | |||
<br /> | |||
Once all the graves have been opened, the teleporter in the center of the north will open up. [[Mortem]] doesn't have any crazy mechanics; he has a large aoe similar to that of [[Terraemotus]] or [[Mons]], and he summons various creatures. If you're particularly worried of his damage, kill the Wights he summons. | |||
<br /> | |||
<br /> | |||
'''Quest Service Help'''<br /> | |||
Keep low levels by the entrance of the seal while a team goes around opening the graves. When you're ready to enter Mortem's chamber guide them north to the teleporter. In the boss fight, use fire/poison/energy bombs to signal where Mortem's aoe damage can hit to prevent low levels getting too close. | |||
<br /> | |||
}} | =='''Reward Room'''== | ||
Upon leaving Mortem's chamber you will find yourself in the reward room. You can take both of the top two items ([[Quicksand Boots]] and [[Ancient Backpack]]), but must choose only one of the below three items ([[Soul Emerald]], [[Ancient Crossbow]] and [[Magician's Staff]]). | |||
<br /><br /><br />}} | |||
Revision as of 10:28, 4 June 2024

|
The Plaguebringers of Abukir Quest | |
|---|---|---|
| Reward: | For everyone: Quicksand Boots and an Ancient Backpack. Choice between one of three items: Soul Emerald, Ancient Crossbow and Magician's Staff. | |
| Location: | Abukir. | |
| Level required: | 100+ (minimum), 150+ recommended | |
| Be prepared to face: | Chimera, Undead Dragon, Abomination, Wight, Manticore, Banshee, Lich, Shattered Soul, Priestess, Necromancer, Fire Elemental, Fire Devil, Revenant, Mons, Ignis, Harenam, Suffocent, Terraemotus, Tempestas, Mortem. | |
| Legend: | The Gods of Abukir have been causing misery and destruction on the people of Abukir for too long. It's time to put a stop to their reign of terror. | |
| Method: | ||
Video of the questRequirements
Route to PoA area and entrance part
Mountain Seal & Mons
Fire Seal & Ignis
Sand Seal & Harenam
Tar Seal & Suffocent
Earth Seal & Terraemotus
Energy Seal & Tempestas
Death Seal & MortemIn order to enter this seal you must have completed the previous 6 seals. This doesn't need to be on the same day, just that at some point you need to have completed the other seals.
It's likely that you could find up to 3 of anything on this list, but this is what I have found personally.
Reward RoomUpon leaving Mortem's chamber you will find yourself in the reward room. You can take both of the top two items (Quicksand Boots and Ancient Backpack), but must choose only one of the below three items (Soul Emerald, Ancient Crossbow and Magician's Staff).
| ||
