Difference between revisions of "The Plaguebringers of Abukir"
(Some more stuff) |
(Added couple more seals) |
||
| Line 29: | Line 29: | ||
=='''Mountain Seal & Mons'''== | =='''Mountain Seal & Mons'''== | ||
*[[Media:Mountainsealmap.png|Seal Map]] - [https://www.youtube.com/watch?v=dg_0vW38Ato& Video] | *[[Media:Mountainsealmap.png|Seal Map]] - [https://www.youtube.com/watch?v=dg_0vW38Ato& Video] | ||
<br /> | |||
The Mountain Seal is full of [[Gargoyle]]s, [[Stone Golem]]s, [[Ancient Golem]]s, and [[Ancient Colossus]]. Before the locked area, there are only 3 Ancient Colossus, each one guarding a lever you need to pull. Once all 3 levers are pulled the section to the north will open. There is another [[Ancient Colossus]] just past the corridor, and another 2 together by the boss teleport. | |||
<br /> | |||
[[Mons]] is the epitome of easy until you make a simple mistake. He walks slow enough that even a low level can outrun him, but if you do let him get close his melee can easily one-hit a player. | |||
<br /> | |||
A blocker that is inexperienced with [[Mons]] should wear a [[Stone Skin Amulet]] even if they're confident that the boss won't get close enough to melee them as his AOE damage can hit multiple times if you're running away from him. | |||
<br /> | |||
'''Quest Service Help'''<br /> | |||
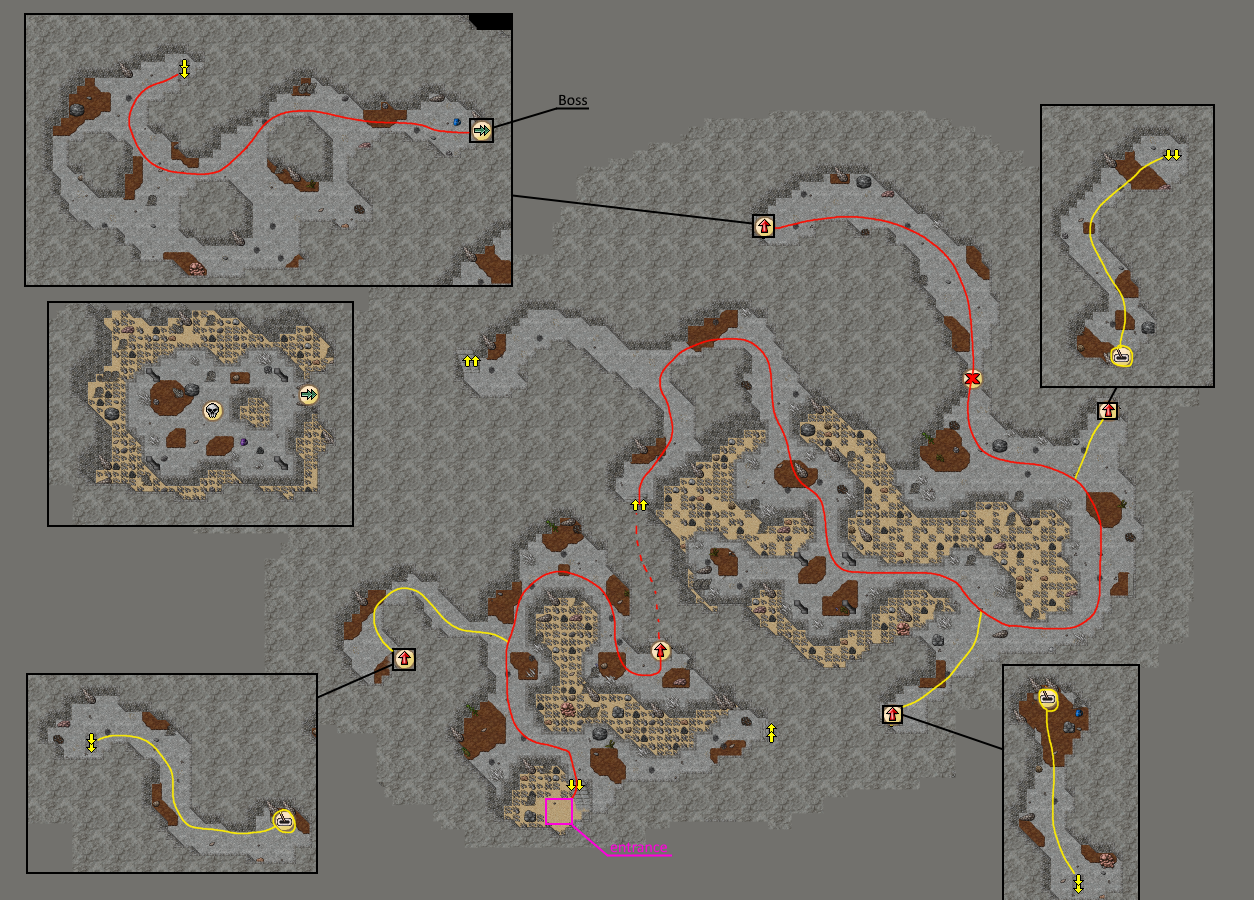
Be careful when going up the stairs to each of the levers, when players follow you up they may take a lot of damage if the blocker gets stuck near the stairs. Make sure the shooters are wearing a [[Stone Skin Amulet]] during the boss fight incase of an agro mishap or get hit by his AOE damage, possibly with spares in their backpacks ready to swap out if the fight takes a while. | |||
<br /> | |||
=='''Fire Seal & Ignis'''== | =='''Fire Seal & Ignis'''== | ||
*[[Media:Firesealmap.png|Seal Map]] - [https://www.youtube.com/watch?v=ch8JV6UV-cs Video] | *[[Media:Firesealmap.png|Seal Map]] - [https://www.youtube.com/watch?v=ch8JV6UV-cs Video] | ||
<br /> | |||
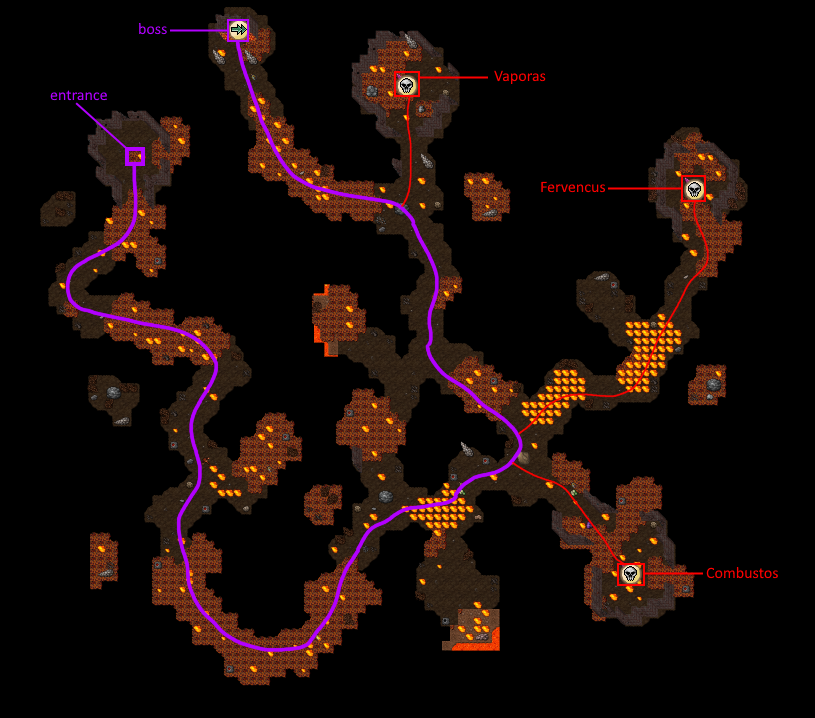
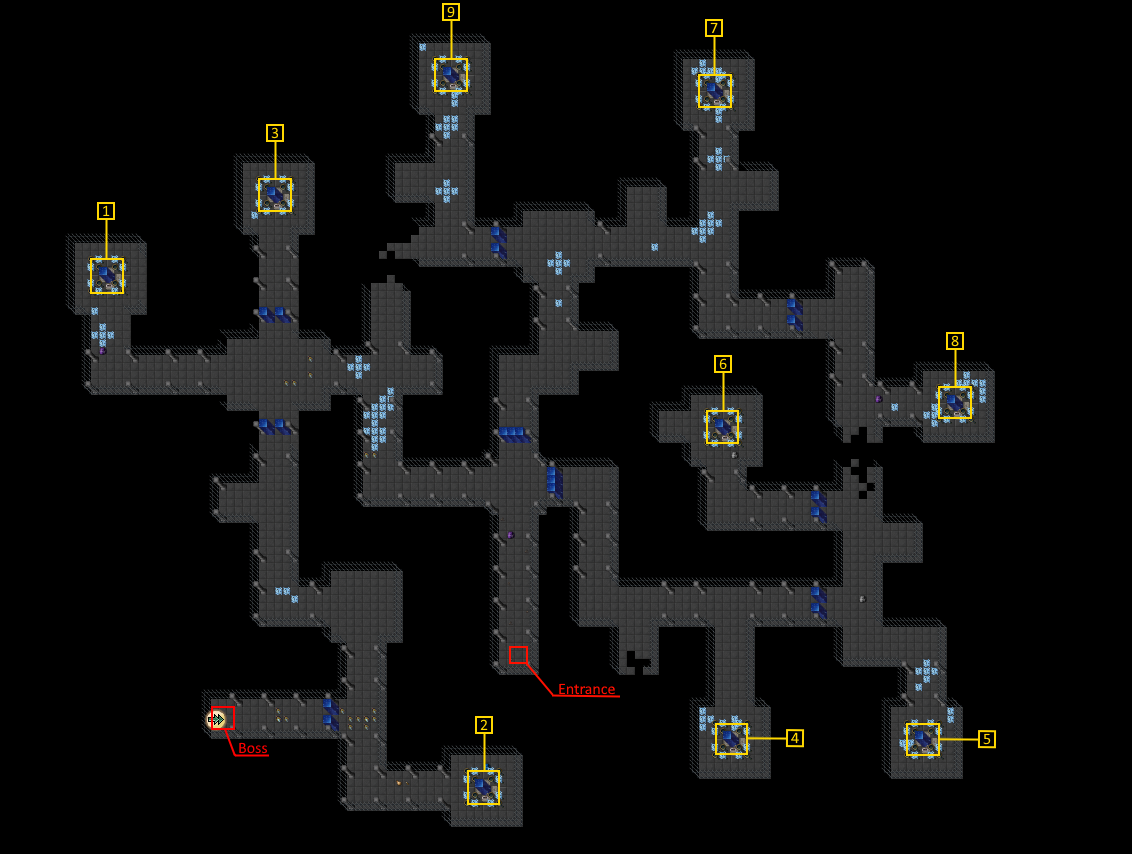
Inside the seal will be numerous [[Fire Devil]]s, [[Dragon]]s, [[Dragon Lord]]s, [[Chimera]]s, and [[Demon]]s. You will be required to defeat 3 bosses before the portal will open: | |||
*[[Combustos]] - The Dragon Lord; a buffed up [[Dragon Lord]] | |||
*[[Fervencus]] - The Fire Elemental; immune to everything except Holy, Ice, and Energy | |||
*[[Vaporas]] - The Demon; comparable damage to [[Ignis]] himself | |||
Once these bosses are killed, you can enter [[Ignis]]' chamber. Inside you will fight Ignis until he loses the first 10% of his health, then he will; disappear upstairs, split the arena into 2 sides (left/right), and send 7 waves of creatures to fight you. These waves come 30 seconds apart and consist of (on each side): | |||
#2 [[Dragon Lord]], 1 [[Demon]] | |||
#2 [[Fire Elemental]], 3 [[Dragon]], [[2 Dragon Lord]] | |||
#6 [[Fire Devil]], 2 [[Demon]] | |||
#1 [[Dragon Lord]], 2 [[Demon]] | |||
#6 [[Fire Devil]], 9 [[Fire Elemental]] | |||
#3 [[Demon]] | |||
#Ignis returns with 4 [[Fire Devil]] and 2 [[Demon]] | |||
<br /> | |||
Take Ignis to a side and make him face away from the shooters as his wave is surprisingly wide. | |||
<br /> | |||
'''Quest Service Help'''<br /> | |||
Make sure you have [[Heavy Magic Missile]]s or a couple mages to beam the Fire Elemental boss. Clear all of the islands that you can't reach as they will drain the health/mana of anyone they target. In the boss room split the team evenly, preferably before even entering the teleport. Make sure there is at least one blocker on each side to keep the demons away from shooters. | |||
<br /> | |||
=='''Sand Seal & Harenam'''== | =='''Sand Seal & Harenam'''== | ||
*[[Media:Sandsealmap.png|Seal Map]] - [ Video] | *[[Media:Sandsealmap.png|Seal Map]] - [ Video] | ||
<br /> | <br /> | ||
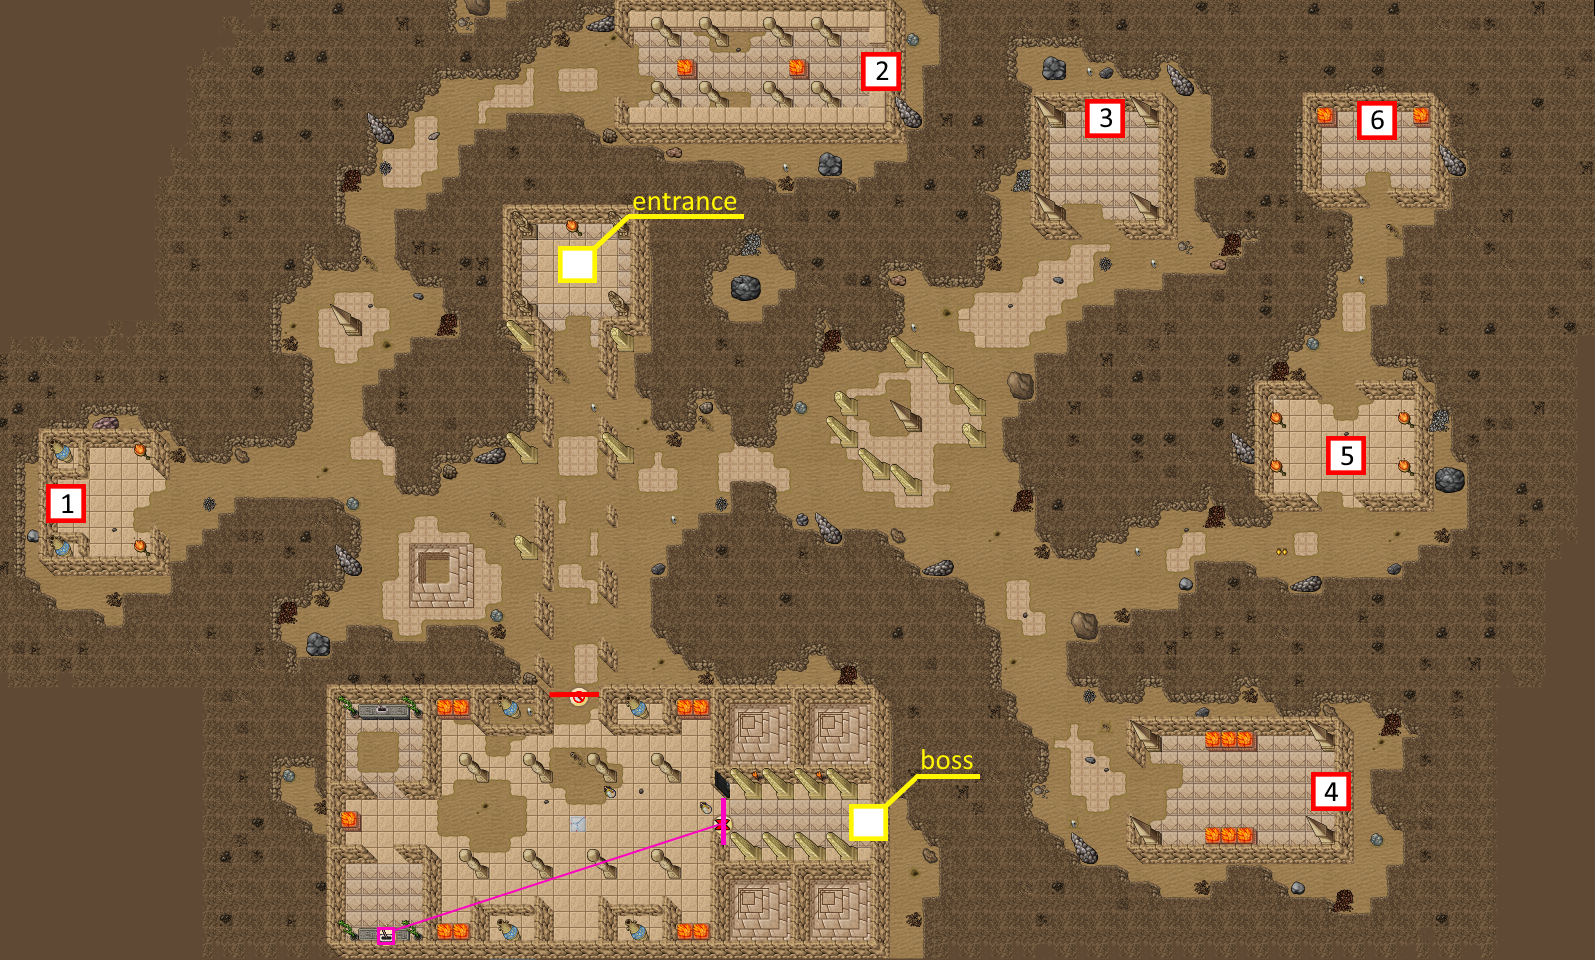
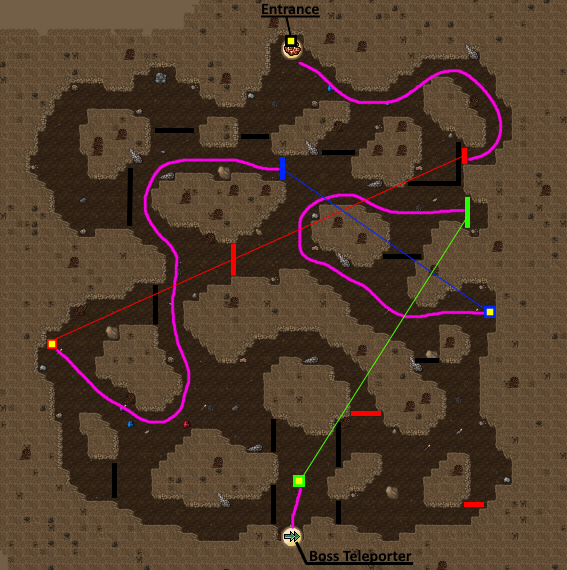
You are required to play the 6 musical instruments located around the seal. There are numerous [[Banshee]]s, [[Priestess]], [[Sandbeast]]s, [[Lich]], and [[Wight]]s so be prepared to fight multiple of each at the same time. After playing all the instruments, the person who completed this will receive a message telling them the next section is open. | |||
<blockquote>You heard a sound of a sandstone wall moving in the distance.</blockquote> | |||
Be careful when entering the southern section when it opens, as there are 5 [[Wight]]s close together as well as a few extra [[Banshee]]. Hit the lever down the bottom left of that section to open the east walls where another 2 [[Wight]] will be protecting the boss teleporter. | |||
<br /> | |||
Harenam is generally easy. His mechanic is that everyone receives constant damage from the instruments that play, although as his health is relatively low it does not pose too much of a threat. At various points during the fight, the wall on the left side will be replaced by some bars revealing the [[Servant of Harenam]], and a magic beam will connect the servant to [[Harenam]], dealing damage to everyone inside every second. You can sever the connection by locating the instrument on the north or south side of the room playing, and standing on the corresponding tile. | |||
<br /> | |||
'''Quest Service Help'''<br /> | |||
Keep low levels near the entrance while higher levels clear the seal and play the instruments. Be very careful of low levels or mages without mana shield when moving south into the Wight room. When killing the boss, keep players close and have a druid use [[Mass Healing]] on them every few seconds. | |||
<br /> | |||
=='''Tar Seal & Suffocent'''== | =='''Tar Seal & Suffocent'''== | ||
| Line 52: | Line 92: | ||
<br /> | <br /> | ||
'''Quest Service Help'''<br> | '''Quest Service Help'''<br /> | ||
Keep the shooters stacked on the teleport instead of spreading around. If the blocker is in a vertical line from the stacked shooters, the boss will be in range for them to shoot and the blocker in a good position. | Keep the shooters stacked on the teleport instead of spreading around. If the blocker is in a vertical line from the stacked shooters, the boss will be in range for them to shoot and the blocker in a good position. | ||
| Line 62: | Line 102: | ||
<br /> | <br /> | ||
[[Terraemotus]] himself is fairly easy - provided you follow 2 simple rules: | [[Terraemotus]] himself is fairly easy - provided you follow 2 simple rules: | ||
1. Make sure the blocker is in a good position to keep agro of the boss but also not become surrounded by his summons and take extra damage. | *1. Make sure the blocker is in a good position to keep agro of the boss but also not become surrounded by his summons and take extra damage. | ||
2. Keep shooters away from the boss' aoe damage | *2. Keep shooters away from the boss' aoe damage | ||
Keeping those in mind, he does not have high combos like some of the other seal bosses have, just a lot of health to power through. | Keeping those in mind, he does not have high combos like some of the other seal bosses have, just a lot of health to power through. | ||
Revision as of 12:22, 4 June 2024

|
The Plaguebringers of Abukir Quest | |
|---|---|---|
| Reward: | For everyone: Quicksand Boots and an Ancient Backpack. Choice between one of three items: Soul Emerald, Ancient Crossbow and Magician's Staff. | |
| Location: | Abukir. | |
| Level required: | 100+ (minimum), 150+ recommended | |
| Be prepared to face: | Chimera, Undead Dragon, Abomination, Wight, Manticore, Banshee, Lich, Shattered Soul, Priestess, Necromancer, Fire Elemental, Fire Devil, Revenant, Mons, Ignis, Harenam, Suffocent, Terraemotus, Tempestas, Mortem. | |
| Legend: | The Gods of Abukir have been causing misery and destruction on the people of Abukir for too long. It's time to put a stop to their reign of terror. | |
| Method: | ||
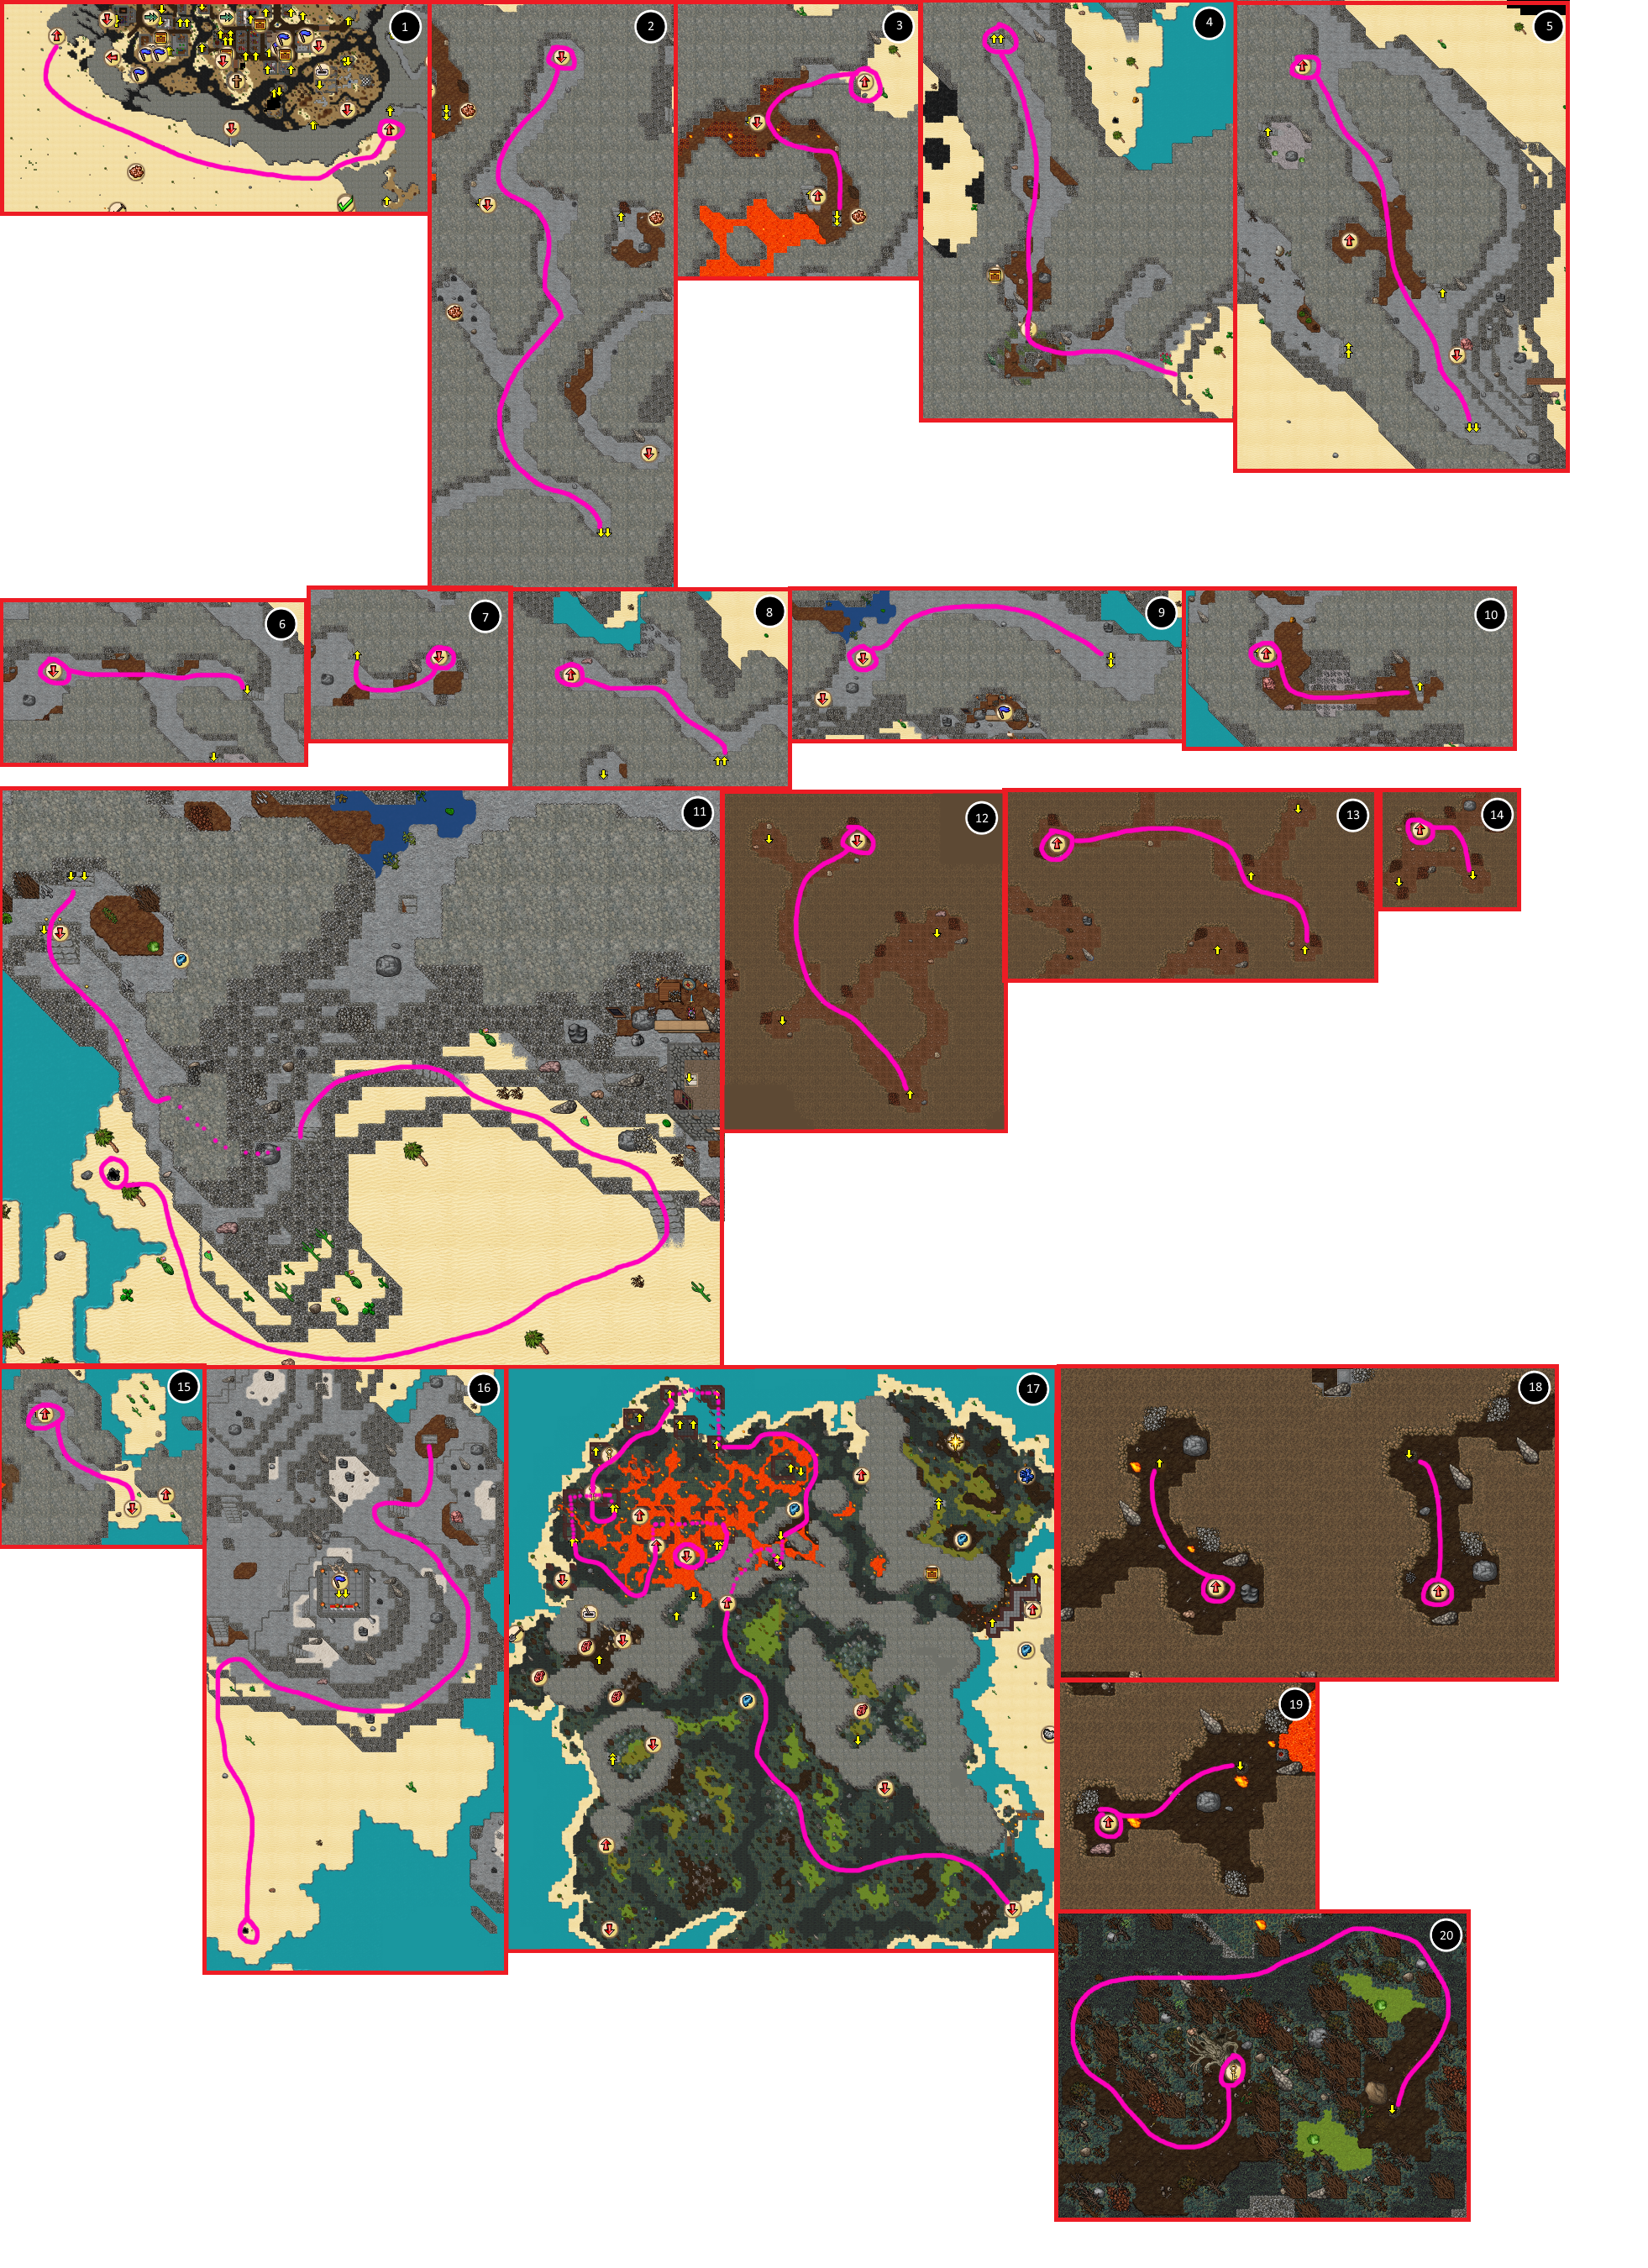
Video of the questRequirements
Route to PoA area and entrance part
Mountain Seal & Mons
The Mountain Seal is full of Gargoyles, Stone Golems, Ancient Golems, and Ancient Colossus. Before the locked area, there are only 3 Ancient Colossus, each one guarding a lever you need to pull. Once all 3 levers are pulled the section to the north will open. There is another Ancient Colossus just past the corridor, and another 2 together by the boss teleport.
Mons is the epitome of easy until you make a simple mistake. He walks slow enough that even a low level can outrun him, but if you do let him get close his melee can easily one-hit a player.
A blocker that is inexperienced with Mons should wear a Stone Skin Amulet even if they're confident that the boss won't get close enough to melee them as his AOE damage can hit multiple times if you're running away from him.
Quest Service Help
Fire Seal & Ignis
Once these bosses are killed, you can enter Ignis' chamber. Inside you will fight Ignis until he loses the first 10% of his health, then he will; disappear upstairs, split the arena into 2 sides (left/right), and send 7 waves of creatures to fight you. These waves come 30 seconds apart and consist of (on each side):
Sand Seal & Harenam
Be careful when entering the southern section when it opens, as there are 5 Wights close together as well as a few extra Banshee. Hit the lever down the bottom left of that section to open the east walls where another 2 Wight will be protecting the boss teleporter.
Tar Seal & Suffocent
Earth Seal & Terraemotus
Keeping those in mind, he does not have high combos like some of the other seal bosses have, just a lot of health to power through.
Energy Seal & Tempestas
To pass this seal easily without simply being high level, requires a leader to coordinate the team well - to lead them on the correct path, combo the Unstable Electricity efficiently, and to leave no Warlock untouched.
Death Seal & MortemIn order to enter this seal you must have completed the previous 6 seals. This doesn't need to be on the same day, just that at some point you need to have completed the other seals.
It's likely that you could find up to 3 of anything on this list, but this is what I have found personally.
Reward RoomUpon leaving Mortem's chamber you will find yourself in the reward room. You can take both of the top two items (Quicksand Boots and Ancient Backpack), but must choose only one of the below three items (Soul Emerald, Ancient Crossbow and Magician's Staff).
| ||
