Difference between revisions of "Demonic Faction"
m (Added mission 3 transcripts) |
(Added numerous links to each spawn) |
||
| Line 44: | Line 44: | ||
*You will be allowed to the city and directed to [[Arbiter Kerrin]]. | *You will be allowed to the city and directed to [[Arbiter Kerrin]]. | ||
*[[Arbiter Kerrin]] will welcome you to the watcher war effort and task you with slaying 900 [[Blood Witch]]es. | *[[Arbiter Kerrin]] will welcome you to the watcher war effort and task you with slaying 900 [[Blood Witch]]es. | ||
*There are 2 spawns of Blood Witches: | |||
*#[[South Blood Witch Spawn]] | |||
*#[[North Blood Witch Spawn]] | |||
*The reward for completing this task is '''2,000,000 Experience'''. | *The reward for completing this task is '''2,000,000 Experience'''. | ||
<br><br> | <br><br> | ||
| Line 59: | Line 62: | ||
**You will need to slay 850 [[Ashlord]]s. | **You will need to slay 850 [[Ashlord]]s. | ||
**The reward for completing this task is an [[Ashlord Doll]]. | **The reward for completing this task is an [[Ashlord Doll]]. | ||
**There is only 1 Ashlord spawn: | |||
**#[[Sheol Ashlord Spawn]] | |||
<br><br> | <br><br> | ||
<div style="text-align:center"><h2>'''Mission 5 - Magic Stones'''</h2></div> | <div style="text-align:center"><h2>'''Mission 5 - Magic Stones'''</h2></div> | ||
| Line 86: | Line 91: | ||
*Information incomplete: | *Information incomplete: | ||
**You will need to slay 800 [[Blasphemer]]s. | **You will need to slay 800 [[Blasphemer]]s. | ||
**There is only 1 Blasphemer spawn: | |||
**#[[Torem's Court]] | |||
**The reward for completing this task is '''2,280,000 Experience'''. | **The reward for completing this task is '''2,280,000 Experience'''. | ||
<br><br> | <br><br> | ||
| Line 99: | Line 106: | ||
<div style="text-align:center"><h2>'''Mission 8 - Incidamus and Venerator Souls'''</h2></div> | <div style="text-align:center"><h2>'''Mission 8 - Incidamus and Venerator Souls'''</h2></div> | ||
*You will need to slay 500 [[Incidamus]] and 500 [[Venerator]]s and collect their souls using a Souldrainer. | *You will need to slay 500 [[Incidamus]] and 500 [[Venerator]]s and collect their souls using a Souldrainer. | ||
*There are 2 Incidamus spawns and 1 Venerator spawn: | |||
*#[[Drowner's Lake]] | |||
*#[[Corruptor Hell]] | |||
*#[[Sheol Library]] | |||
<br><br> | <br><br> | ||
<div style="text-align:center"><h2>'''Mission 9 - Corruptor Crystal'''</h2></div> | <div style="text-align:center"><h2>'''Mission 9 - Corruptor Crystal'''</h2></div> | ||
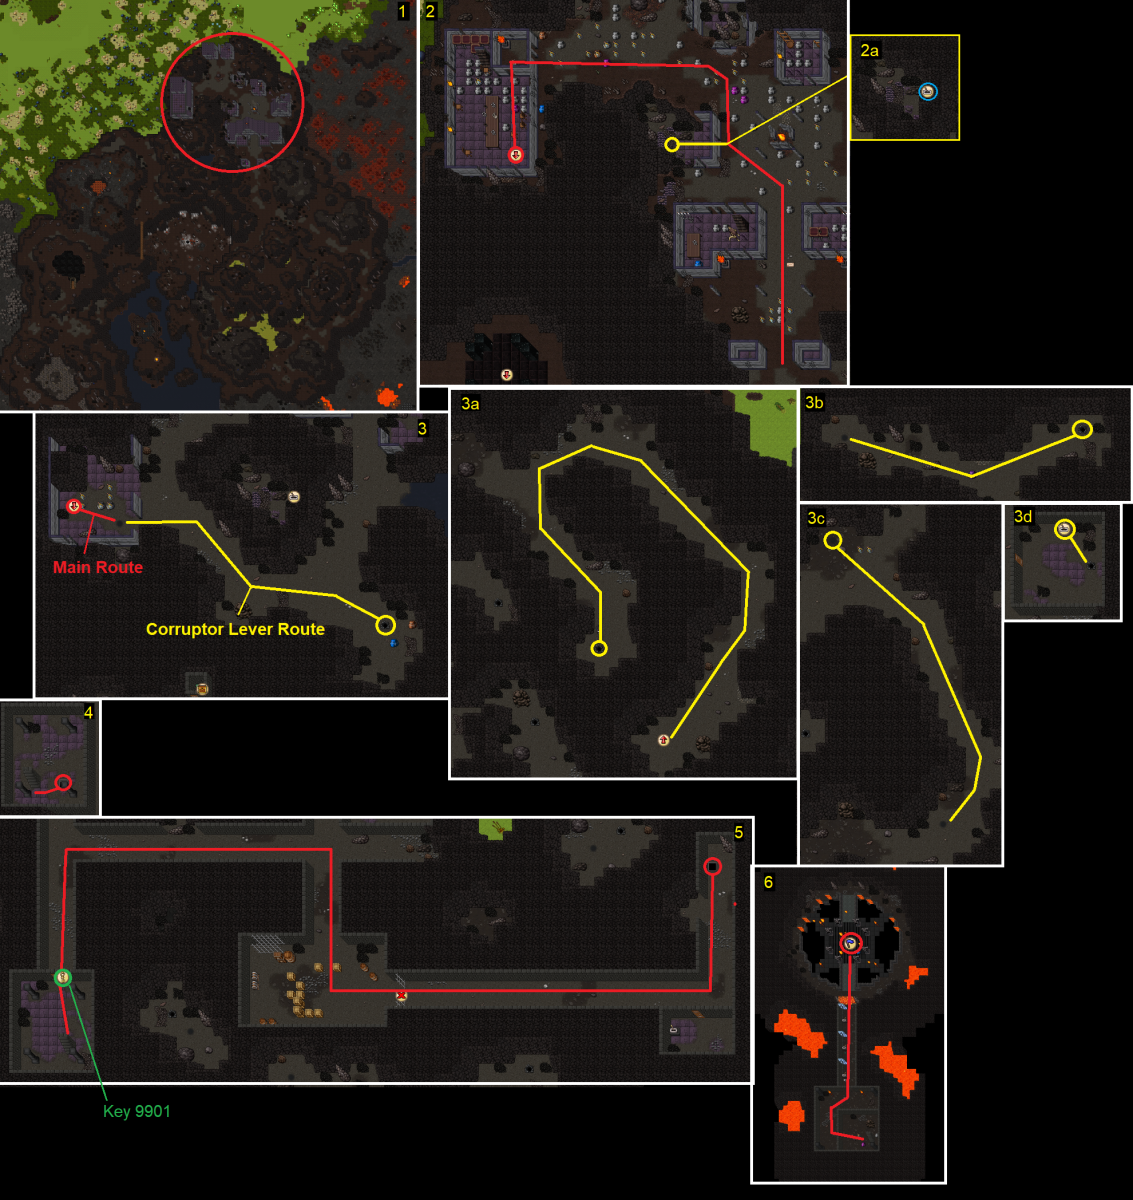
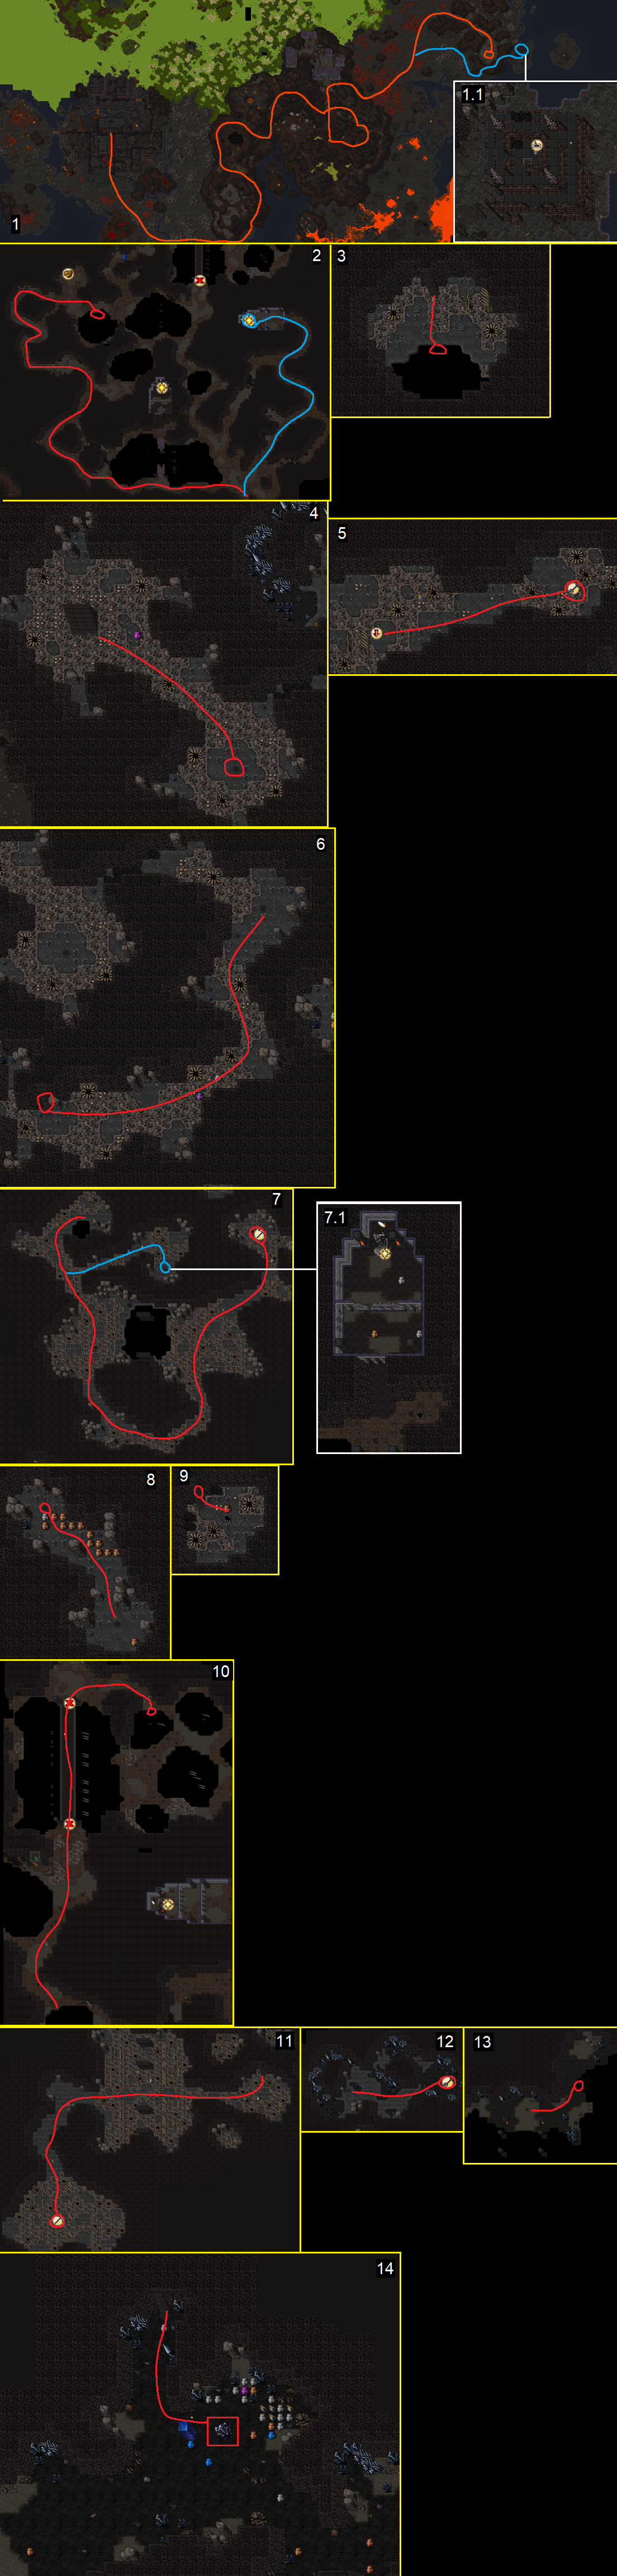
[https://www.youtube.com/watch?v=GI1G00l0aEk Video] - [[Media:Blackcrystalroutemap.png|Quest Route Image]] | [https://www.youtube.com/watch?v=GI1G00l0aEk Video] - [[Media:Blackcrystalroutemap.png|Quest Route Image]] | ||
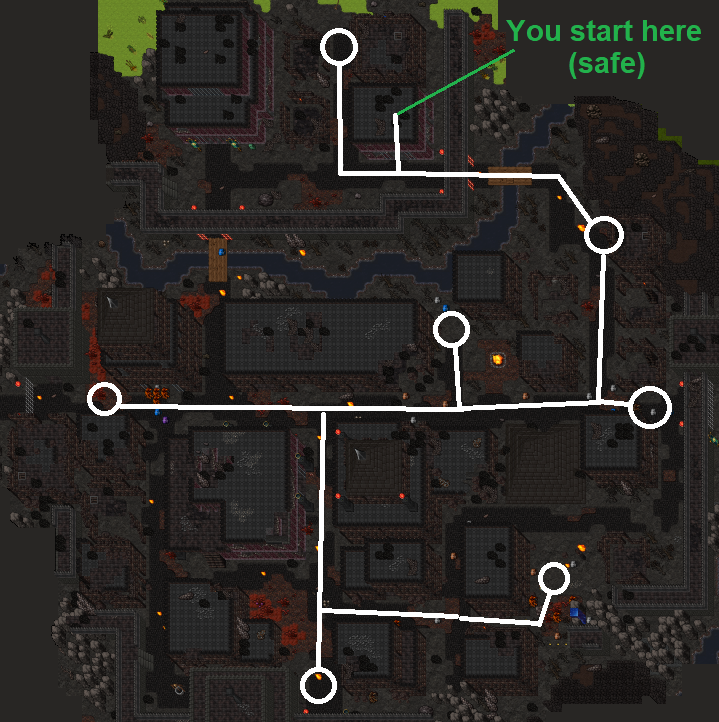
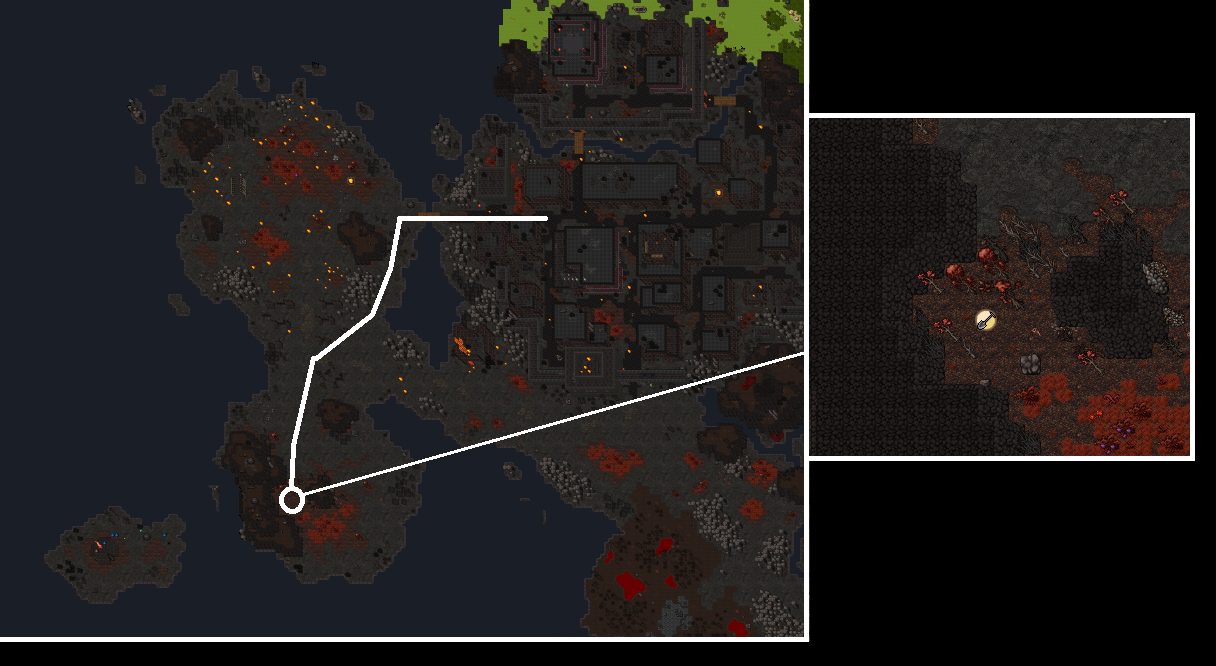
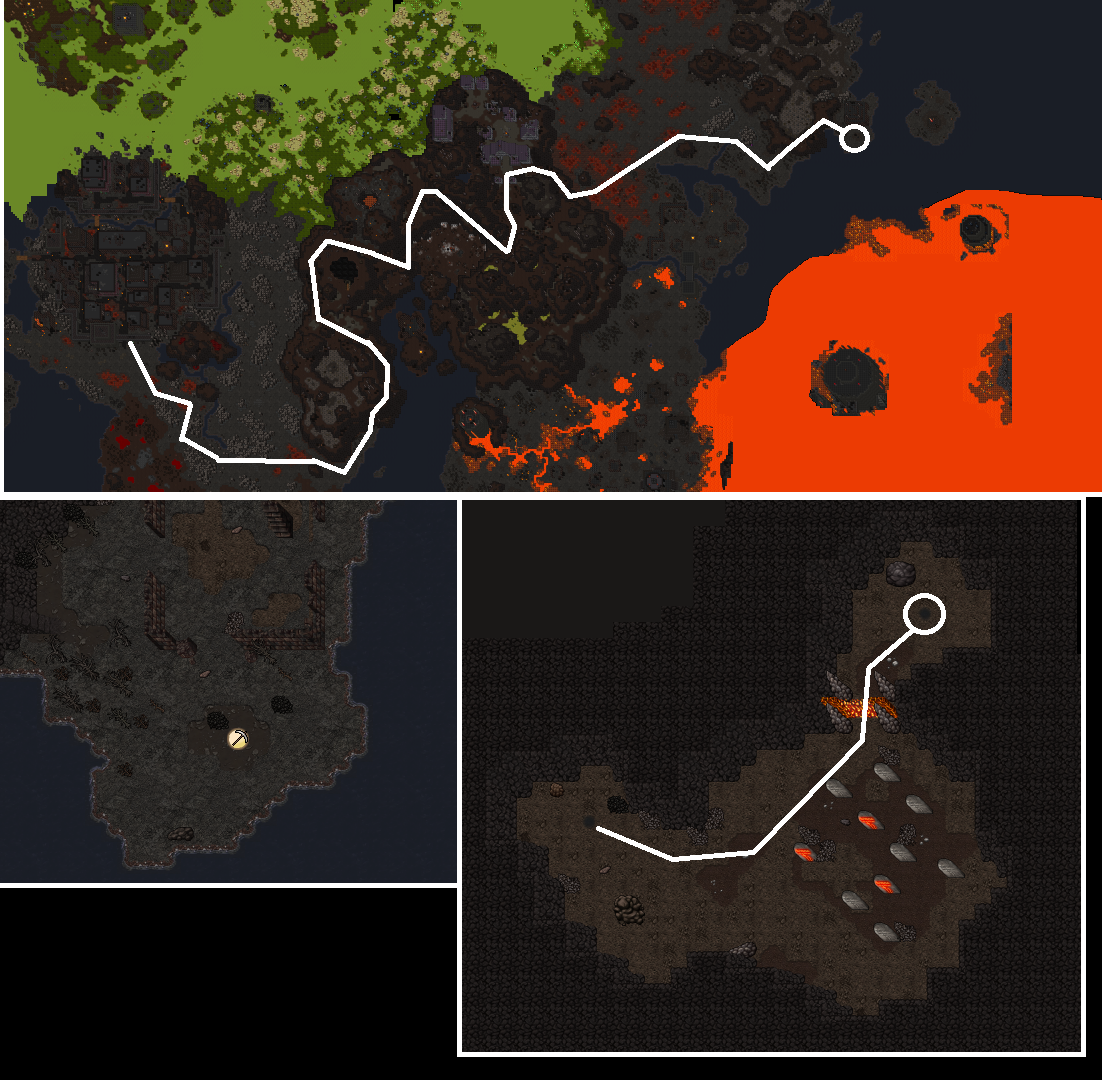
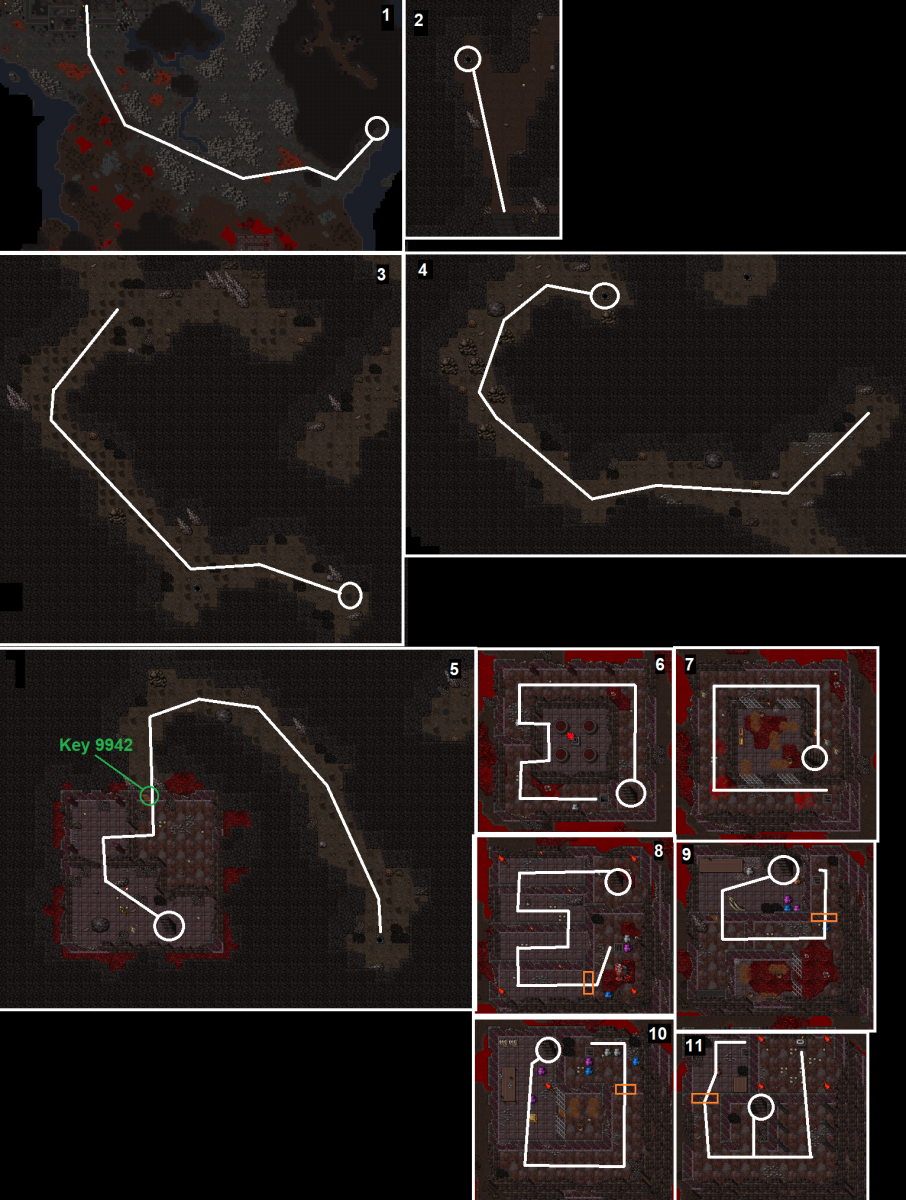
**Deep in | **Deep in [[Corruptor Hell]], beyond the Incidamus lays the Corruptors where a special crystal is. You'll need to hit a lever to access the cave. Inside the cave you'll need to use 2 gravestones which will each summon a boss ([[Ozgalluch]] the Incidamus boss and [[Tagthoder]] the Corruptor boss) - this will remove some obstacles later in the journey. | ||
**Once inside the Corruptors section take the east path and you'll find the crystal nearby the stairs. The person on the mission should use their quest item on the crystal to begin the ritual. | **Once inside the Corruptors section take the east path and you'll find the crystal nearby the stairs. The person on the mission should use their quest item on the crystal to begin the ritual. | ||
**Fog will appear making the area into an arena and after 10 seconds the first wave will spawn, with more waves spawning every 30 seconds after. There are 6 waves and each consist of 3 creatures. The 3 creatures can be either a [[Corruptor]], [[Ashlord]] or [[Incidamus]]. | **Fog will appear making the area into an arena and after 10 seconds the first wave will spawn, with more waves spawning every 30 seconds after. There are 6 waves and each consist of 3 creatures. The 3 creatures can be either a [[Corruptor]], [[Ashlord]] or [[Incidamus]]. | ||
| Line 110: | Line 121: | ||
*Information incomplete: | *Information incomplete: | ||
**You will need to slay 700 [[Demorc]]s. | **You will need to slay 700 [[Demorc]]s. | ||
**There are 2 spawns to hunt Demorcs: | |||
**#[[Demorc Entrance Spawn]] | |||
**#[[Demorc Main Spawn]] | |||
**The reward for completing this task is '''1,120,000 Experience'''. | **The reward for completing this task is '''1,120,000 Experience'''. | ||
<br><br> | <br><br> | ||
| Line 132: | Line 146: | ||
<div style="text-align:center"><h2>'''Mission 12 - Demorc Warchief Task'''</h2></div> | <div style="text-align:center"><h2>'''Mission 12 - Demorc Warchief Task'''</h2></div> | ||
*Information incomplete: | *Information incomplete: | ||
**You will need to slay 700 [[Demorc Warchief]]s. | **You will need to slay 700 [[Demorc Warchief]]s. There is only 1 spawn with Demorc Warchiefs: | ||
**#[[Demorc Main Spawn]] | |||
**The reward for completing this task is '''2,950,000 Experience'''. | **The reward for completing this task is '''2,950,000 Experience'''. | ||
<br><br> | <br><br> | ||
| Line 142: | Line 157: | ||
*Information incomplete: | *Information incomplete: | ||
**You will need to slay 1000 [[Cerberus]]es and collect 100 [[Cerberus Head]]s for this mission. | **You will need to slay 1000 [[Cerberus]]es and collect 100 [[Cerberus Head]]s for this mission. | ||
**There is only 1 spawn with Cerberus: | |||
**#[[Cerberus Hell]] - [https://www.youtube.com/watch?v=F4K0JSZhwN8 video of spawn] | |||
**The reward for completing this task is '''3,650,000 Experience'''. | **The reward for completing this task is '''3,650,000 Experience'''. | ||
<br><br> | <br><br> | ||
| Line 147: | Line 164: | ||
*Information incomplete: | *Information incomplete: | ||
**You will need to slay 400 [[Flamebringer]]s and collect 4 [[Blazing Core]]s for this mission. | **You will need to slay 400 [[Flamebringer]]s and collect 4 [[Blazing Core]]s for this mission. | ||
**There is only 1 spawn with Flamebringers: | |||
**#[[Flamebringer Hell]] | |||
**The reward for completing this task is '''3,040,000 Experience'''. | **The reward for completing this task is '''3,040,000 Experience'''. | ||
<br><br> | <br><br> | ||
| Line 152: | Line 171: | ||
*Information incomplete: | *Information incomplete: | ||
**You will need to slay 350 [[Typhon]]s, collect 50 [[Typhon Ear]]s and 20 [[Hellstone Ore]] for this mission. | **You will need to slay 350 [[Typhon]]s, collect 50 [[Typhon Ear]]s and 20 [[Hellstone Ore]] for this mission. | ||
**There are 2 spawns of Typhons: | |||
**#[[Small Typhon Spawn]] | |||
**#[[Typhon Island]] | |||
**The reward for completing this task is '''2,800,000 Experience'''. | **The reward for completing this task is '''2,800,000 Experience'''. | ||
<br><br> | <br><br> | ||
| Line 161: | Line 183: | ||
*Information incomplete: | *Information incomplete: | ||
**You will need to slay 500 [[Corruptor]]s. | **You will need to slay 500 [[Corruptor]]s. | ||
**There is only 1 spawn of Corruptors: | |||
**#[[Corruptor Hell]] | |||
**The reward for completing this task is '''4,650,000 Experience''' and the [[Crimson Key]] to the Black Gate. | **The reward for completing this task is '''4,650,000 Experience''' and the [[Crimson Key]] to the Black Gate. | ||
<br><br> | <br><br> | ||
<div style="text-align:center"><h2>'''Mission 19 - Succubus Task'''</h2></div> | <div style="text-align:center"><h2>'''Mission 19 - Succubus Task'''</h2></div> | ||
*Information incomplete: | *Information incomplete: | ||
**You will need to slay 400 [[Succubus]] | **You will need to slay 400 [[Succubus]]. | ||
**There is only 1 spawn of Succubus: | |||
**#[[Flamebringer Hell]] | |||
**The reward for completing this task is '''1,960,000 Experience'''. | **The reward for completing this task is '''1,960,000 Experience'''. | ||
<br><br> | <br><br> | ||
| Line 171: | Line 197: | ||
*Information incomplete: | *Information incomplete: | ||
**You will need to slay 150 [[Dreadlord]]s. | **You will need to slay 150 [[Dreadlord]]s. | ||
**There are 2 spawns of Dreadlords: | |||
**#[[Triple Dreadlord Spawn]] | |||
**#[[Citadel Dreardlord Spawn]] | |||
**The reward for completing this task is '''2,355,000'''. | **The reward for completing this task is '''2,355,000'''. | ||
<br><br> | <br><br> | ||
Revision as of 13:41, 25 June 2023
| Reward: | ??? | |
|---|---|---|
| Location: | Sheol | |
| Level required: | 300+ recommended | |
| Requirements: |
| |
| Items required: |
| |
| Be prepared to face: | Ashlord, Blasphemer, Blood Witch, Cerberus, Corruptor, Hellfire, Hellion, Demorc, Demorc Brute, Demorc Warchief, Dreadlord, Flamebringer, Incidamus, Skeleton Warlord, Succubus, Typhon, Venerator, Zarguth, Qyreva, Belrekath, Velranos, Ozgalluch, Tagthoder, and more... | |
| Legend: | The Empire of Eschen and the Archini Guild are cooperating to save Medivia from the encroaching demonic invasion! All Imperial Royalists and Archini Masters have been summoned to attend an audience with Emperor Arsene. | |
| Method: | ||
Mission 1 - Gaining Access
Mission 2 - Blood Witch Task
Mission 3 - Freeing Molgorth
Mission 4 - Ashlord Task
Mission 5 - Magic Stones
Mission 6 - Blasphemer Task
Mission 7 - The Tower
Mission 8 - Incidamus and Venerator Souls
Mission 9 - Corruptor Crystal
Mission 10 - Demorc Task
Mission 11 - Convince Demorc Brute
Mission 12 - Demorc Warchief Task
Mission 13 - Kill Blacksmith?
Mission 14 - Cerberus Task
Mission 15 - Flamebringer Task
Mission 16 - Typhon Task
Mission 17 - The Forge
Mission 18 - Corruptor Task
Mission 19 - Succubus Task
Mission 20 - Dreadlord Task
Mission 21 - The 6 Seals
Mission 22 - Rashed and Baalerun
| ||