Difference between revisions of "Demonic Faction"
| Line 38: | Line 38: | ||
* '''[[Demonic_Faction_Mission_1|Link to Access Mission Page]]''' | * '''[[Demonic_Faction_Mission_1|Link to Access Mission Page]]''' | ||
* Once you've defeated all the hellgate guardians, you can access Sheol through the main hellgate in the dwarf generals area of the Mittenhoff mines. You can travel there via minecart from the main hub. | * Once you've defeated all the hellgate guardians, you can access Sheol through the main hellgate in the dwarf generals area of the Mittenhoff mines. You can travel there via minecart from the main hub. | ||
<div style="text-align:center"><h2>'''Mission 2 - Blood Witch Task'''</h2></div> | <div style="text-align:center"><h2>'''Mission 2 - Blood Witch Task'''</h2></div> | ||
*Travel east into the city of [[Zarrith]]. | *Travel east into the city of [[Zarrith]]. | ||
| Line 48: | Line 49: | ||
*#[[North Blood Witch Spawn]] | *#[[North Blood Witch Spawn]] | ||
*The reward for completing this task is '''2,000,000 Experience'''. | *The reward for completing this task is '''2,000,000 Experience'''. | ||
<div style="text-align:center"><h2>'''Mission 3 - Freeing Molgorth'''</h2></div> | <div style="text-align:center"><h2>'''Mission 3 - Freeing Molgorth'''</h2></div> | ||
*[https://www.youtube.com/watch?v=0S99G1YIKDU Part 1] - [https://www.youtube.com/watch?v=DEEdOy7ZkFg Part 2] - [https://www.youtube.com/watch?v=fGcTVpvBjTY Part 3] - [https://www.youtube.com/watch?v=D6ybCld4OmE Torem's Court Video] | *[https://www.youtube.com/watch?v=0S99G1YIKDU Part 1] - [https://www.youtube.com/watch?v=DEEdOy7ZkFg Part 2] - [https://www.youtube.com/watch?v=fGcTVpvBjTY Part 3] - [https://www.youtube.com/watch?v=D6ybCld4OmE Torem's Court Video] | ||
| Line 58: | Line 59: | ||
**Return to [[Molgorth]] with 8 [[Violet Magic Orb]]s that can be looted inside [[Torem's Court]] from any monster at floor -1. | **Return to [[Molgorth]] with 8 [[Violet Magic Orb]]s that can be looted inside [[Torem's Court]] from any monster at floor -1. | ||
*[[Demonic Faction Mission 3 Transcripts]] | *[[Demonic Faction Mission 3 Transcripts]] | ||
<div style="text-align:center"><h2>'''Mission 4 - Ashlord Task'''</h2></div> | <div style="text-align:center"><h2>'''Mission 4 - Ashlord Task'''</h2></div> | ||
**You will need to slay 850 [[Ashlord]]s. | **You will need to slay 850 [[Ashlord]]s. | ||
| Line 65: | Line 66: | ||
**#[[Ashlord Volcano]] | **#[[Ashlord Volcano]] | ||
**#You can also choose to hunt them at The Hellish Gate where you fight [[Thor'garak]] | **#You can also choose to hunt them at The Hellish Gate where you fight [[Thor'garak]] | ||
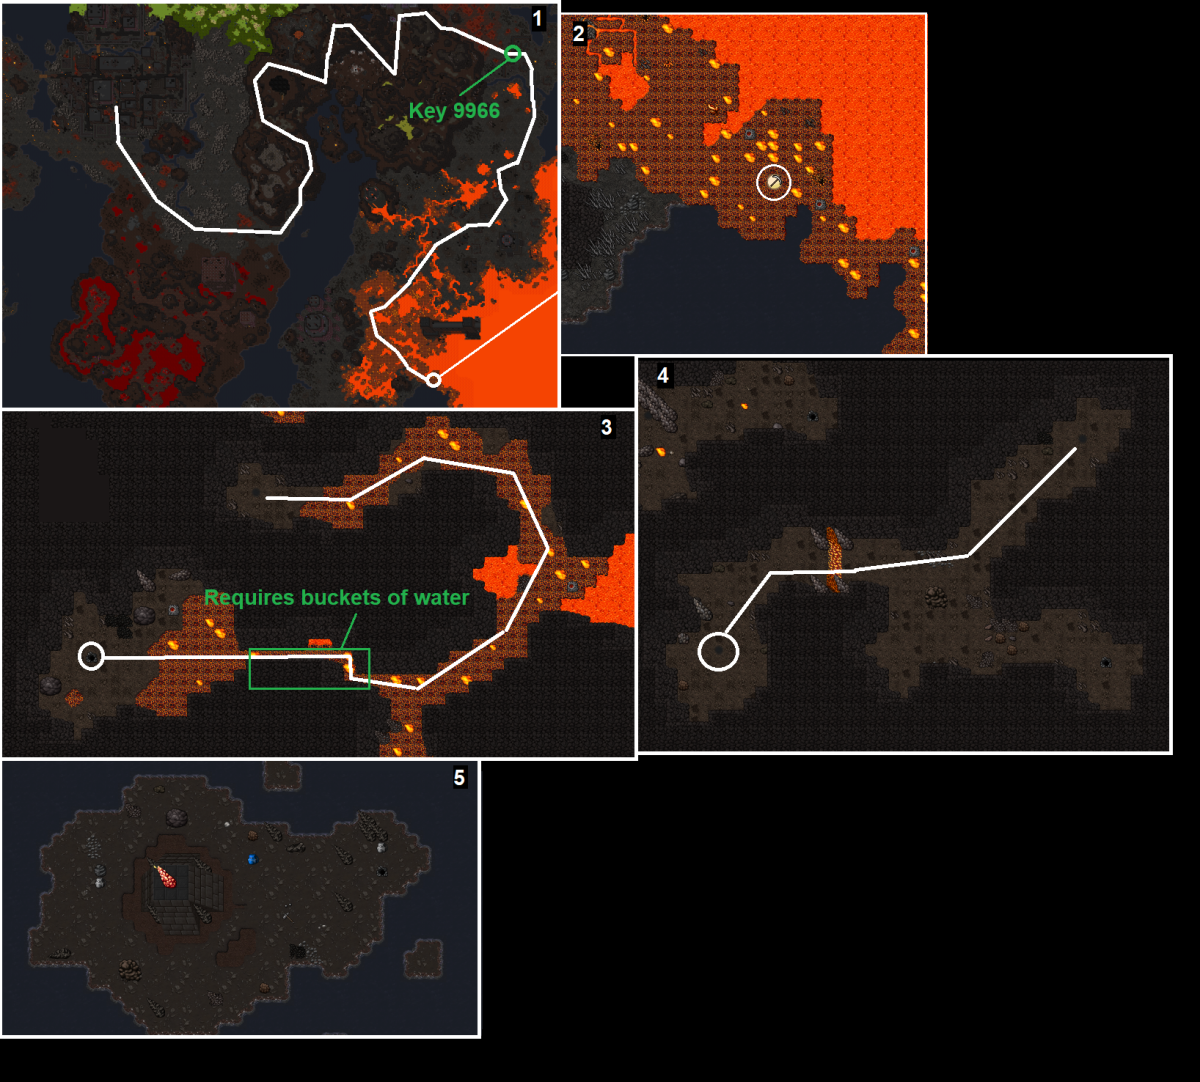
<div style="text-align:center"><h2>'''Mission 5 - Magic Stones'''</h2></div> | <div style="text-align:center"><h2>'''Mission 5 - Magic Stones'''</h2></div> | ||
*Requires [[Key 9966]] for Magic Stone #1 | *Requires [[Key 9966]] for Magic Stone #1 | ||
| Line 88: | Line 89: | ||
**Stone #4 - [https://i.gyazo.com/aa2d1a52f9c13cdaa024127c644edb73.png Map] | **Stone #4 - [https://i.gyazo.com/aa2d1a52f9c13cdaa024127c644edb73.png Map] | ||
***The fourth stone is located far to the east of [[Sheol]]. Once inside the magic stone you will be watching a cinematic of Umos the Dragon God fighting Rashed the Demon King. You do not need to do anything except wait for the cinematic to be over. | ***The fourth stone is located far to the east of [[Sheol]]. Once inside the magic stone you will be watching a cinematic of Umos the Dragon God fighting Rashed the Demon King. You do not need to do anything except wait for the cinematic to be over. | ||
<div style="text-align:center"><h2>'''Mission 6 - Blasphemer Task'''</h2></div> | <div style="text-align:center"><h2>'''Mission 6 - Blasphemer Task'''</h2></div> | ||
<div style="text-align:center">[[File:Blasphemer.png]]</div><br> | |||
You will need to slay 800 [[Blasphemer]]s.<br> | |||
There is only 1 "good" Blasphemer spawn: [[Torem's Court]]<br> | |||
But you can do also in [[Sheol Library]] and [[Sheol Elevator]]<br><br> | |||
After finish the [[Blasphemer]]s task you need to deliver 50 [[File:Blasphemer Staff.png|link=Blasphemer Staff]], which can be easily picked up during the task.<br> | |||
The reward for completing this task is '''2,280,000 Experience'''. | |||
<div style="text-align:center"><h2>'''Mission 7 - The Tower'''</h2></div> | <div style="text-align:center"><h2>'''Mission 7 - The Tower'''</h2></div> | ||
*[https://www.youtube.com/watch?v=uXSr3gku78Q Video] - [https://i.gyazo.com/fb080d3c476d6929b01e63d119d75bef.png Map] | *[https://www.youtube.com/watch?v=uXSr3gku78Q Video] - [https://i.gyazo.com/fb080d3c476d6929b01e63d119d75bef.png Map] | ||
| Line 105: | Line 106: | ||
**#'''UE Clear''' <p>Bring 2-4 archmages who will stairhop the difficult floors before a knight will continue. | **#'''UE Clear''' <p>Bring 2-4 archmages who will stairhop the difficult floors before a knight will continue. | ||
**Once on the top floor all players on the mission will need to speak to NPC [[Mauldir]] together as once one person has finished talking the NPCs will all disappear until the next server save.</p> | **Once on the top floor all players on the mission will need to speak to NPC [[Mauldir]] together as once one person has finished talking the NPCs will all disappear until the next server save.</p> | ||
<div style="text-align:center"><h2>'''Mission 8 - Incidamus and Venerator Souls'''</h2></div> | <div style="text-align:center"><h2>'''Mission 8 - Incidamus and Venerator Souls'''</h2></div> | ||
*You will need to slay 500 [[Incidamus]] and 500 [[Venerator]]s and collect their souls using a Souldrainer. | *You will need to slay 500 [[Incidamus]] and 500 [[Venerator]]s and collect their souls using a Souldrainer. | ||
| Line 112: | Line 113: | ||
*#[[Corruptor Hell]] | *#[[Corruptor Hell]] | ||
*#[[Sheol Library]] | *#[[Sheol Library]] | ||
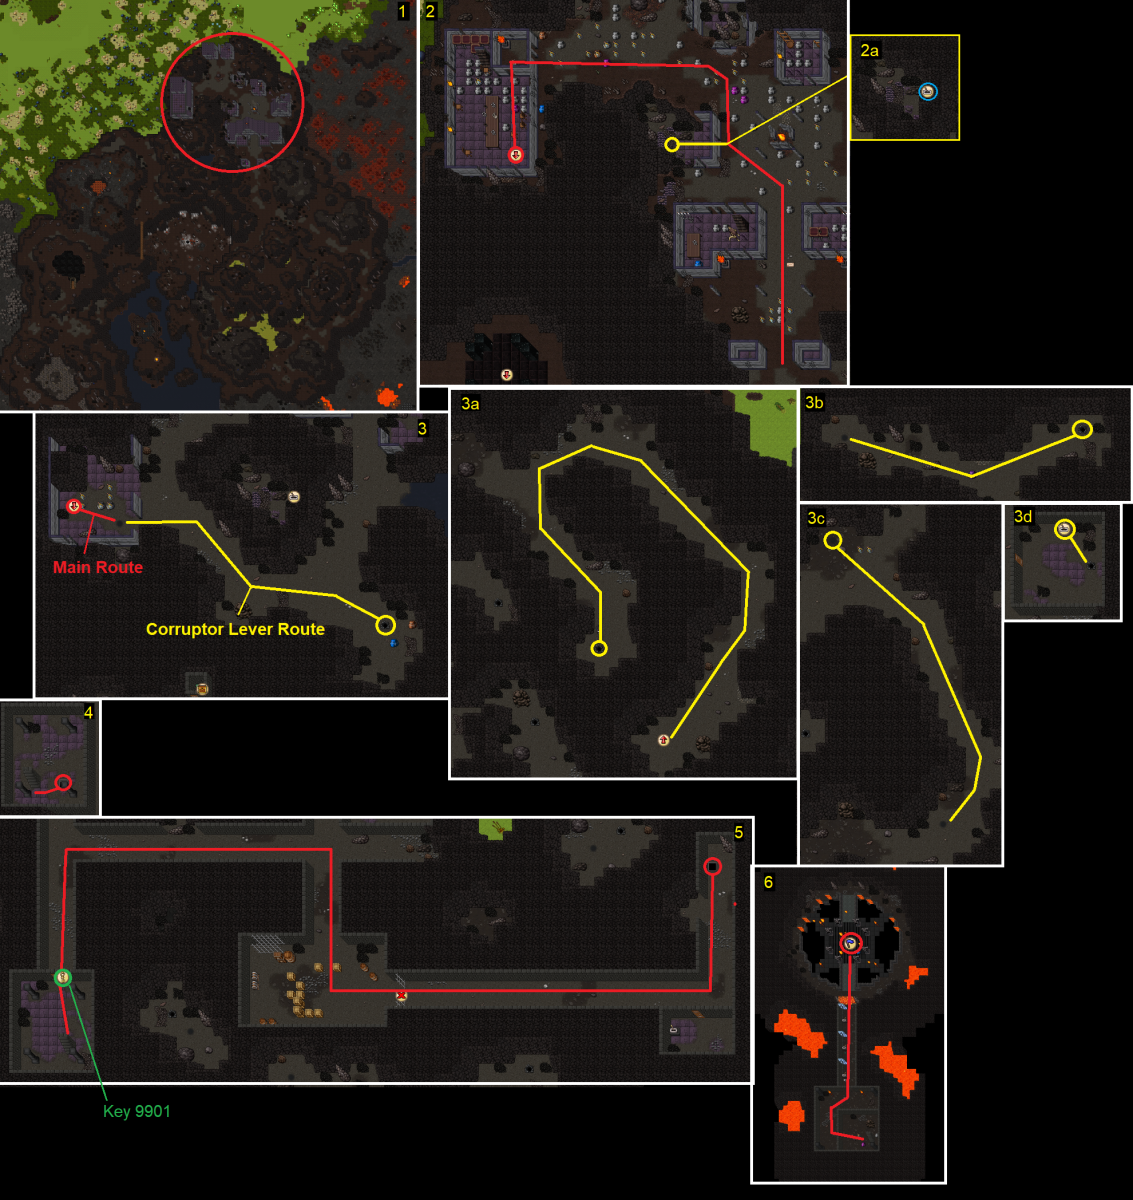
<div style="text-align:center"><h2>'''Mission 9 - Corruptor Crystal'''</h2></div> | <div style="text-align:center"><h2>'''Mission 9 - Corruptor Crystal'''</h2></div> | ||
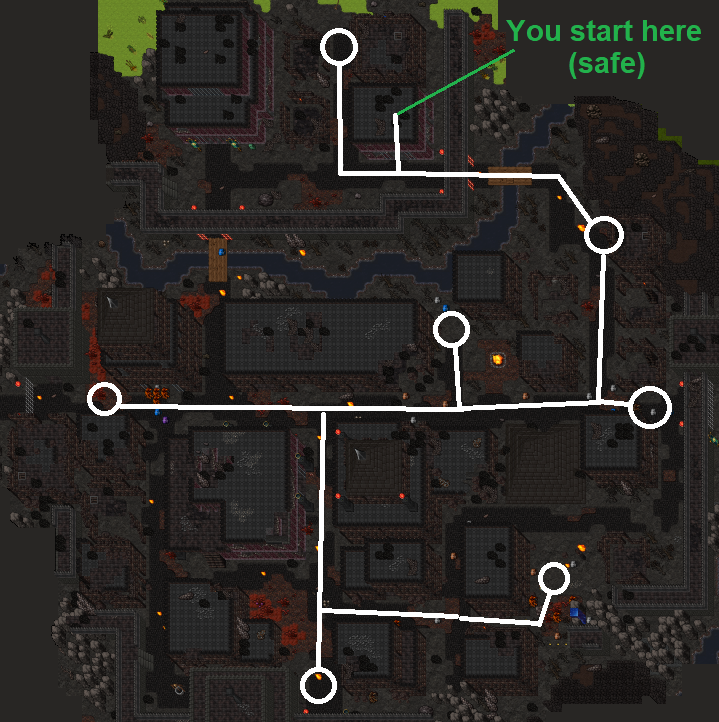
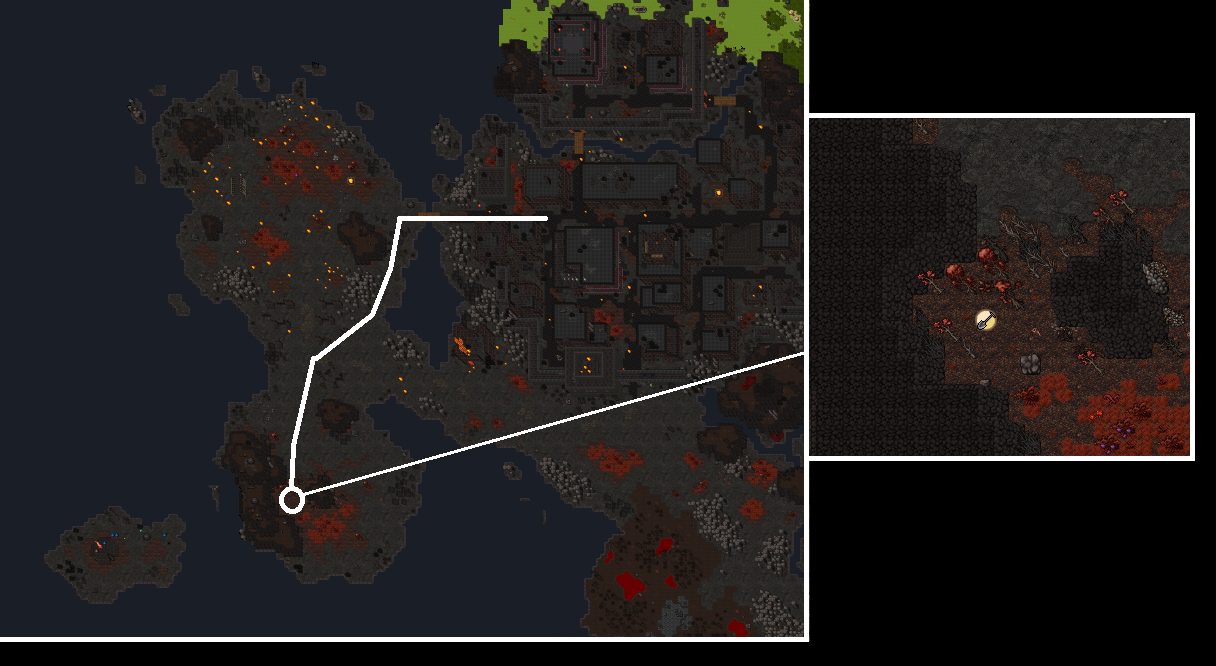
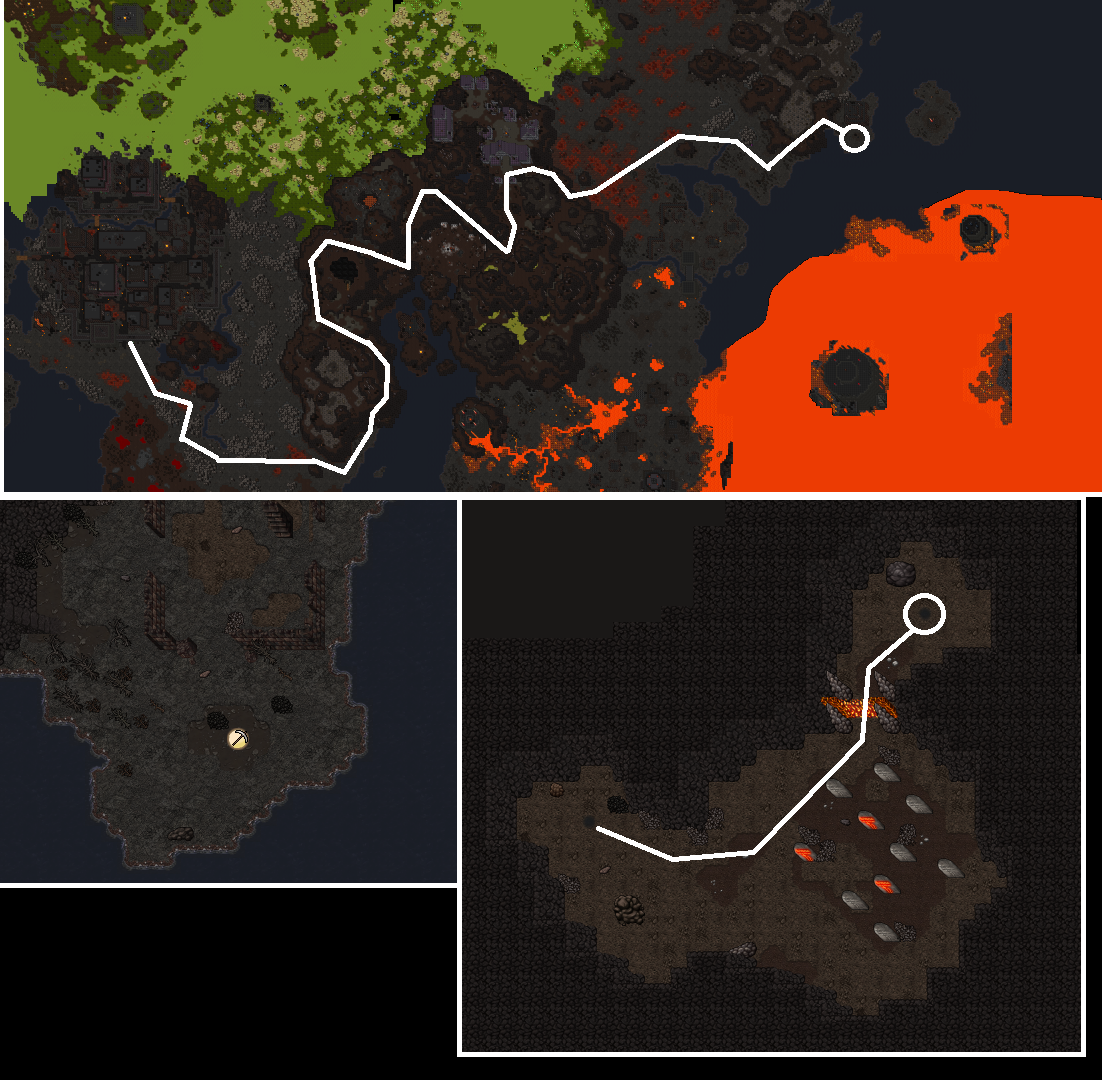
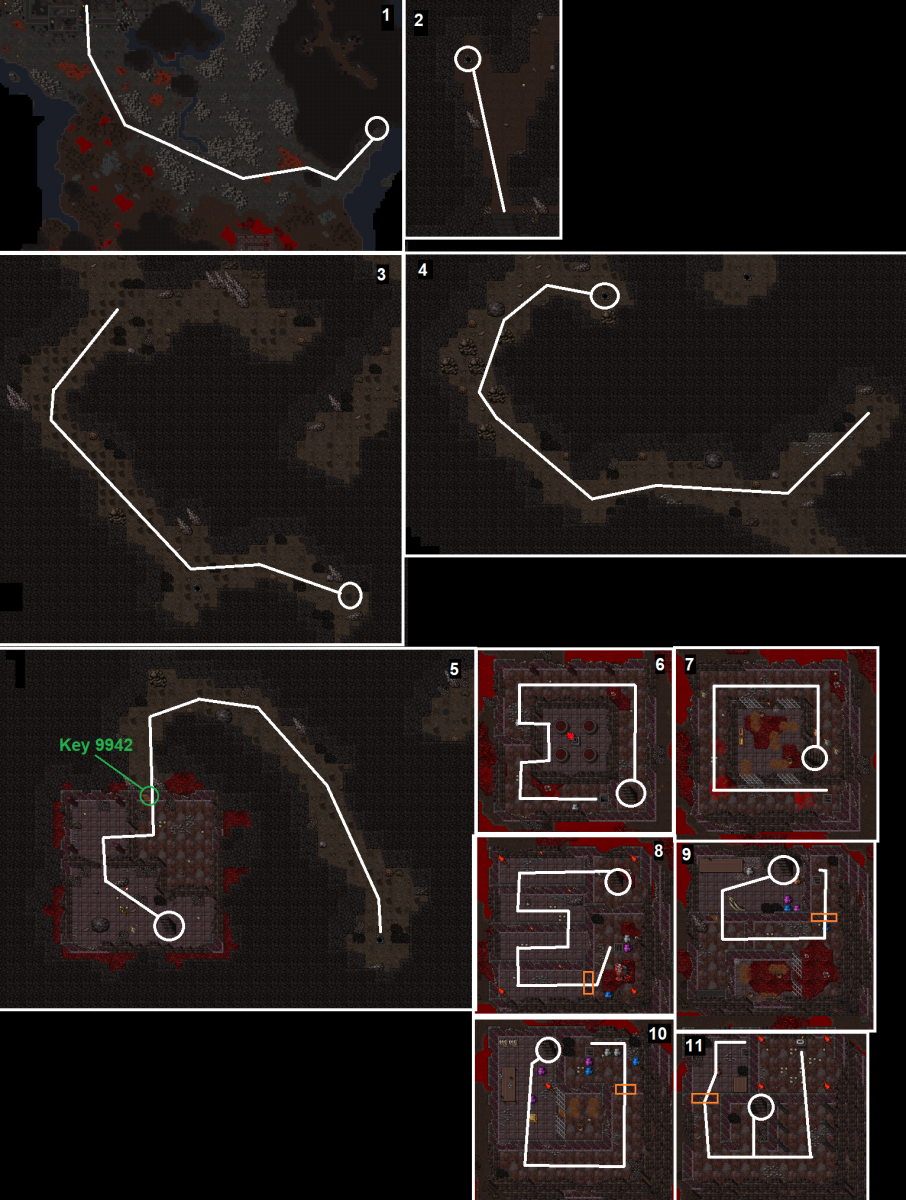
[https://www.youtube.com/watch?v=GI1G00l0aEk Video] - [[Media:Blackcrystalroutemap.png|Quest Route Image]] | [https://www.youtube.com/watch?v=GI1G00l0aEk Video] - [[Media:Blackcrystalroutemap.png|Quest Route Image]] | ||
| Line 121: | Line 122: | ||
[[File:Lensesoftruth.PNG|200px]]<br> | [[File:Lensesoftruth.PNG|200px]]<br> | ||
**Give the [[Lenses of Truth]] to [[Grandmaster Elijah]] and wait 10 minutes.<br> | **Give the [[Lenses of Truth]] to [[Grandmaster Elijah]] and wait 10 minutes.<br> | ||
**After wait the 10 minutes, speak again with [[Grandmaster Elijah]] to start the next mission. | **After wait the 10 minutes, speak again with [[Grandmaster Elijah]] to start the next mission. | ||
<div style="text-align:center"><h2>'''Mission 10 - Demorc Task'''</h2></div> | <div style="text-align:center"><h2>'''Mission 10 - Demorc Task'''</h2></div> | ||
*Information incomplete: | *Information incomplete: | ||
| Line 129: | Line 131: | ||
**#[[Demorc Main Spawn]] | **#[[Demorc Main Spawn]] | ||
**The reward for completing this task is '''1,120,000 Experience'''. | **The reward for completing this task is '''1,120,000 Experience'''. | ||
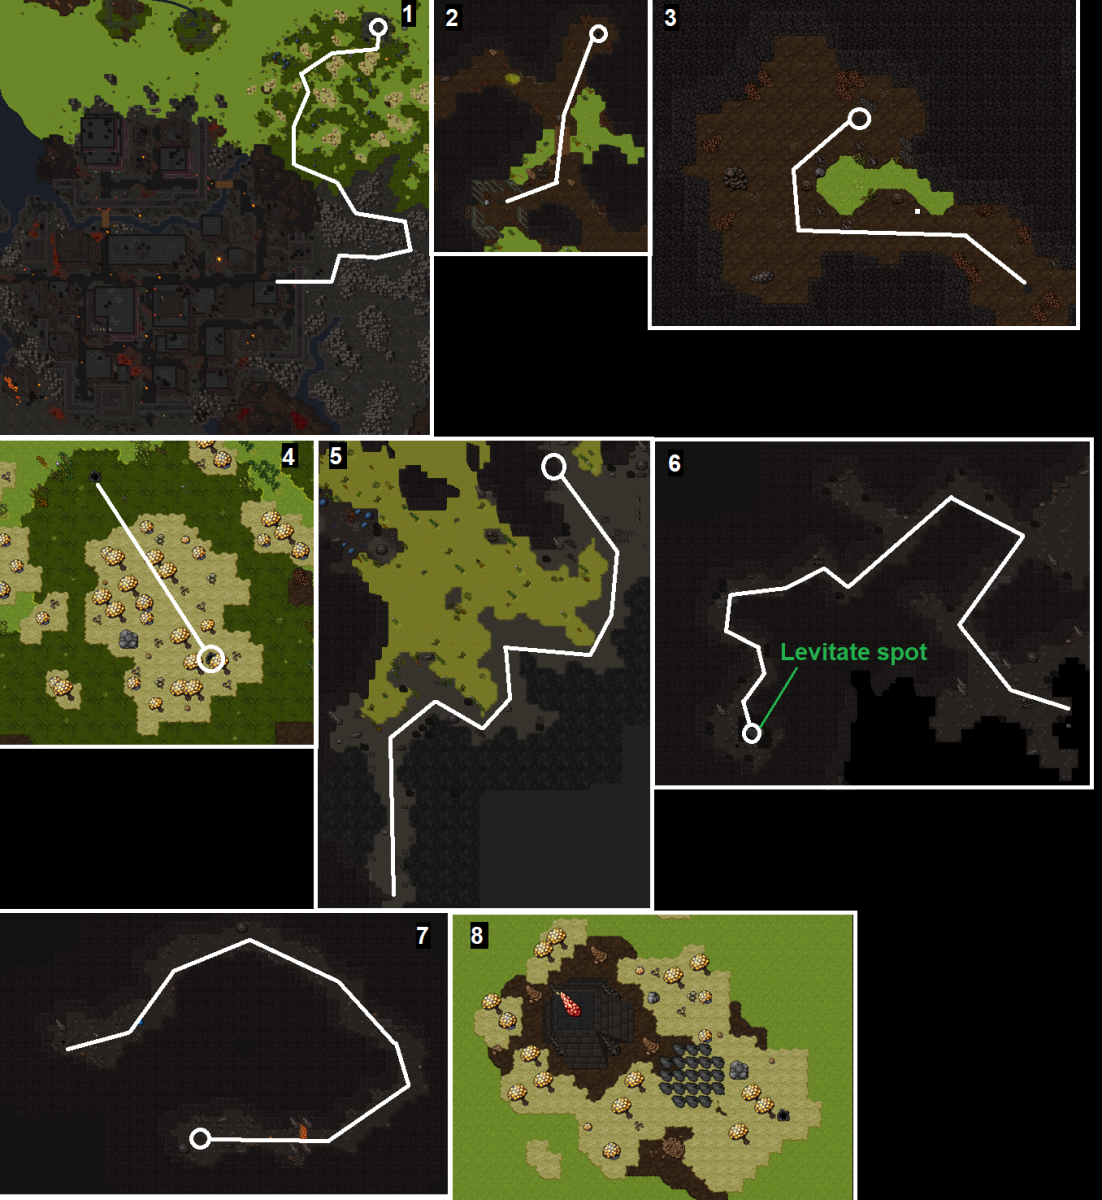
<div style="text-align:center"><h2>'''Mission 11 - Convince Demorc Brute'''</h2></div> | <div style="text-align:center"><h2>'''Mission 11 - Convince Demorc Brute'''</h2></div> | ||
*Using the Mind Crystal[[File:Mind_crystal.gif]]you must convince just one [[Demorc Brute]] while they're on low (red) health. The chance of a successful persuasion is very low. Once convinced you must interrogate them for knowledge on [[Demorc Warchief]]s <b>weak points</b>. | *Using the Mind Crystal[[File:Mind_crystal.gif]]you must convince just one [[Demorc Brute]] while they're on low (red) health. The chance of a successful persuasion is very low. Once convinced you must interrogate them for knowledge on [[Demorc Warchief]]s <b>weak points</b>. | ||
| Line 171: | Line 173: | ||
[[File:Wayto.PNG|400px]]<br><br> | [[File:Wayto.PNG|400px]]<br><br> | ||
[[File:Wayto2.PNG|400px]]<br><br> | [[File:Wayto2.PNG|400px]]<br><br> | ||
[[File:Wayto3.PNG|400px]] | [[File:Wayto3.PNG|400px]] | ||
<div style="text-align:center"><h2>'''Mission 13 - Kill Blacksmith'''</h2></div> | <div style="text-align:center"><h2>'''Mission 13 - Kill Blacksmith'''</h2></div> | ||
*Information incomplete: | *Information incomplete: | ||
**? | **? | ||
<div style="text-align:center"><h2>'''Mission 14 - Cerberus Task'''</h2></div> | <div style="text-align:center"><h2>'''Mission 14 - Cerberus Task'''</h2></div> | ||
*Information incomplete: | *Information incomplete: | ||
| Line 182: | Line 185: | ||
**#[[Cerberus Hell]] - [https://www.youtube.com/watch?v=F4K0JSZhwN8 video of spawn] | **#[[Cerberus Hell]] - [https://www.youtube.com/watch?v=F4K0JSZhwN8 video of spawn] | ||
**The reward for completing this task is '''3,650,000 Experience'''. | **The reward for completing this task is '''3,650,000 Experience'''. | ||
<div style="text-align:center"><h2>'''Mission 15 - Flamebringer Task'''</h2></div> | <div style="text-align:center"><h2>'''Mission 15 - Flamebringer Task'''</h2></div> | ||
*Information incomplete: | *Information incomplete: | ||
| Line 189: | Line 192: | ||
**#[[Flamebringer Hell]] | **#[[Flamebringer Hell]] | ||
**The reward for completing this task is '''3,040,000 Experience'''. | **The reward for completing this task is '''3,040,000 Experience'''. | ||
<div style="text-align:center"><h2>'''Mission 16 - Typhon Task'''</h2></div> | <div style="text-align:center"><h2>'''Mission 16 - Typhon Task'''</h2></div> | ||
*Information incomplete: | *Information incomplete: | ||
| Line 197: | Line 200: | ||
**#[[Typhon Island]] | **#[[Typhon Island]] | ||
**The reward for completing this task is '''2,800,000 Experience'''. | **The reward for completing this task is '''2,800,000 Experience'''. | ||
<div style="text-align:center"><h2>'''Mission 17 - The Forge'''</h2></div> | <div style="text-align:center"><h2>'''Mission 17 - The Forge'''</h2></div> | ||
*Information incomplete: | *Information incomplete: | ||
**Travel to the forge?, then to the demonic hand? and then to the forge in the past. | **Travel to the forge?, then to the demonic hand? and then to the forge in the past. | ||
<div style="text-align:center"><h2>'''Mission 18 - Corruptor Task'''</h2></div> | <div style="text-align:center"><h2>'''Mission 18 - Corruptor Task'''</h2></div> | ||
*Information incomplete: | *Information incomplete: | ||
| Line 208: | Line 211: | ||
**#[[Corruptor Hell]] | **#[[Corruptor Hell]] | ||
**The reward for completing this task is '''4,650,000 Experience''' and the [[Crimson Key]] to the Black Gate. | **The reward for completing this task is '''4,650,000 Experience''' and the [[Crimson Key]] to the Black Gate. | ||
<div style="text-align:center"><h2>'''Mission 19 - Succubus Task'''</h2></div> | <div style="text-align:center"><h2>'''Mission 19 - Succubus Task'''</h2></div> | ||
*Information incomplete: | *Information incomplete: | ||
| Line 215: | Line 218: | ||
**#[[Flamebringer Hell]] | **#[[Flamebringer Hell]] | ||
**The reward for completing this task is '''1,960,000 Experience'''. | **The reward for completing this task is '''1,960,000 Experience'''. | ||
<div style="text-align:center"><h2>'''Mission 20 - Dreadlord Task'''</h2></div> | <div style="text-align:center"><h2>'''Mission 20 - Dreadlord Task'''</h2></div> | ||
*Information incomplete: | *Information incomplete: | ||
| Line 223: | Line 226: | ||
**#[[Citadel Dreardlord Spawn]] | **#[[Citadel Dreardlord Spawn]] | ||
**The reward for completing this task is '''2,355,000'''. | **The reward for completing this task is '''2,355,000'''. | ||
<div style="text-align:center"><h2>'''Mission 21 - The 6 Seals'''</h2></div> | <div style="text-align:center"><h2>'''Mission 21 - The 6 Seals'''</h2></div> | ||
*Information incomplete: | *Information incomplete: | ||
| Line 233: | Line 236: | ||
** Kryzgog, the Great Torture [[Kryzgog]] | ** Kryzgog, the Great Torture [[Kryzgog]] | ||
** Mortem, the Mighty General [[Mortem_(sheol)]] | ** Mortem, the Mighty General [[Mortem_(sheol)]] | ||
<div style="text-align:center"><h2>'''Mission 22 - Rashed and Baalerun'''</h2></div> | <div style="text-align:center"><h2>'''Mission 22 - Rashed and Baalerun'''</h2></div> | ||
*You must defeat Rashed. | *You must defeat Rashed. | ||
Revision as of 20:37, 5 December 2023
| Reward: | A new Promotion and choice between one of five items: The Armageddon, The Apocalypse, The Calamity, The Annihilator or The Doomcaller | |
|---|---|---|
| Location: | Sheol | |
| Level required: | 300+ recommended | |
| Requirements: |
| |
| Items required: |
| |
| Be prepared to face: | Ashlord, Blasphemer, Blood Witch, Cerberus, Corruptor, Hellfire, Hellion, Demorc, Demorc Brute, Demorc Warchief, Dreadlord, Flamebringer, Incidamus, Skeleton Warlord, Succubus, Typhon, Venerator, Zarguth, Qyreva, Belrekath, Velranos, Ozgalluch, Tagthoder, and more... | |
| Legend: | The Empire of Eschen and the Archini Guild are cooperating to save Medivia from the encroaching demonic invasion! All Imperial Royalists and Archini Masters have been summoned to attend an audience with Emperor Arsene. | |
| Method: | ||
Mission 1 - Gaining Access
Mission 2 - Blood Witch Task
Mission 3 - Freeing Molgorth
Mission 4 - Ashlord Task
Mission 5 - Magic Stones
Mission 6 - Blasphemer Task You will need to slay 800 Blasphemers. Mission 7 - The Tower
Mission 8 - Incidamus and Venerator Souls
Mission 9 - Corruptor Crystal
Mission 10 - Demorc Task
Mission 11 - Convince Demorc Brute
Player: Hi
Weakened Demorc Brute: I beg you... Do not kill me!...
Weakened Demorc Brute: I will tell you everything you want to know, just spare my life...
Weakened Demorc Brute: What do you want to know?
Player: Weak Point
Weakened Demorc Brute: Only the strongest demorcs can become warchiefs, they have no flaws...
Weakened Demorc Brute: But just like me they are still demorcs. And we all fear one thing...
Weakened Demorc Brute: Fire...
Weakened Demorc Brute: I have told you enough, haven't I? Now please, let me go...
Weakened Demorc Brute disappears>
Mission 12 - Demorc Warchief Task
Player: hi
Demorc Lord Galzebran: So this is you, that mortal who has invaded my domain?...
Demorc Lord Galzebran: I am suprised that an entity from the world of Medivia has managed to destroy this many of my troops...
Demorc Lord Galzebran: As you may already tell, I cannot let more of my kind die by your hand and for my kingdom to become a ruin...
Demorc Lord Galzebran: I surrender. We will aid you in the war against Baalerun and will not attack Medivia...
Demorc Lord Galzebran: We will grant you permission to enter the swamp and meet our prisoner, which is what you wanted in the first place...
Demorc Lord Galzebran: My brothers may not understand or accept my decision. Expect them to still be hostile against you...
Demorc Lord Galzebran: They were not trained to surrender, after all.
Mission 13 - Kill Blacksmith
Mission 14 - Cerberus Task
Mission 15 - Flamebringer Task
Mission 16 - Typhon Task
Mission 17 - The Forge
Mission 18 - Corruptor Task
Mission 19 - Succubus Task
Mission 20 - Dreadlord Task
Mission 21 - The 6 Seals
Mission 22 - Rashed and Baalerun
| ||


