Difference between revisions of "Demonic Faction"
| Line 48: | Line 48: | ||
<div style="text-align:center"><h2>'''Mission 3 - Freeing Molgorth'''</h2></div> | <div style="text-align:center"><h2>'''Mission 3 - Freeing Molgorth'''</h2></div> | ||
<div style="text-align:center">[[File:Molgorth.png]] | <div style="text-align:center">[[File:Molgorth.png]]<br> | ||
[https://www.youtube.com/watch?v=0S99G1YIKDU Part 1]<br> | [https://www.youtube.com/watch?v=0S99G1YIKDU Part 1]<br> | ||
[https://www.youtube.com/watch?v=DEEdOy7ZkFg Part 2]<br> | [https://www.youtube.com/watch?v=DEEdOy7ZkFg Part 2]<br> | ||
[https://www.youtube.com/watch?v=fGcTVpvBjTY Part 3]<br> | [https://www.youtube.com/watch?v=fGcTVpvBjTY Part 3]<br> | ||
[https://www.youtube.com/watch?v=D6ybCld4OmE Torem's Court Video]< | [https://www.youtube.com/watch?v=D6ybCld4OmE Torem's Court Video]</div><br> | ||
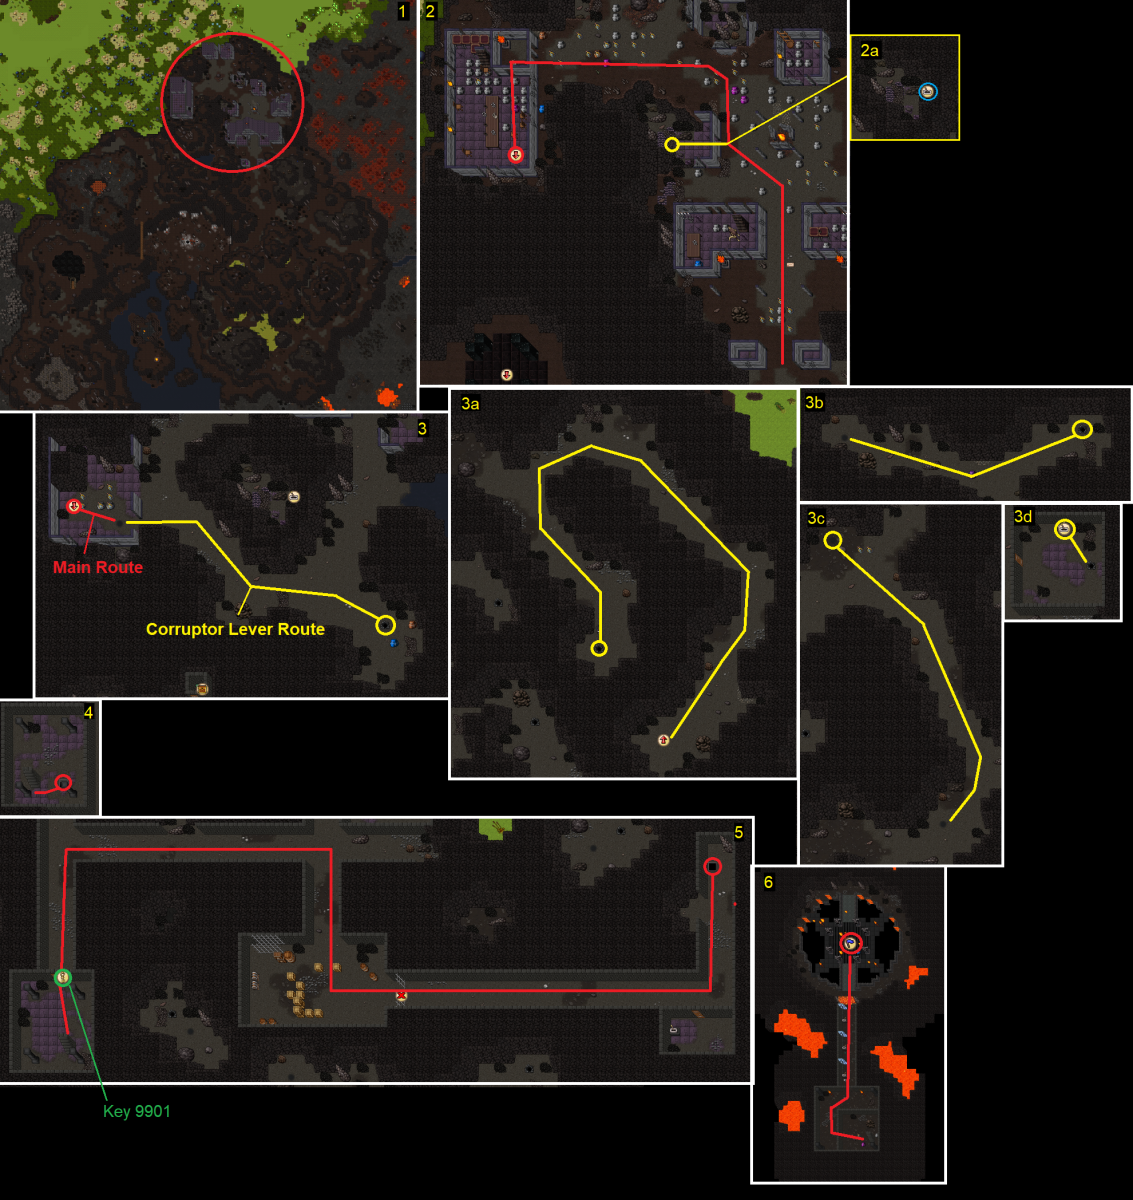
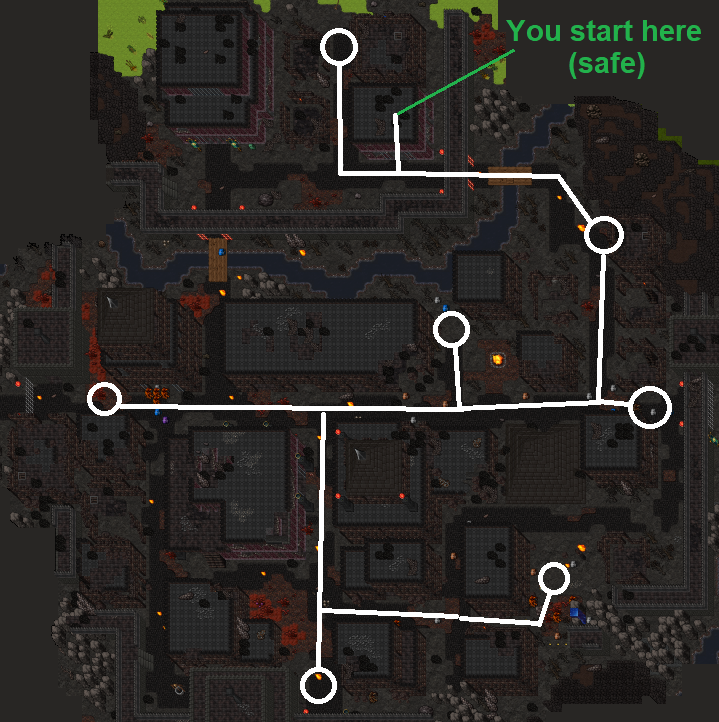
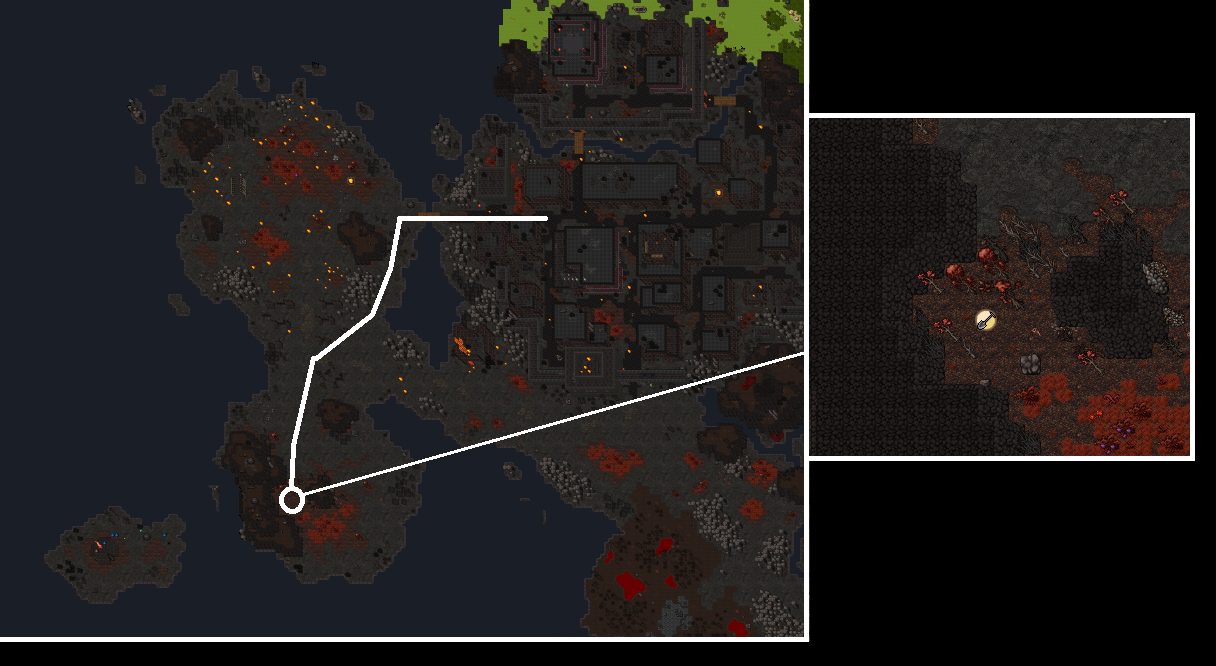
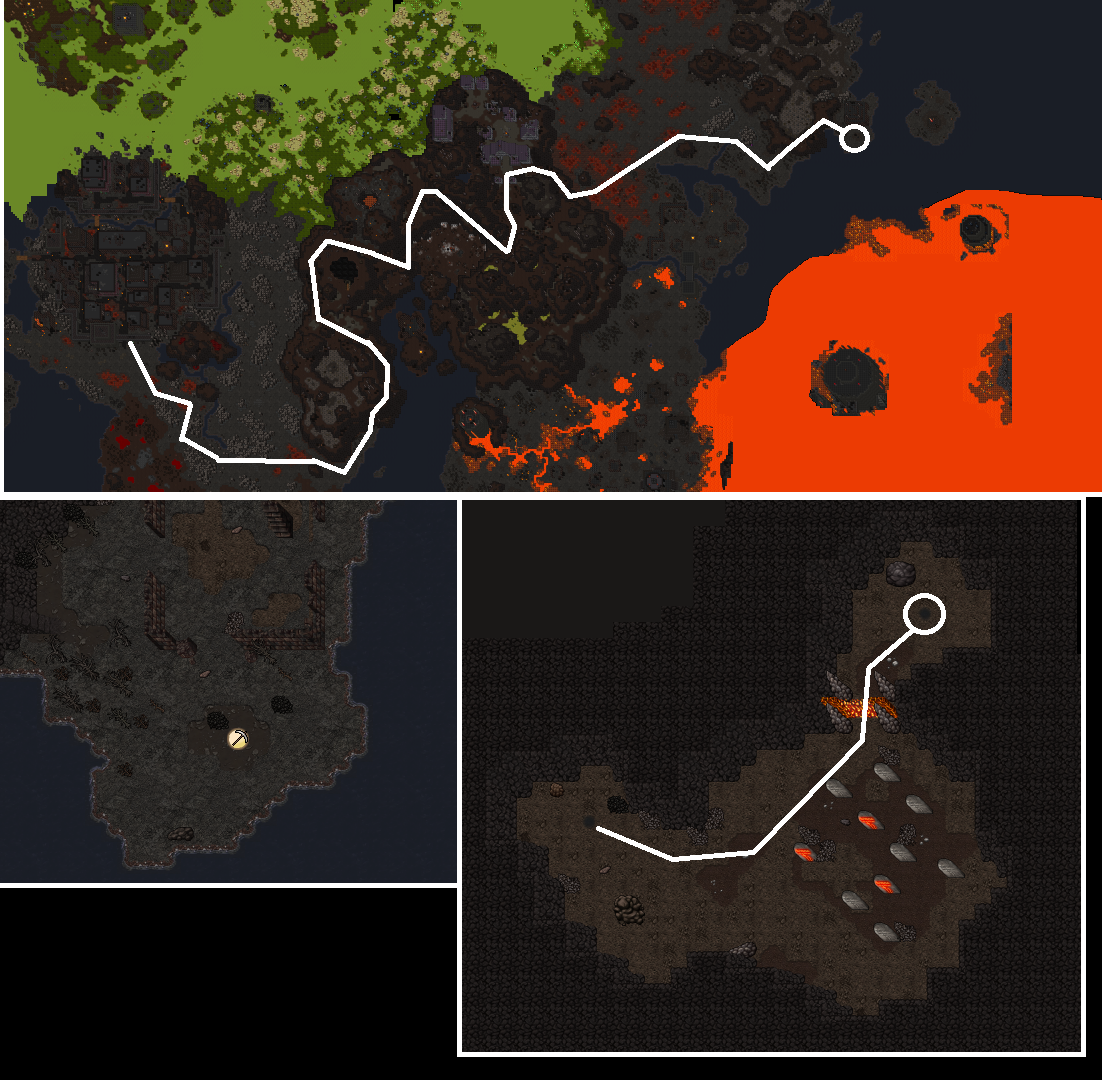
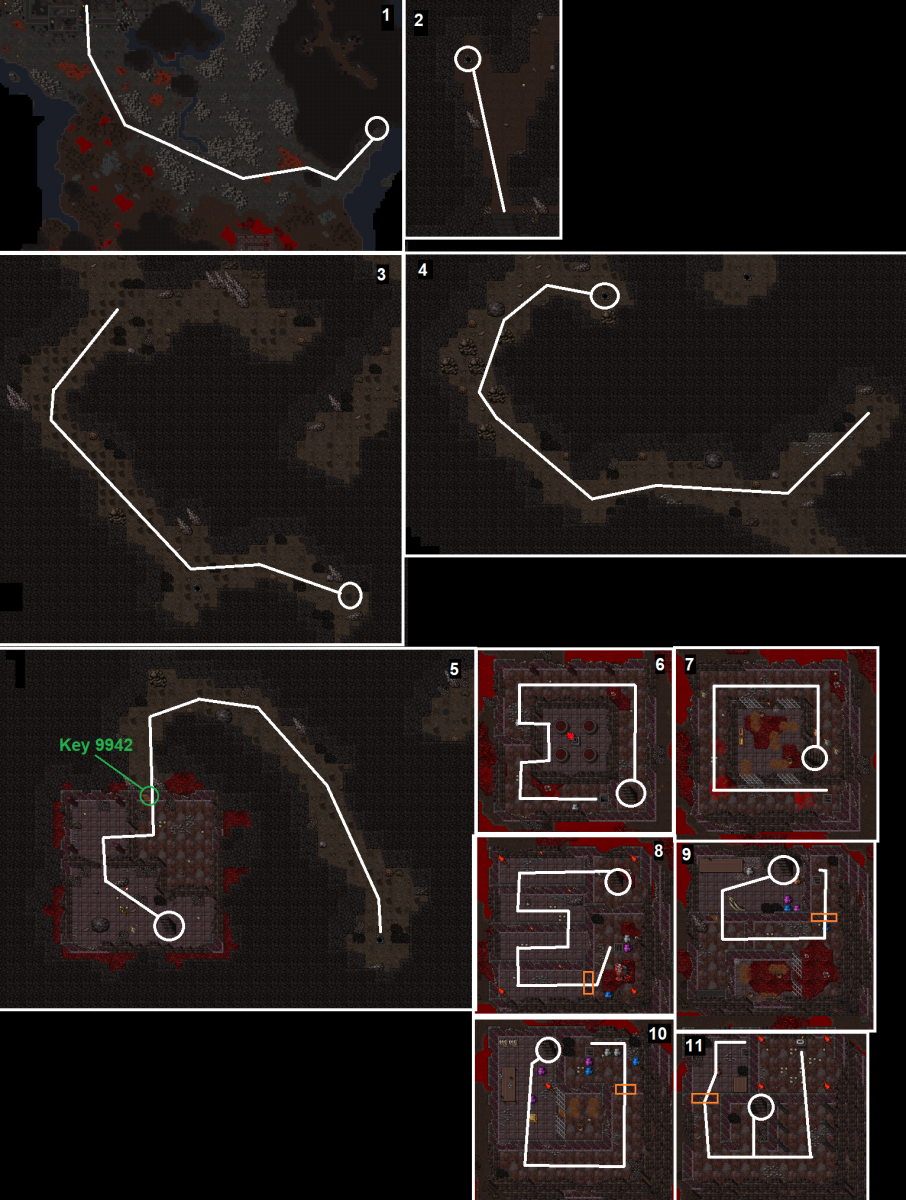
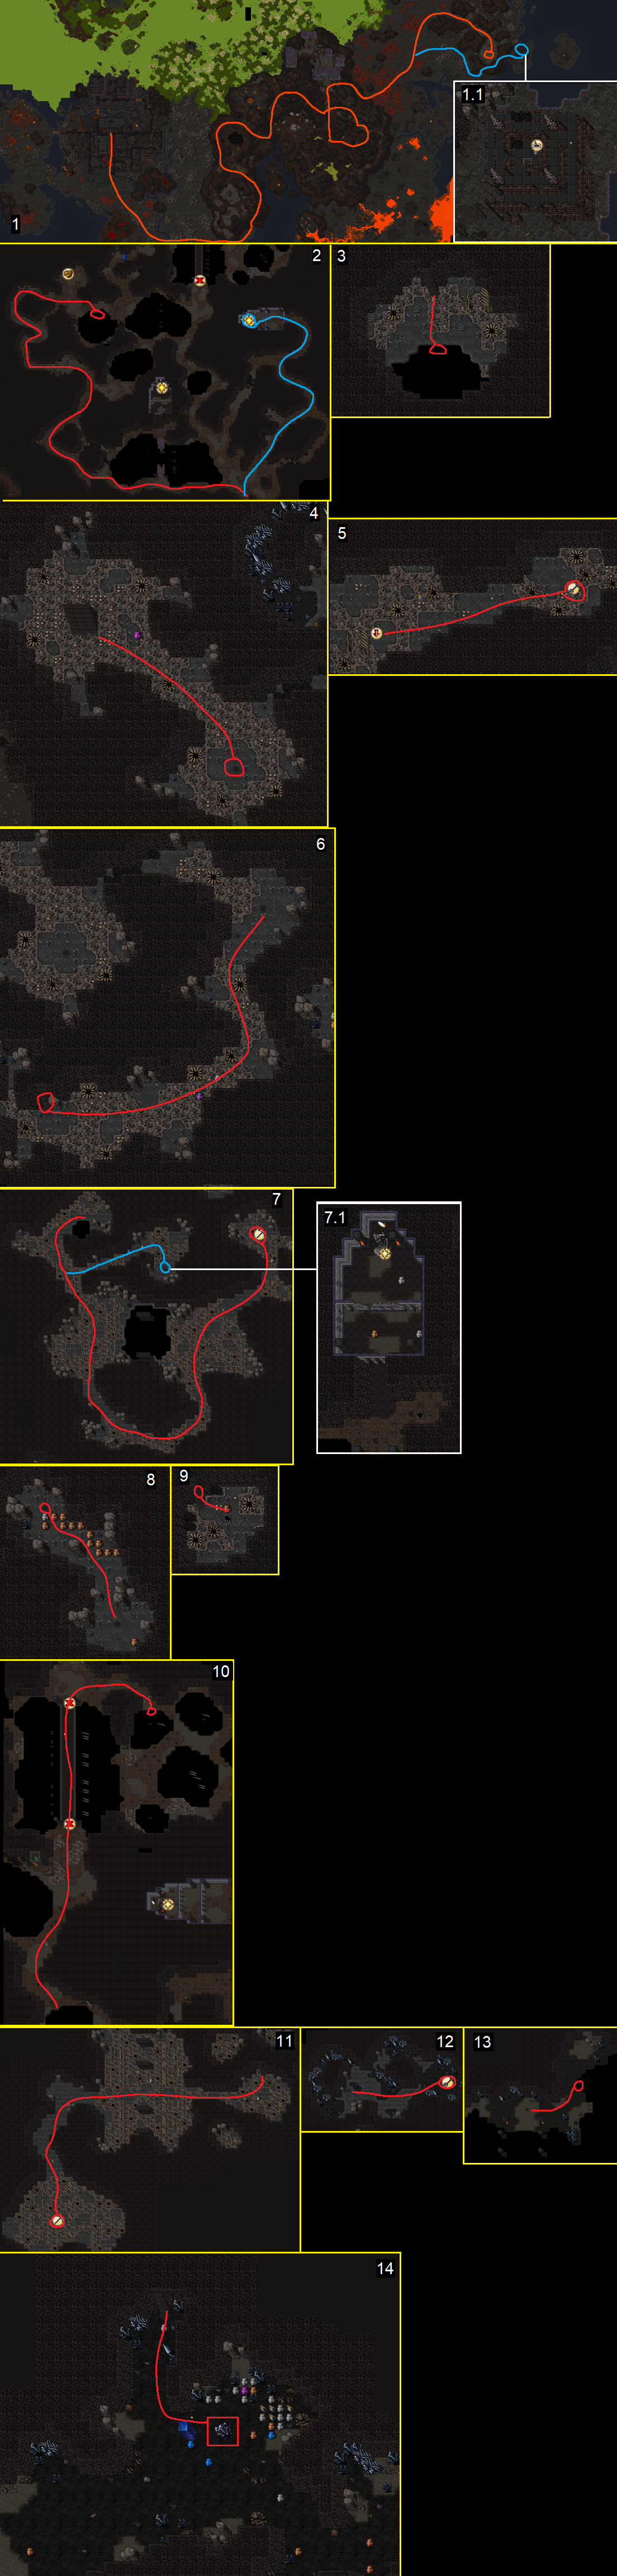
[[Arbiter Kerrin]] will send you to speak with [[Molgorth]] in the deepest part of [[Torem's Court]]. [https://i.gyazo.com/88d49a191201fde5c5b1ad2406cee7b0.png Here's] a map of how to get to him.<br> | #[[Arbiter Kerrin]] will send you to speak with [[Molgorth]] in the deepest part of [[Torem's Court]]. [https://i.gyazo.com/88d49a191201fde5c5b1ad2406cee7b0.png Here's] a map of how to get to him. The bottom floor of [[Torem's Court]] has a [[Corruptor]] and numerous [[Giant Energy Elemental]]s so make sure to bring appropriate supplies.<br> | ||
After speaking with [[Molgorth]] return to [[Arbiter Kerrin]] back in [[Zarrith]].<br> | #After speaking with [[Molgorth]] return to [[Arbiter Kerrin]] back in [[Zarrith]].<br> | ||
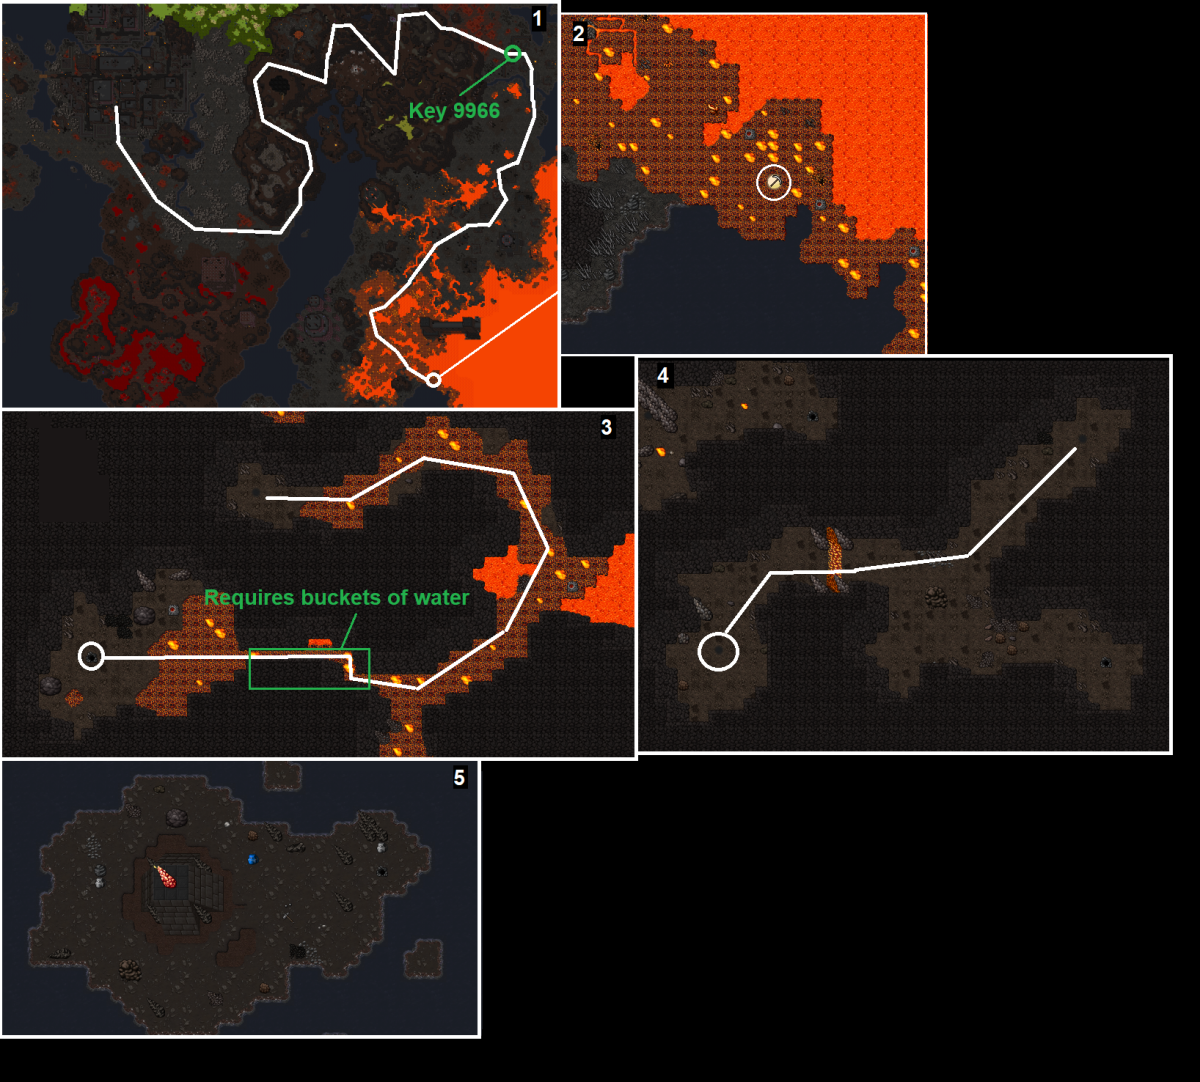
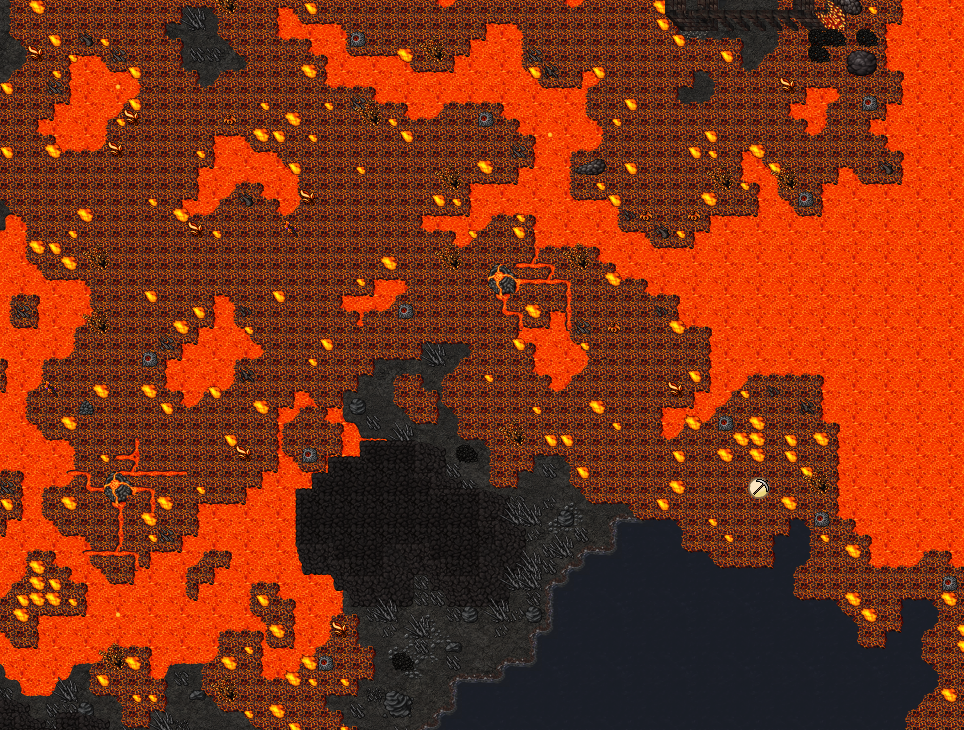
He will send you to the [[Sheol Library]]. In the deepest part with the [[Venerator]]s you'll find a giant orb suspended on some pillars protected by a single [[Corruptor]]. Levitate up to the top of the pillars and use the orb to be sent back into the past.<br> | #He will send you to the [[Sheol Library]]. In the deepest part with the [[Venerator]]s you'll find a giant orb suspended on some pillars protected by a single [[Corruptor]]. Levitate up to the top of the pillars and use the orb to be sent back into the past.<br> | ||
Return to [[Arbiter Kerrin]] in [[Zarrith]]. He'll tell you to help [[Molgorth]].<br> | #Return to [[Arbiter Kerrin]] in [[Zarrith]]. He'll tell you to help [[Molgorth]].<br> | ||
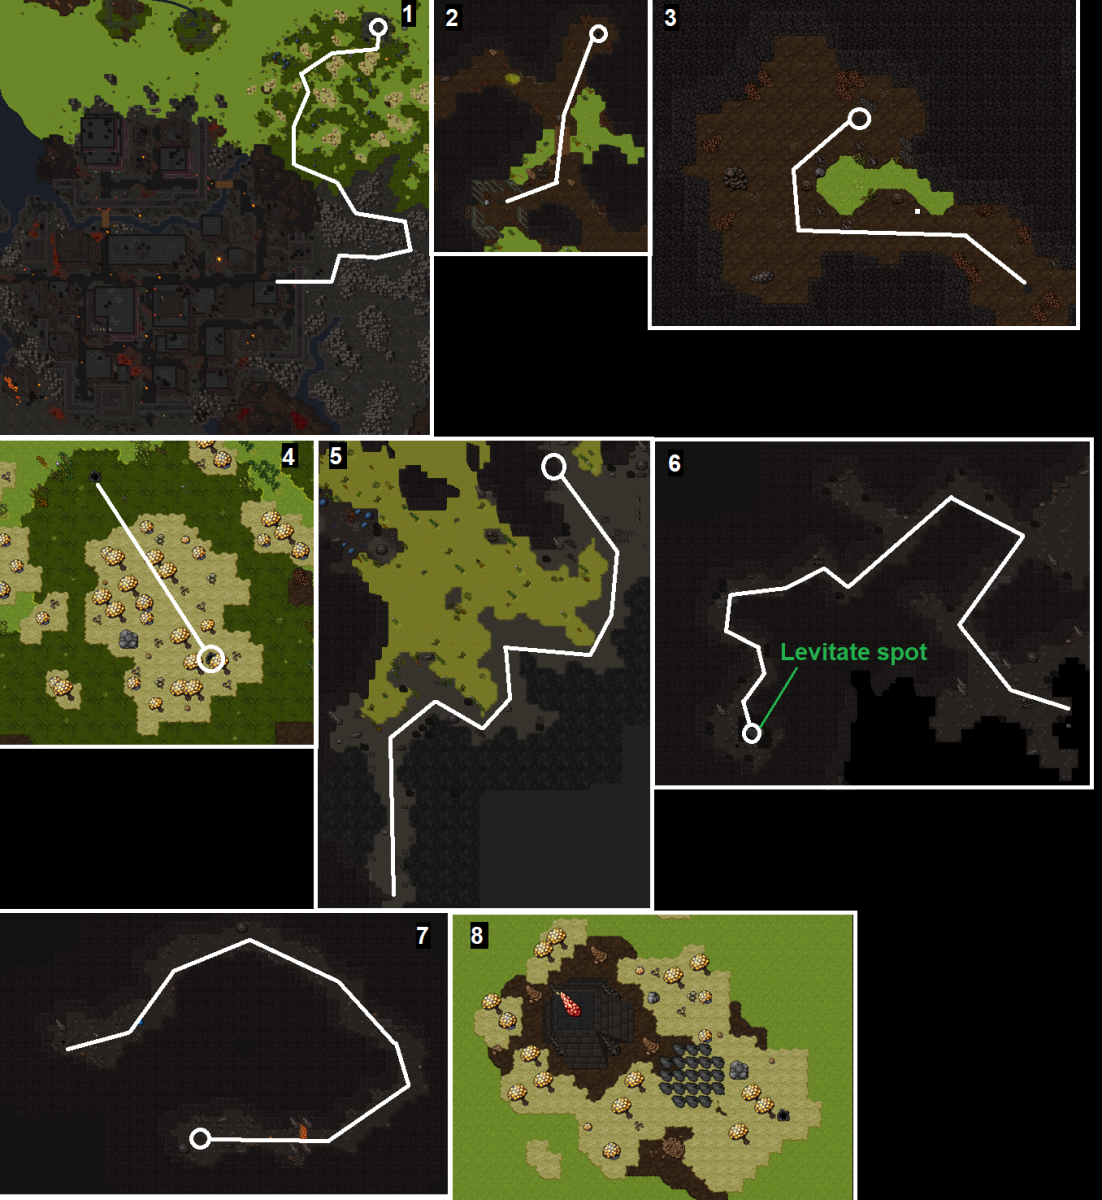
Return to [[Molgorth]] with 8 [[Violet Magic Orb]]s that can be looted inside [[Torem's Court]] from any monster at floor -1.<br> | #Return to [[Molgorth]] with 8 [[Violet Magic Orb]]s that can be looted inside [[Torem's Court]] from any monster at floor -1.<br><br> | ||
{{Transcripts| title = <small>Mission 3 Transcripts</small>| text= | |||
<pre> | |||
Player: Hi | |||
Molgorth: What brings a mortal to the lands covered in black ash?... | |||
Molgorth: And how one stands before me with his soul intact? You are not a mere human... | |||
Molgorth: What do you want from an ardevok trapped by magical chains? | |||
Player: Kill | |||
Molgorth: Now flee, before they will storm this place. | |||
Molgorth: MY FATE WAS DECIDED THE MOMENT I HAVE ACCEPTED THE GIFT FROM MY CURSED BROTHER!... | |||
Molgorth: The armor I am wearing is draining my life force and will keep draining it till there is none left... | |||
Molgorth: I have been locked up here to starve. This is how devoks are treating the rightful heir to the throne... | |||
Molgorth: Yes, I should be the one calling myself the Devok King. I was betrayed by my brother, Baalerun... | |||
Molgorth: He tricked me into wearing this leeching armor that has made me weak and unable to escape this prison... | |||
Molgorth: If you came here thinking that slaying me will weaken the forces of Baalerun, you are wrong! By doing this you will do Baalerun a favor... | |||
Molgorth: See it for yourself. If you think I am lying and trying to prolong my life. Do you think I want to spend any more time here, in this prison?... | |||
Molgorth: The watchers once owned a powerful artifact that allowed them see the past. Use it to see the truth... | |||
Molgorth: Give me a chance to get my revenge and I shall become your ally. | |||
</pre> | |||
<pre> | |||
Player: Mission | |||
Arbiter Kerrin: He knows Baalerun and his commanders more than we do... | |||
Arbiter Kerrin: The artifact he spoke of is called a soul mirror... | |||
Arbiter Kerrin: It looks like an enormous eye, and with each gaze it feels as if your soul is being pulled into it... | |||
Arbiter Kerrin: Everything that happened, in every place on all worlds can be seen once again by using this sacred artifact... | |||
Arbiter Kerrin: It is hidden in the Library of the Fortunetellers, located far east of the Blood Lake... | |||
Arbiter Kerrin: The library is not a safe place. No place is safe in the lands of Sheol... | |||
Arbiter Kerrin: The way to the soul mirror is guarded by psychic demons who call themselves the Bookwardens... | |||
Arbiter Kerrin: They spent most of their lives in the Library, absorbing every bit of knowledge stored in books... | |||
Arbiter Kerrin: Very intelligent creatures. And also very dangerous... | |||
Arbiter Kerrin: Reach the soul mirror and see the past. We must know if we can trust Molgorth. | |||
</pre> | |||
<pre> | |||
Player: Mission | |||
Arbiter Kerrin: I trust what you have seen, Player... | |||
Arbiter Kerrin: Molgorth would become a powerful ally, but only if he will be freed first... | |||
Arbiter Kerrin: I know the Temple of War very well, I know what magic is keeping prisoners in their cells... | |||
Arbiter Kerrin: But Molgorth is not in a mere cell. He is bound by 8 enchanted demonic busts, on the lowest floor of the Temple... | |||
Arbiter Kerrin: Disable them, and Molgorth will be able to escape the prison on his own... | |||
Arbiter Kerrin: But the problem is you need to find the orbs first, that are needed to disable the busts... | |||
Arbiter Kerrin: My scrying powers cannot detect the location of orbs, for they are enchanted with magic... | |||
Arbiter Kerrin: This magic not only hides them, but also keeps them within the boundaries of the Temple... | |||
Arbiter Kerrin: They can be carried by any devok you will find within this dungeon... | |||
Arbiter Kerrin: Now hurry up, before the enemy will make their next move. | |||
</pre> | |||
}} | |||
<div style="text-align:center"><h2>'''Mission 4 - Ashlord Task'''</h2></div> | <div style="text-align:center"><h2>'''Mission 4 - Ashlord Task'''</h2></div> | ||
Revision as of 21:05, 5 December 2023
| Reward: | A new Promotion and choice between one of five items: The Armageddon, The Apocalypse, The Calamity, The Annihilator or The Doomcaller | |||
|---|---|---|---|---|
| Location: | Sheol | |||
| Level required: | 300+ recommended | |||
| Requirements: |
| |||
| Items required: |
| |||
| Be prepared to face: | Ashlord, Blasphemer, Blood Witch, Cerberus, Corruptor, Hellfire, Hellion, Demorc, Demorc Brute, Demorc Warchief, Dreadlord, Flamebringer, Incidamus, Skeleton Warlord, Succubus, Typhon, Venerator, Zarguth, Qyreva, Belrekath, Velranos, Ozgalluch, Tagthoder, and more... | |||
| Legend: | The Empire of Eschen and the Archini Guild are cooperating to save Medivia from the encroaching demonic invasion! All Imperial Royalists and Archini Masters have been summoned to attend an audience with Emperor Arsene. | |||
| Method: | ||||
Mission 1 - Gaining AccessLink to Access Mission Page Mission 2 - Blood Witch Task Travel east into the city of Zarrith. The reward for completing this task is 2,000,000 Experience. Mission 3 - Freeing Molgorth
Mission 3 Transcripts
Mission 4 - Ashlord Task
Mission 5 - Magic Stones
Mission 6 - Blasphemer Task You will need to slay 800 Blasphemers. Mission 7 - The Tower
Mission 8 - Incidamus and Venerator Souls
Mission 9 - Corruptor Crystal
Mission 10 - Demorc Task
Mission 11 - Convince Demorc Brute
Player: Hi
Weakened Demorc Brute: I beg you... Do not kill me!...
Weakened Demorc Brute: I will tell you everything you want to know, just spare my life...
Weakened Demorc Brute: What do you want to know?
Player: Weak Point
Weakened Demorc Brute: Only the strongest demorcs can become warchiefs, they have no flaws...
Weakened Demorc Brute: But just like me they are still demorcs. And we all fear one thing...
Weakened Demorc Brute: Fire...
Weakened Demorc Brute: I have told you enough, haven't I? Now please, let me go...
Weakened Demorc Brute disappears>
Mission 12 - Demorc Warchief Task
Player: hi
Demorc Lord Galzebran: So this is you, that mortal who has invaded my domain?...
Demorc Lord Galzebran: I am suprised that an entity from the world of Medivia has managed to destroy this many of my troops...
Demorc Lord Galzebran: As you may already tell, I cannot let more of my kind die by your hand and for my kingdom to become a ruin...
Demorc Lord Galzebran: I surrender. We will aid you in the war against Baalerun and will not attack Medivia...
Demorc Lord Galzebran: We will grant you permission to enter the swamp and meet our prisoner, which is what you wanted in the first place...
Demorc Lord Galzebran: My brothers may not understand or accept my decision. Expect them to still be hostile against you...
Demorc Lord Galzebran: They were not trained to surrender, after all.
Mission 13 - Kill Blacksmith
Mission 14 - Cerberus Task
Mission 15 - Flamebringer Task
Mission 16 - Typhon Task
Mission 17 - The Forge
Mission 18 - Corruptor Task
Mission 19 - Succubus Task
Mission 20 - Dreadlord Task
Mission 21 - The 6 Seals
Mission 22 - Rashed and Baalerun
| ||||


